Gelcoat works fine over epoxy if it’s fully cured and the surface is clean before the gelcoat is applied. If you have any issues with the gelcoat not curing, clean it off, then use a gentle heat source to help cure the epoxy overnight. Clean the surface again and reapply the gelcoat. That typically works.
cool
It’s been almost two weeks since I last updated this because other life responsibilities have intervened. Not to mention the past long weekend, which saw me paddling around Philip Edward Island near Killarney, Ontario in my other boat, a CD Sirocco. It’s actually a very good thing this has happened because I would have otherwise not had the opportunity to paddle the Sirocco in rougher conditions at “touring weight”, which is completely different than paddling it empty. It’s a very pleasurable experience!
But I’ve been back at it since then, and have about a 3 hour wait for epoxy to set up enough to continue working. It seemed an appropriate time to update things here.
Most of the work up until today was still on the coaming. I’ve determined that working with gel coat on anything but a female mold is just about the least fun one can have. I thought I’d get smart about it and use masking tape to create a dam and build up a very thick coat that could be sanded and shaped without thin spots. [Spoiler: Good idea, but didn’t completely work out]

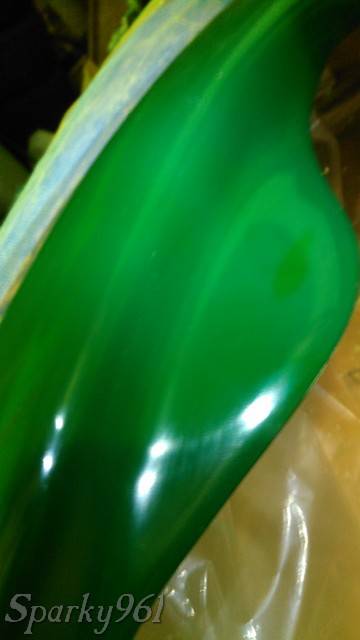
This is what the work in progress looks like. Here I’m fairing the gel coat so there are no rough transitions between old and new.

I’ve continued to swap back and forth between the coaming and skeg box while waiting for one or the other to cure. I’ve added more gel coat to the chipped corners of the box, and added a very thick layer inside the box over the glass repairs. I used a strip of tape running down inside the box to mark the location of the existing hole so I know where to drill later. [Hindsight: Tape was a bit close to the gel coating area and edge got stuck underneath a little bit. No worries, this area is not visible when done and won’t cause water intrusion issues.]


I didn’t go nuts on the sanding here. I just smoothed out the high spots and feathered in the edges a bit. I then painstakingly marked the location of the hole to drill using a sharpie taped to a stick. You can see I managed to goop some gel coat on the sides of the skeg box too. This was not well-adhered and chipped off fairly easily.

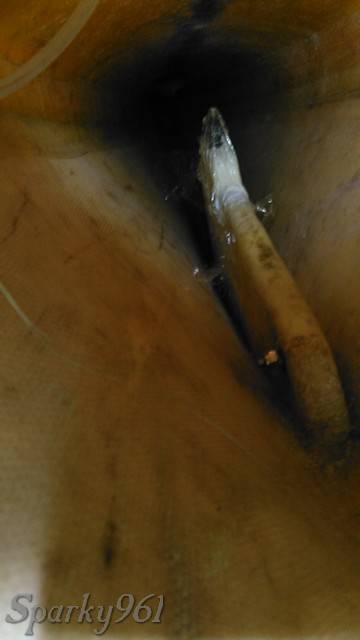
How to glass in the block that’s going to hold the compression fitting has been the subject of much subconscious effort. If it wasn’t already obvious, I’ll restate that working inside the stern hatch is very difficult. I can barely get one arm inside far enough to reach to the back of the skeg box, and when I do I can get my head inside the hatch only far enough to see with one eye. Working with any kind of dexterity in there is not going to happen. Most of my work needed to be done by feel so I planned ahead and made up some pieces that should fit exactly in place and not require much screwing around to position. I cut three pieces with about 1/4" difference in the length of the tabs. This one was the first and looked more ragged than the rest. I also added a hole in the middle of each to clear the fitting.

Last night I spend some more time sanding the coaming. There are a few places where I’ve sanded through to the original gel coat, but they aren’t very noticeable if you aren’t looking for them (like I am). The progression of sandpaper grits I used to do this was: 60 - rough shaping, 120 - smoothing and feathering, 220 - remove deep scratches from previous, 400 wet - remove 220 scratches and begin to be shiny, Heavy duty rubbing compound - reduce wet sanding scratches and polish to an acceptable shine. I definitely took shortcuts in jumping sandpaper grades because I keep reminding myself that perfection is not the goal here. A perfectly smooth mirror finish would actually look rather odd on a boat where nothing else looks so nice! The goal was to fix the problem that had caused the original cracks, which I did, and then to make the appearance at least as good as before. I believe I’ve accomplished this. There’s also no reason I can’t do more later if I decide I want to restore more of the boat to original appearance. Though I’m unlikely to do this, as I’m much more interested in paddling it than just looking at how shiny it is.

Back to the back, I return to the stern. I thought it might be a good idea to test fit the skeg and make sure the cable passed cleanly though the new hole I drilled. My earlier efforts paid off and the hole seems to be in exactly the right place. I did have to trim a little off the skeg itself to clear the thickness of gel coat near the pivot point. I suspect this may have been the cause of the damage there. Not a problem anymore.

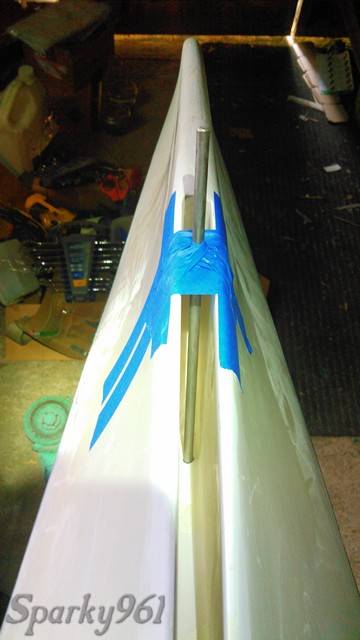
Getting the block lined up with the hole and on top of the skeg box was another thing I had well planned. After dry fitting and determining the angle the hole would sit at, I attached a well-waxed rod through the hole and centered in the skeg box. Tape was enough to keep this in place. It doesn’t need to be exact, but if it’s really wonky the skeg cable will bind.

Here’s the result of lots of planning and staging things to grab while the clock was ticking. I used some white pigment in the epoxy to help see where I was putting it, and to increase the aesthetics of the wood block I’m adding. The wood itself is well encased in epoxy, so it is now essentially a plastic block with a wood core. The procedure was:
- Do wet layup of 3-layers of cloth previously cut for the purpose. This was done on the bench on parchment paper.
- Spread epoxy on skeg box, or rather just goop it around as best I could by feel and intuition…
- Add thickener to remaining resin and “butter” the bottom of the block and the top of the skeg box
- Slide block onto rod and press firmly on top of skeg box
- Add more thickened epoxy to fill any gaps
- Remove pre-wetted cloth from parchment paper and place over block, fitting, and rod. Smooth down edges with gloved fingers
- Apply cling-film and smooth some more with bare hand.
The moment of truth will come later today when I remove the cling film, sand down the rough spots, and examine my work. I plan to add more thickened epoxy to fill and smooth the surface if needed, or possibly a few more strips of glass if things looks really bad.
One more thing I should add, as I’ve discovered a small error in my assumptions regarding the mixing of epoxy by weight.
There is a small difference in the density of resin vs. hardener, which means that mixing by weight is not the same as by volume. In practice though, the difference is small and many online sources will say that things work out fine in the end.
For the epoxy I’m using, MAS LV and medium hardener, the ratio for mixing by weight is 100:45, as opposed to by volume which is 2:1. Ratios for different brands and products vary slightly, but all I found are fairly close to this. I don’t anticipate problems with a little excess hardener, but I’ll be using the correct ratio for future batches.
Makes my head spin, Sparky, but sure looks like you’re doing a great job.
@Rookie said:
Makes my head spin, Sparky, but sure looks like you’re doing a great job.
Thanks for the encouragement. It’s been a good experience to strip the boat down to the core and rebuilt it back from there. It’s been a ton of work and time though. I’ve spent almost every weekday evening and lots of time on weekends trying to get this done. I understand why getting repairs like this done professionally cost so much!
The most difficult of this project is upon me: “Almost done”. It’s easy to plug away at things that seem like they will take forever, but the small things required to truly bring a project to completion are always the hardest.
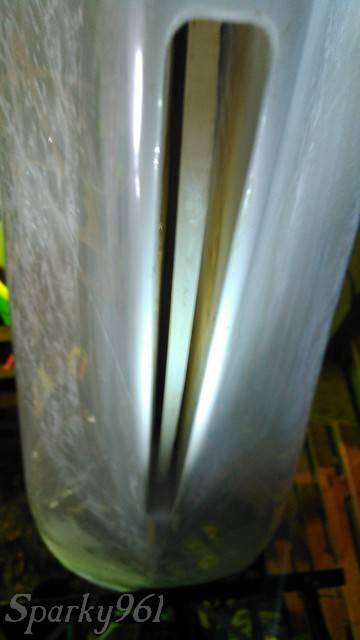
Fiberglassing the block on top of the skeg box worked out pretty well, all considered. I did a bit of sanding just to clean up the rough edges, and decided I was happy enough with the results that I’d leave it at that. The white pigment I added makes for a much cleaner looking job that blends into the existing structure nicely. Here’s how it looked upon removal of the cling film.

I installed the compression fitting and gently snugged it up with a wrench. Then because I can only get one arm in there to work, I taped that wrench in place and used another one to tighten the compression nut onto the skeg cable tube. All of this will get a generous coating of sealant but I want to check for leaks first and use the sealant only as a second line of defense against water intrusion. [Spoiler: It doesn’t leak. Not one little bubble checking with soap, water, and a bit of pressure.]

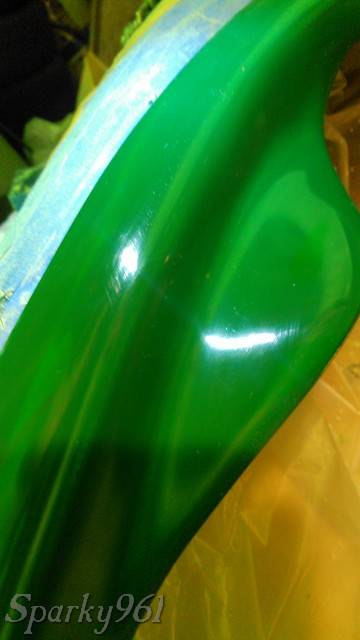
Boy, it’s good to see a skeg back in here! Also notice the chips around the edge of the skeg box are gone now and the area is shinier than the rest of the hull.
Here’s another one showing the finished coaming, for those of you who are curious what kind of finish is attainable using the methods detailed above. You can see the light scratches from coarser sandpaper grades, but it’s also very shiny overall. This is probably what most coamings look like after a few years of use anyway. They’ll get scratched up by sand and dirt, reentries, and whatever. I’m still very happy with the result though.
And finally, what’s the true test for how things look? Get it WET, of course! That’s how a kayak should be presented after all! Even an old faded, oxidized, scratched, chipped, and dirty boat looks good when it’s wet. Ok, mine isn’t quite that bad but the water helps to enhance the beauty. Besides, it badly needed a bath after all that work.


Now it needs to dry out again before I can add sealant over the skeg cable fitting. I’m also going to take a look at the seat pan and do some repairs there now that I’ve “mastered” this fiberglassing thing.
If you haven’t added sealant over the skeg fitting, I suggest that you don’t. Compression fittings are watertight (as you’ve seen) and adding sealant will just make it harder to work on the skeg should you ever need to. If you feel that you must add sealant, restrict it to the joint between the fitting and the skeg box, which it the only place that a leak is remotely likely. Also, stay away from any sealant that contains silicone. Use a product like Lexel or any of the GOOP sealants. They’re stronger and they don’t leave silicone residue behind if you remove them.
@bnystrom said:
If you haven’t added sealant over the skeg fitting, I suggest that you don’t.
I like this suggestion. Not only does it contain foresight, but it means less work and mess for me.  I do think I’ll put a small amount of sealant around the base of the compression fitting into the new mounting block. If nothing else, this should help keep it from slowly working it’s way loose. It won’t be much trouble to cut the sealant off there if I do need to take out the fitting at some later point.
I’ve had a tube of Lexel sitting on the kitchen counter for over a month now. It’s intended use was to reseal some foam bulkheads in another poly boat in the fleet, but this has taken a back seat to the Assateague repair/rebuild.
This is the final installment in the project. I actually finished most of this a few weeks ago, but just installed the foam for the thigh/knee braces yesterday. After way too long, I finally paddled it again today! I just about forgot how much I like this boat!
The seat pan was something I don’t think I mentioned originally. Considering how far I took the repairs it seemed wrong not to address the problems with the back band attachment points, and some structural cracking.
I tried an interesting technique to get the gel coat thickness somewhat uniform without sanding it all away. It worked well enough; better than how I did the coaming for sure.
I also noted after removing the gel coat that there are a few pieces of Kevlar reinforcement in the seat. This is good to see, but it seemed to have been carelessly placed, and the remaining CSM/Polyester resin layup wasn’t up to the task.
Here are few pictures showing the progression:


