My wife and I have been wanting to try kayaking for some time, after watching craigslist for a few months I bought a pair and brought them home. Lo and behold one has a decent leak, but only when you are sitting in it/lots of weight. I filled it up with water and it didnt leak for quite some time, but finally I found the culprit.
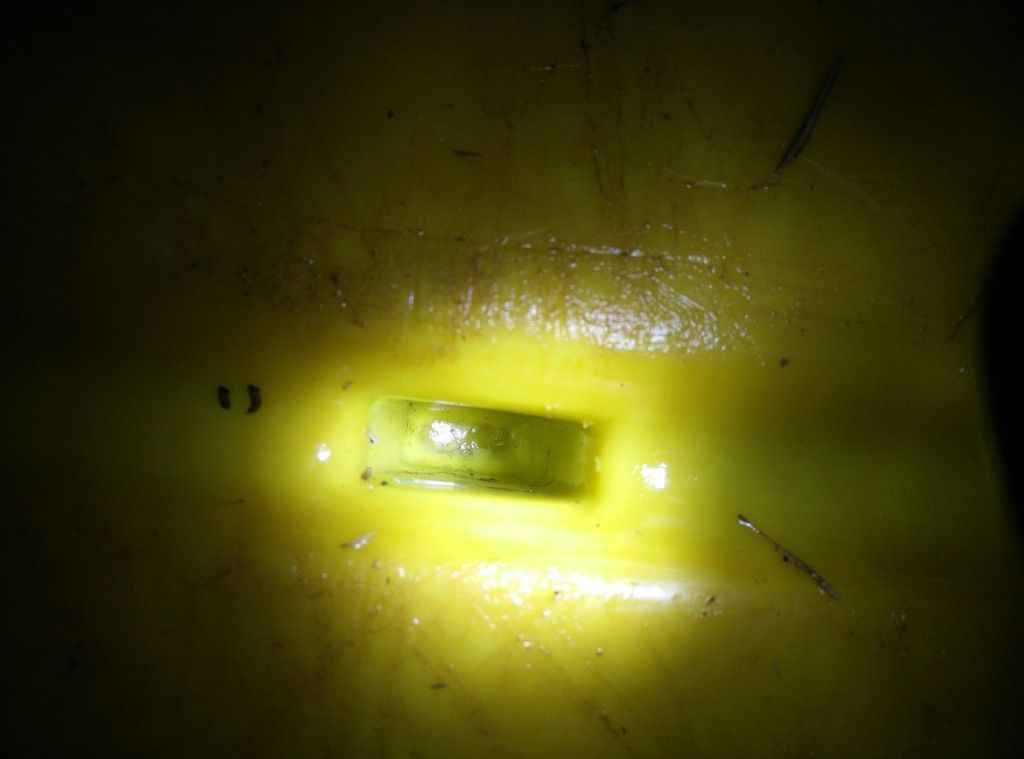
It is a heritage featherlite kayak, there are four molded pockets in the bottom of the hull(I assume this is where the seat bucket connects?) and there is a hole in there. Is this an easy patch?
http://i114.photobucket.com/albums/n252/cyber06wolf/IMG_20150401_201327_zpsznqyewyi.jpg
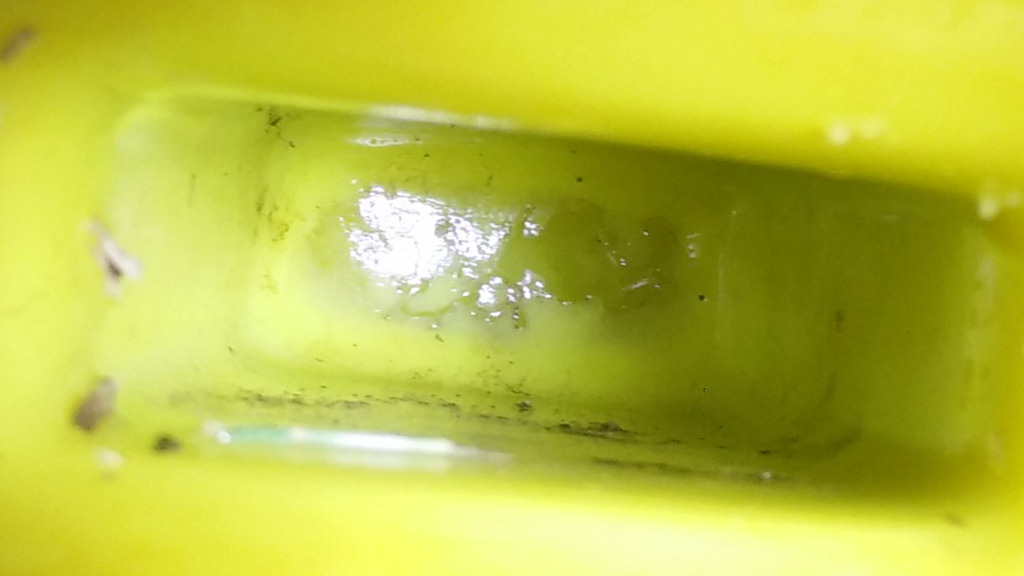
http://i114.photobucket.com/albums/n252/cyber06wolf/IMG_20150401_201347_zpskxwargx2.jpg
It might be fixed with a spade tip
soldering iron and some poly material, perhaps some woven poly tarp material. I can’t see clearly from the picture, but it appears the leak might be on one side, where the tip of a soldering iron can be applied.
If you are not equipped or not comfortable doing this sort of thing, you might scout your community for a pro who does plastic welding.
Another approach would be to fill the leaky aperture with some sticky goop and let it set up. But things don’t stick to poly forever, and I would not be confident about that sort of fix holding up when you drag the boat over logs, etc.
Doesn’t look easy
You should describe the “hole”, as I don’t think anyone can be sure what the leak looks like based on what can be seen in the close-up photo. I think I might see a substantial crack running along one entire face of the indentation. With weight on the seat, that crack probably opens up enough to let water flow pass through more quickly than otherwise. Filling the boat with water might stress the cracked area in the opposite direction, tending to seal the crack rather than open it, and that may be why it took so long to find what otherwise is a substantial leak.
I can envision a method which most likely would seal up that entire indentation, but the purists here will ridicule the idea from the get-go, and it wouldn’t be especially quick to do. The problem with any traditional approach is that it’s difficult to get things to adhere to polyethylene. Plastic welding might be best. I’d expect that a crude approximation of plastic welding, just heating and “smearing” the crack shut, would be likely to crack open again unless done very skillfully.
description
Maybe I can describe it better. The seat is inserted with a sort of shelf/inner piece. I’m pretty sure those four holes are the bottom supports for the seat assembly. In the one I took a pic of the bottom looks thin/broken like it has been stressed too many times. Adding material will probably work but I don’t think I could just melt the existing material.
Would some sort of two part epoxy work perhaps?
more description
I imagine the factory uses some sort of clamping process and melts the pieces together at those points. In person it looks like a pretty obvious hole in the very bottom of the pocket. The sides look fine, it just seems to be where the seat part attaches/used to be secured.
Picture
http://i114.photobucket.com/albums/n252/cyber06wolf/Screenshot_2015-04-01-21-10-49_zpscxbbh1dk.png
There is a closer close up
How does the seat attach?
– Last Updated: Apr-01-15 9:30 PM EST –
You say you think the seat was clamped/melted at the attachment points. Does that mean the seat can't be removed? If the seat can't be removed or if there's no flat surface on the top side of the seat mount, I have no ideas.
If the seat can be removed or if there's a flat spot on the top side of the seat mount, this might be a classic case where clamping two small plates of brass or aluminum in place, with the leaking section of hull sandwiched between them, would be 100-percent reliable, forever. This isn't the method I was thinking of in my first post, but even though much simpler to implement, the purists will still scoff. If the topside access/material shape permits, you just trim two metal plates (about 1/8th-inch thickness) to fit the base of that indentation, and clamp them together with two or three brass or stainless steel bolts (bolts of 1/8th to 3/16ths diameter would be fine). Include a *non-hardening* sealant between the hull and each plate, and you've got a seal that will absolutely never leak. Something like the non-hardening variety of Permatex "Form-a-Gasket" would be ideal. Silicone gasket-making compound (not joint sealer) would be an okay second choice.
I have a hunch that complications involving the seat attachment might make all of this academic.
Oh, I'm no expert on epoxy, but people generally say that nothing will adhere well to this kind of plastic (the sealant material as described above need not adhere strongly, as it's trapped in compression against the hull).
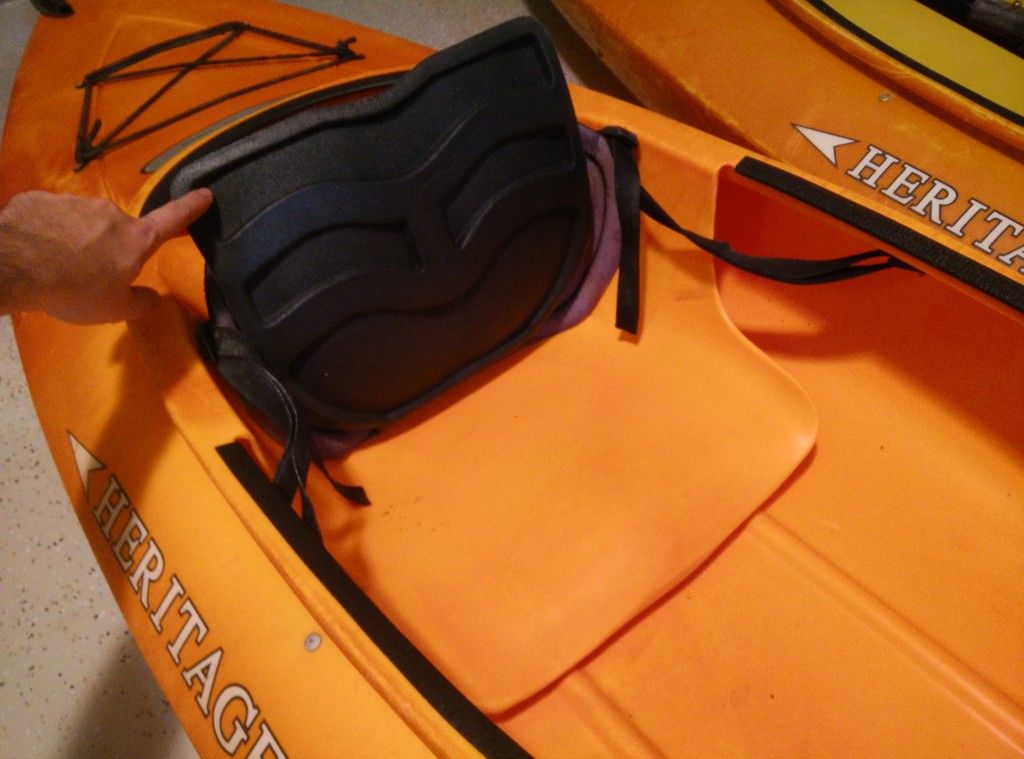
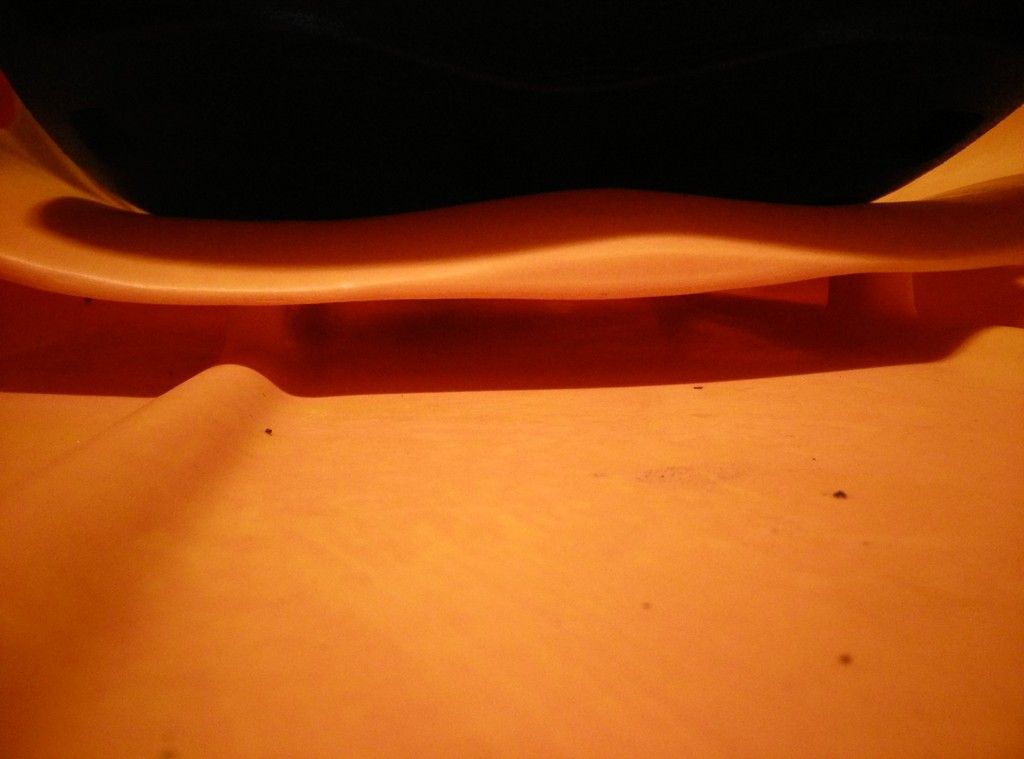
Seat pics
Unfortunately the seat is permanent. The first pic shows its molded to the rim. The second shows the columns coming up under the seat.
http://i114.photobucket.com/albums/n252/cyber06wolf/IMG_20150401_212633_zpsvucvxqjw.jpg
http://i114.photobucket.com/albums/n252/cyber06wolf/IMG_20150401_212652_zpsvr6yfbqt.jpg
There may be hope, but I’m not sure.
– Last Updated: Apr-01-15 10:20 PM EST –
I'm wondering if the lower supports of that seat can be pried up off the protruding parts of the hull. If so, you can make the metal-plate sandwich work, with the inside plate being positioned between the mounting face of the seat and the hull protrusion. If you can't pry the seat up enough to get a few fingers to the work zone, I'm out of ideas, other than cutting the side supports of the seat and splicing them together afterward (and on a boat like that, that wouldn't be the worst idea ever).
Oh, if the seat mounts are bonded to those hull protrusions (they may have even been molded that way as a single piece), this whole idea is out.
there are polyethalene epoxies
They can be found at Grainger, or sometimes at a home store as a “poly tank repair kit”.
I would be a little hesitant to use any of these products as there are about a billion different polyethylene formulas. If you were to use a product not suited to your particular formula of poly, any future attempts at patching would, at best, make it tougher to weld the plastic properly; worse case scenario it could make another repair attempt impossible.
Poly welding kits are readily available, you can practice on non-structural or above water areas. In my opinion, that would be your best course of action if you want to repair it yourself.
Fill the holes?
Heritage recommends thermoplastic sealants. Does anyone know a reason I couldn’t basically fill in the valleys most of the way with a sealant and form a plug? They are tapered in a way that while in the water the pressure would force the seal tighter like a wedge.
It needs to adhere well
The effect of water pressure will be miniscule in comparison with the stress on the plug that’s associated with minor warping of the hull that occurs due to your weight applied to the seat, the shifting of your weight on the seat, and the passing of waves. If the material adheres well enough, of course your idea will work well. Besides the difficulty of finding suitable adhesives for poly, some people have said it’s important to prep the hull, not just by thorough cleaning, but by flame treatment of the surface (I don’t recall the details about how to do that properly). Once more people chime in, you’ll probably get a better idea of whether a simple adhesive plug will do the trick.
Other thoughts. Have a plastic welder
close the hole at the level of the hull surface.
Or, fill the hole with Goop, back it up with duct tape, and renew the tape as needed.
First idea is a good one
Applying the principles of metal welding, which I’m pretty familiar with (most of the difficulties of controlling heat as affected by access, material thickness and weld position are bound to be the same in this case), I’d call this idea the best one yet.
Welding
So I have a lot of experience soldering and have an array of soldering irons, I think I will try my hand at melting the hole shut and putting in some filler plastic. Then maybe adding something like goop or plasti dip to fill in most of the valley on top of the hole.
Might be able to make this stuff work.
http://www.google.com/url?sa=t&rct=j&q=&esrc=s&source=web&cd=1&cad=rja&uact=8&ved=0CCsQyCkwAA&url=http%3A%2F%2Fwww.youtube.com%2Fwatch%3Fv%3D2a5RlcP-4JE&ei=6VgdVc2pNsWLyATa8ICoCQ&usg=AFQjCNHo8fIiRcOU-ku6KSm56xCCbVGzoQ&sig2=EtN-8dtPlYFMRDIaX33t4Q&bvm=bv.89744112,d.aWw
polyethylene repairs
The recessed area is relatively protected from abrasion so filling in the area with some type of goop might work. My concern is that flexing of this area of the hull from your weight on the seat will break it loose and my experience has been that a failed “quick and dirty repair” usually greatly complicates a later “proper” repair and compromises its chances of success.
If the kayak is made out of linear polyethylene thermal welding is certainly an option. Most boats are made out of linear PE these days, but I would check with the manufacturer if possible. Thermal welding does not work on cross-linked PE. X-link PE will combust before it melts. To successfully thermally weld this area you would need to be able to directly apply heat to the area of repair. This might be done with a spade tipped soldering iron as ezwater suggested, and Harbor Freight sells a relatively inexpensive spade tipped thermal welding device. Alternatively, you might be able to transfer heat to the area by heating the tip of a tool that can access the break using a propane torch. To successfully thermally weld, you must actually melt the hull and repair stick together. Just melting PE onto the break without melting the hull will not work.
If you can get the tip of a propane torch flame down to the break, you can use G Flex epoxy. I have done repairs of polyethylene canoes and kayaks (even cross-linked PE boats) with G Flex and they have been durable. But you must rough the area up with sandpaper, clean it very well, and flame oxidize it before applying the epoxy for the stuff to bond. You can get a repair kit containing G Flex epoxy for about $25-30.
PE identification
Is there any easy way to distinguish linear or crosslinked PE?
Pete, can you remind us of the procedure
… for flame-oxidation? I know that in other applications I’m familiar with, the gas mixture and the exact subcomponent of the flame is critical. I remember in the past you mentioned which part of a the flame from a propane torch should be used. My first guess is that it’s not the tip or any portion of the outer flame, as oxygen would be in short supply there.
not by appearance
– Last Updated: Apr-02-15 2:43 PM EST –
Not many kayak makers have used cross-linked poly since the early to mid 1990s, except for Jackson Kayak which I believe was using it until a few years ago. Back then, cross-linked poly was significantly stiffer and stronger than linear.
With the more recent introduction of various "super linear PEs" and "high density polyethylenes (HDPE)", coupled with the fact that cross-linked poly can't be recycled, the vast majority of makers have gone to linear PE. But you never know and it doesn't hurt to check.
Linear PE is a thermoformable plastic that can be remelted, reshaped, and reset a few times, although strength is reduced with each cycle. Cross-linked PE is a thermoset plastic. It is thermoformable one time only, then when it takes a set cannot be reformed. If you try to melt cross-link poly you might actually see the edge of the hole or crack start to spark.