If you ask most people how to check for leaks in a kayak, the most common answer is probably to put the boat up on saw horses, fill it with a bit of water, slosh it around and look for drips. There’s a place for this method for sure, but it’s quite slow and hard to pinpoint exactly where a leak is coming from.
Another less common way is to use low pressure air, along with soap and water, and look for bubbles just like you would do when checking a leaky tire on your car or bicycle.
One challenge with this latter method is how to pressurize the hull. I did just this very thing today, and thought I’d share what I came up with. Though my method may not be unique, I didn’t come across it in my couple minutes of searching online before beginning.
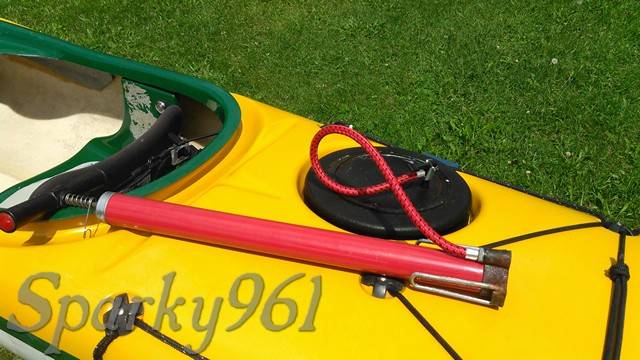
On the weekend I picked up two rubber VCP (Necky) oval hatch covers to replace my very aged and cracked ones. One was good enough to keep around as a spare, while the other was certainly done for. I decided to try and use the one destined for the garbage as a “pressure testing cap” for the bow and stern hatches. I liberally applied contact cement all over both sides of the hatch cover to try and seal any cracks or slight porosity. After drying for an hour or two I drilled a 1/2" hole and stuck a tubeless tire valve stem (valve core removed) in the hole with a bit more glue. The whole thing was a bit Micky Mouse, but when I installed it on the boat and used a bicycle tire pump to add pressure I noticed the cover bulge out slightly before slowly settling back down. I grabbed a spray bottle with soapy water and went to work spraying down potential leak areas.
In the picture I’m using an old day hatch cover that I replaced with a SeaLect one a while ago. So far I found that the two rear bulkheads are leaking enough to produce vigorous bubbles with this method. I wasn’t able to find any external leaks, but I’m going to reseal the bulkheads with silicone and then repeat the procedure to find any smaller leaks in fittings, deck, or hull.
I’m also going to try this on a plastic boat for which I don’t have any hatch covers I can bastardize. I’m thinking to try using a plastic bag along with some tape, elastic bands, and other paraphernalia to produce a seal on the hatch for pressurizing.
I’ve resealed the bulkheads and just waiting for them to cure. In the meantime I also installed my new hatch covers; which was just slipping the tether cord into the opening and tying a knot. Oh, and of course liberally applying UV protectant.
I then started thinking that it would be really nice to test the entire system, new hatches and all. This led to the idea of creating or releasing a gas from within the sealed compartment, then using soap and water as before to check for leaks. Definitely not a match for some of the following…
There are a few things that came to mind initially:
Baking soda and vinegar, maybe some kind of drip-delay setup (CO2)
Unlit propane torch (no smoking!)
Dry ice (sadly don’t have any)
Battery and salt water (electrolysis - O2 + H2… don’t be smoking around this one either)
Any sort of small compressed air cylinder with a slow release valve
Anyone want to comment on the exact quantity of crazy that might be afflicting me?
I don’t know about crazy, but it seems you are a man with time on his hands! I can’t fault your creativity. My laziness gene will probably have me sticking with the water in the hatch method though. You go, guy!
I prefer the natural version of this method. At the beginning of the season, I wait for a weekend day with a forecast for warm sun. I leave my boat in my nice cool garage all night, seal the hatch covers in the morning, then put the boat out in the sun. If the hatch covers don’t bow upwards from the pressure in 30 or 45 minutes I probably have a leak somewhere.
At that point, I spray the bulkheads with soapy solution then use the hatch covers to provide some pressure. I open and reseal them then give them a press in the center which is enough to produce a little pressure. That pressure is usually enough to show a leak.
If I ever replace mine I might give the pump a try, but on my two boats I have 5 different sized hatches and I’m not about to buy 5 spare covers :-).
Cut some ac plywood a little larger than the hatch ( smooth side down) Install air line in ply. Weight plywood or strap it to kayak. Use a little gasket material between hatch and boat as necessary. You should only need 5 pounds. Soap test …
The silicone was dry and the weather stupidly hot. I decided to put off my science experiment and went paddling tonight instead.
The reason for my sudden obsession is that I’ve been noticing more water accumulating in my stern hatch than I’m comfortable with. It looks like the issue is isolated to the rear because my day hatch is now staying totally dry.
How about smoke? Generate smoke inside then see where it leaks out? I’m mostly kidding with this one.
I ended up just using the hatch cover pressure testing cap I made because if it holds well enough to deflect outward then there’s enough pressure to leak test elsewhere. I might try the internal pressure generator if I suspect a hatch or hatch ring leaking in the future but so far that doesn’t seem to be the case.
Yes, this should have been one of the first places I looked. And indeed, it was one of the places I suspected. I just wasn’t very keen on working on the skeg in the tight quarters of the hatch - or making the problem worse by messing with it. But it seems I’m into that whether I like it or not so any suggestions on best ways to re-seal the pivot and skeg cable entry would certainly be appreciated.
Just FYI Sparky your method is basically same as a method used in automotive to check total vehicle air leakage…which affects vehicle quietness. If you like you could use a hair dryer to pressurize the boat interior but your bicycle pump idea is also fine (and in principle if your bicycle pump has a pressure gage and you measure the time it takes to bleed down from pressurized to some constant higher pressure back down to atmospheric you will know if your leakage is increasing). Nothing wrong with using soapy water to look for bubbles…that’s a practical and effective method.
I look at this as more evidence that kayaks are much more maintenance intensive than canoes. I bet the ends of your boat are filled with spiders too.
You do realize that although you want hatch covers, skeg boxes and such to be watertight, you don’t want the compartments to be airtight. That causes problems with hatch covers and decks bulging when a cold boat is set in the hot sun and I’ve even heard of split hull-deck seams in extreme cases. Conversely, putting a warm boat in cold water causes the hatch covers to suck inward and can result in the deck or hull pulling inward as well. If there are any tiny leaks around the hatches, skeg box, skeg control, etc., there will be a tendency for water to be sucked into the boat. Both situations can cause problems with bulkheads that are held in place with sealant loosening.
All of this is easily prevented by venting the bulkheads. For boats with composite or plastic bulkheads, all you need is a 1/32" hole drilled somewhere around the middle of the bulkhead. I usually go about 1" above center. With foam bulkheads, I’ll poke a piece of wire through the bulkhead (bicycle spokes work well), then insert a piece of the plastic tubing the comes with spray lubricants/cleaners to keep the hole open.
These tiny vents allow the pressure in the compartments to equalize as the temperature changes, but because they’re inside the boat, they don’t allow water in. Even when doing rescue practice and repeatedly flooding the cockpit, I’ve never had more than a few drops of water get into the boat.
@bnystrom said:
You do realize that although you want hatch covers, skeg boxes and such to be watertight, you don’t want the compartments to be airtight.
You raise a good point. I’ve undertaken this project because I’ve had a significant increase in the amount of water in my rear hatch in the past few months. I didn’t know for sure that it was the rear hatch until I resealed the two bulkheads in the stern. I’d have used a better product than silicone, but silicone was used previously so I didn’t push my luck trying to stick something else to it.
Once I’ve sealed everything up to very watertight and practically air tight I plan to make vent holes as you’ve described.
I’ve since disassembled the skeg assembly and removed the cable fitting from the skeg box. Not exactly a fun job, let me tell you. It almost makes me want my canoe back. Almost, but not quite. I found the area around the fitting to have a few small cracks, and I’m going to attempt to some fiberglass repair at least from the inside, perhaps on the outside too but it seems very difficult to work down inside the skeg box. I’ll more likely reinforce from the inside then do the best I can routing out the gel coat cracks in the skeg box and filling them with new gel coat.
At the moment I’m happy to have a second boat because while these repairs take place I’ll have to keep it out of the water.
@TomL said:
If you like you could use a hair dryer to pressurize the boat interior
Good idea. Initially I figured I’d need more significant pressure, but it really doesn’t take much.
I look at this as more evidence that kayaks are much more maintenance intensive than canoes. I bet the ends of your boat are filled with spiders too.
You’re probably right about the maintenance. I’m willing to accept it though, as I find them more versatile for my own situation.
No spiders that I’ve seen. I wash down the insides of the hatches at least once a season and this includes spraying water from a garden hose right into the ends of the boat and giving it a good clean out. I’ve debated storing the boat with hatches off to promote drying of the inside but I prefer to just leave it open to dry then seal off the hatches for longer term storage.
The skeg cable connection at the box seems to be a common weak spot on a lot of boats, often looking like a glommed-together mess. The main issue that I sees is that they’re often trying to attach a threaded fitting to a sharply curved surface, rather than making a nice, flat surface that would allow the installation of a thin nut or threaded sleeve on the outside. That would provide a solid mechanical connection, rather than just having a glue or sealant joint.
@Sparky961 said:
I’ve resealed the bulkheads and just waiting for them to cure. In the meantime I also installed my new hatch covers; which was just slipping the tether cord into the opening and tying a knot. Oh, and of course liberally applying UV protectant.
I then started thinking that it would be really nice to test the entire system, new hatches and all. This led to the idea of creating or releasing a gas from within the sealed compartment, then using soap and water as before to check for leaks. Definitely not a match for some of the following…
There are a few things that came to mind initially:
Baking soda and vinegar, maybe some kind of drip-delay setup (CO2)
Unlit propane torch (no smoking!)
Dry ice (sadly don’t have any)
Battery and salt water (electrolysis - O2 + H2… don’t be smoking around this one either)
Any sort of small compressed air cylinder with a slow release valve
Anyone want to comment on the exact quantity of crazy that might be afflicting me?


 I found the area around the fitting to have a few small cracks, and I’m going to attempt to some fiberglass repair at least from the inside, perhaps on the outside too but it seems very difficult to work down inside the skeg box. I’ll more likely reinforce from the inside then do the best I can routing out the gel coat cracks in the skeg box and filling them with new gel coat.