This project is not for the faint of heart.
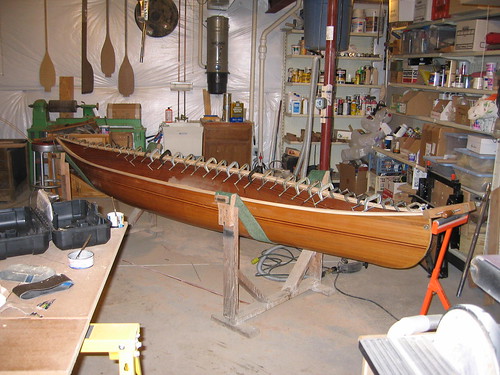
For several months I have been contemplating a new freestyle hull and working on the specs. for it. One night it hit me that I already had the hull I was pondering (sort of). I’d built the boat 8 or 9 years ago, not as a freestyle hull but as a boat for traversing twisty, winding, narrow streams. Sounds sort of like freestyle. I’d named it the Batsto 13 after it’s namesake river in the NJ Pine Barrens.
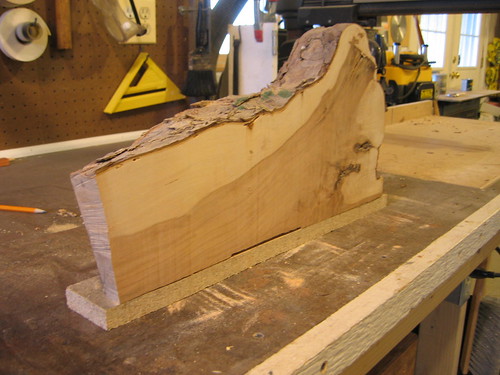
I dug up the original specs. for the boat and brought the hull in from the barn to double check measurements. As I suspected, everything was nearly identical to what I was working on except for the depth. The Batsto was too deep. In order to lay it down on the rail (necessary for FS competition) the heel angle would be extreem. In fact, I’ve heel that boat quite radically many times and still had an inch or so to go before getting the rail down.
There was no real need for the Batsto to be so deep. It only added to the windage. The solution seemed obvious. Cut around the entire sheerline of the canoe, an inch or so below the gunnels, thereby removing the existing gunnels, decks etc. Install new gunnels, decks, etc. and I’d have my new boat.
Getting up the nerve to do it was another thing. I liked the Batsto, alot. After a few days of pondering, I steeled myself, marked the hull, a took a saw to it. Below is a link to photos of the sheer cutting. I’ll follow through with additional chapters as the project progresses. The new boat will be known as the Illusion.
http://www.flickr.com/photos/mornstein/sets/72157610037118511/
Marc Ornstein
Dogpaddle Canoe Works
Custom paddles and cedar strip canoes
Cool Marc
Now you’ve got complete inwales and decks to build a composite hull around in your spare time!
How does Batsto compare to Dragonfly
the latter is deep for waveshedding a downriver runner…maybe some of us would like that too.
I am particular to boats that are designed for tripping that are amenable to FS techniques but are not particularly suited to comp as their turning radii are bigger and they require a slowwwww tempo.
I’m curious
Hi Marc:
The way I understand this, your goal is a FS comp hull and nothing else. I assume that seaworthiness is not an issue. For this reason I wonder, “why leave the recurve in the sheeline at the stems?” Since deflecting waves is not a concern why not omit this feature? Just cut the sheerline flatter at the stems and get rid of the extra weight and reduce the wind catching area in the bargain. Good luck with this project. Must have been difficult to cut a hull that you like to paddle.
The Batsto was
approximately the same depth as the Dragon Fly. In fact, the Batsto was conceived on a trip to the Pine Barrens where I compared the performance of three hulls, including a Dragon Fly and a previous hull of my own which was a Dragon Fly derivative. The Illusion will be about an inch shallower than the Dragon Fly. I’ll provide more info on this and full specs in future posts on the project.
Marc Ornstein
Dogpaddle Canoe Works
Custom paddles and cedar strip canoes
My goal is not
to build a “pure” freestyle hull although I can see how I may have given that impression. My goal is build an excellent touring hull that also will serve my needs for freestyle comp.
As you know, I am currently paddling a Loonworks Allegro in comp. It is also a superb touring hull. Maybe the best there is. I love to heel the boat radically, both to increase the “spin” rate and because it looks and feels cool. Even with filler strips on the inwales, if I heel as far as I’d like to, during some maneuvers I take on water a bit aft of the seat. The Illusion will be a bit deeper than the Allegro, allowing me that additional heel. The illusion also has more tumblehome than the Allegro and that will also allow more heel without swamping.
Below the level waterline, the 2 boats have alot in common, so should behave similarly when paddled level.
As for recurve at the stems:
I agree that removing the recurve would reduce windage and weight but I like the looks of moderately recurved stems. Therefore I compromise.
I never found the need for the depth of the Batso on any rivers that I would likely paddle it on. An inch or two off the gunnels won’t cause me to take on any water. The reduced height will allow me to sneak under a few more downed trees and in areas where I like to paddle that will be an advantage.
Marc Ornstein
Dogpaddle Canoe Works
Custom paddles and cedar strip canoes
Modifying a hull Part 2
After scribing and cutting a new sheer line it's time for new gunnels.
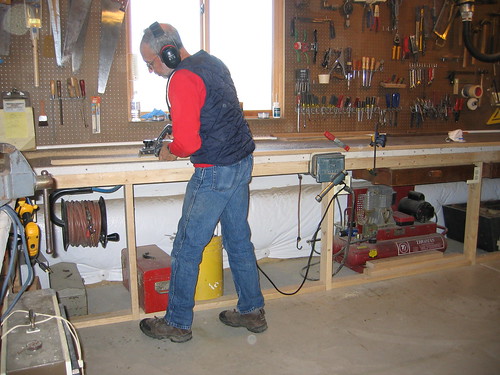
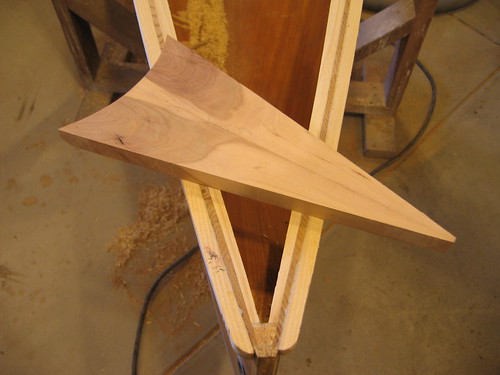
I milled the new gunnes from white ash stock that had seasoned several years in the barn. I tapered the ends of the gunnels both to save weight and because I like the way the tapered ends look as they join with the decks and stems.
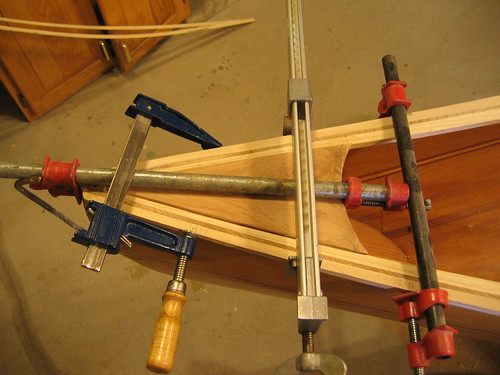
I generally glue the gunnels in place with epoxy, rather than fasten them with screws. Gluing allows me to make the gunnels thinner/lighter than would be necessary for screws. Glued gunnels also make for a stiffer hull than similarly sized screwed gunnels.
Tapering the gunnels with a hand held power plane
http://farm4.static.flickr.com/3170/3056912155_2b4a8bfd44.jpg?v=0
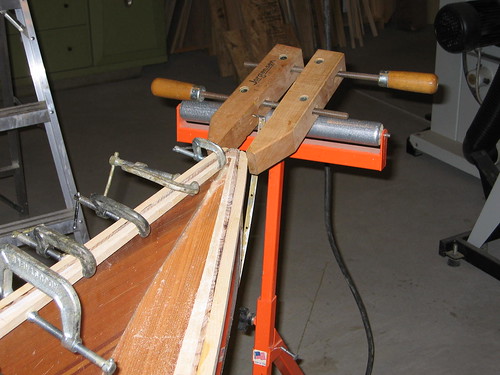
Numerous clamps necessary until the epoxy sets
http://farm4.static.flickr.com/3214/3056910873_0c4a58d632.jpg?v=0
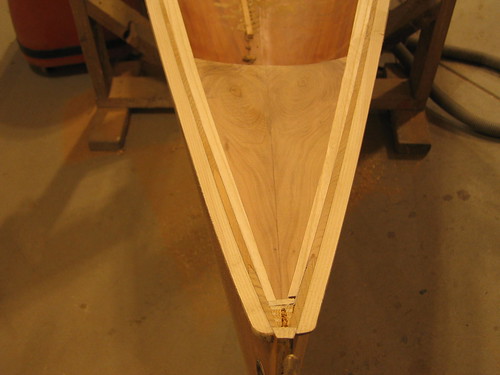
Stem view of the newly installed gunnels
http://farm4.static.flickr.com/3072/3056910587_be607bfbf3.jpg?v=0
The next step will be the decks.
Marc Ornstein
Dogpaddle Canoe Works
Custom paddles and cedar strip canoes
Tapered Outwales
One of the finest examples of tapered wales I have ever seen. I saw this canoe at the 07 WCHA Assembly. It is an F.Brodbeck built in Boston MA, recurved stems and tapered outwales, absolutely gorgeous IMO.
http://good-times.webshots.com/photo/2704476520086525661KWkTrK
I like gluing wales as well. Let me know if you ever need extra clamps.
http://good-times.webshots.com/photo/2544601930086525661LdKBeX
Gotcha…
I agree, a bit of recurve is aesthetically more pleasing. Now, understanding your goals, it makes good sense.
More tumblehome, for most folks makes for more bobble but you’ve got one of the more smooth, stable heels I’ve seen and this should work for you. Have fun.
Wow
This post just illistrates to me that just when I think I am fairly well versed in canoes-I realise that I there is a lot yet to learn.That’s one of the things I like about it!
Turtle
Nice work on that Franken-boat
Hey Marc, when you said on the Oak Orchard daytrip that you were going to lop a few inches off one of your lovely boats, you had a big SMILE on your face. It’s so interesting to see a person “creating” and tinkering on a nice boat. Did you feel any remorse? (But, I’m guessing any remorse was probably fleeting.)
Keep taking those photos (or should I say, getting someone to take them of you and the boat) as you progress. It is always interesting. And of course, we want to hear about how the final product performs.
A bit of apprehension but no remorse.
Once the new gunnels were in place I knew I was out of the woods, so to speak.
The sheer of the Batsto was vertical, as is usual and makes for a fairly straight forward attachment of the gunnels. I knew that when I cut down the hull, I would be into the non-vertical portion of the tumblehome and attaching the gunnels would be tricky. Now that I’ve successfully dealt with that challenge the rest should be straight forward.
While waiting for the epoxy to set on each of the 4 gunnels, I’ve been making new decks seats, thwarts etc. I expect to add a new post about the decks tomorrow.
Marc Ornstein
Dogpaddle Canoe Works
Custom Paddles and Cedar Strip Canoes
Modifying a hull Part 3
I always enjoy making and installing the decks. It's the point at which the stems of the boat begin to achieve a finished appearance. They tie everything together.
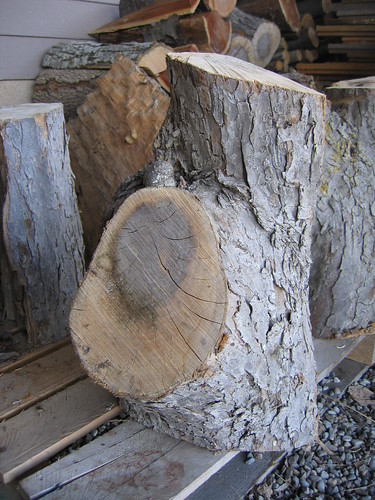
Since the decks are made from relatively small pieces of wood I can often make them from cut offs from other parts of the project or from interesting small pieces of wood that I have collected. In this case I decided on a short log from an apple tree that I cut down several years ago.
I mounted the log on a sacrificial sled, made from scrap lumber. The sled allowed me to slice the log accurately on the band saw. After slicing two thick slabs, I resliced each, opened the slices like book pages and reglued them. This is known as "book matching". By doing this I ended up with mirror image grain on the decks.
Once the glue had cured on the book matched blanks, I scribed them to match curve of the hull between the inwales, carefully cut and trimmed them to fit accurately. I glued and clamped them in place. Once the glue (epoxy) had cured, I sculpted and faired them to the gunnels.
During the downtime while the epoxy was setting, I worked on the thwarts and seat, but that's for the next chapter.
Apple log ready to become decks
http://farm4.static.flickr.com/3294/3056910375_3ffd09cbe4.jpg?v=1227655801
Sliced log
http://farm4.static.flickr.com/3007/3056910077_5b9d4c9e06.jpg?v=0
Bookmatched deck blank, ready to be fitted
http://farm4.static.flickr.com/3229/3056909869_217936c20b.jpg?v=0
Deck glued and clamped in place
http://farm4.static.flickr.com/3181/3057746238_e510e7c380.jpg?v=0
Finished deck
http://farm4.static.flickr.com/3198/3057745998_6b51d9793d.jpg?v=0
Marc Ornstein
Dogpaddle Canoe Works
Custom paddles and cedar strip canoes
Really liked that series of pix
It’s fun for me to see how it’s made, start to finish. Wow. That is beautiful wood, Marc.
Hmmm, no wonder I like the “How It’s Made” series on Discovery Channel.
never seen…
an apple deckplate before. It’s right fine Marc.
Modifying a hull Part 4
I've had lots of time today. Thanksgiving dinner guests won't arrive until 4:30. The weather's not good for anything fun so I've had lots of time in the shop.
I almost always kneel so I like canted seats. I also like a smooth, rounded drop in the front rail of the seat. I could buy commercial seats and Ed's Canoe Parts sells some nice ones, but generally I prefer to make my own.
I like the looks and the comfort afforded by cane seats. I don't like the maintenance associated with cane and I don't like pre-woven cane installed with splines. I've seen too many come loose, especially with sculpted seat frames. Some years ago I discovered synthetic cane. It looks very nice, similar to varnished cane, is maintenance free and is virtually indestructable. It has become my standard.
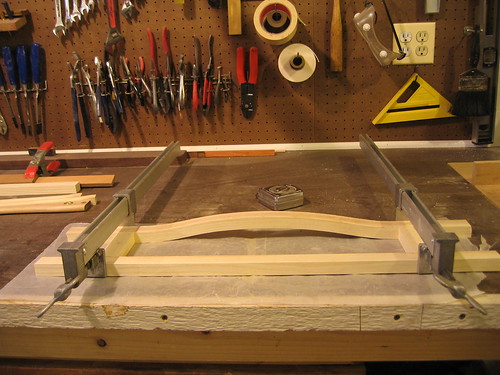
The front rail of the seat is laminated out of five plies of ash. I clamp the glued laminations in a form cut to the finished contour of the rail. I prefer this to steam bending as I think it makes for a stronger rail and holds it's shape. Often times, steam bent parts tend to straighten somewhat with time if there is nothing to hold them in shape. Sawing the contour out of a solid piece of wood would cause portions of the rail to be running cross grain, weaking the member.
The rear and side rails are milled from clear, straight grained, solid stock.
The seat frame is glued together with dowels reinforcing the joints. The frame is then drilled, in preparation for caning. After the drilling is complete, the edges are all rounded with a router. The frame is then sanded and finished, in this case with Watco Oil. It is now ready for caning.
For a boat that would be used almost exclusively for freestyle, I would have installed a thwart or my favorite, a "thweat" which is essentially a very narrow seat. Although I anticipate using this boat for freestyle, it will also be used as a touring hull and the comfort of a full seat is warranted.
Gluing up the seat frame
http://farm4.static.flickr.com/3174/3063484349_fb9ee6e7f2.jpg?v=0
Drilling the seat fram for caning
http://farm4.static.flickr.com/3171/3063484773_9035c9b67f.jpg?v=0
Finished seat frame
http://farm4.static.flickr.com/3212/3063484957_b8d705d9b3.jpg?v=0
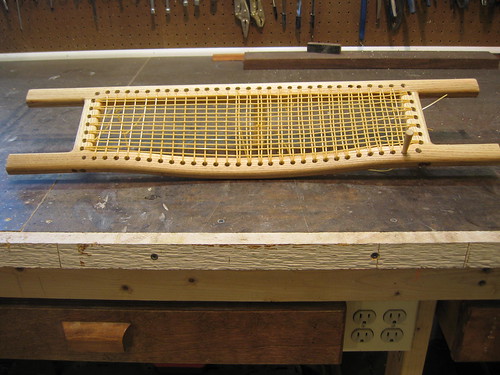
Caning in progress
http://farm4.static.flickr.com/3205/3064323622_8df4f944fa.jpg?v=0
Modifying a hull Part 5
Caning a seat is at once tedious and satisfying. It's the one operation that I typically do outside of the shop. It's a good project to do while watching TV or spending time with the family.
Once you start the diagonal weaves, the seat comes alive.
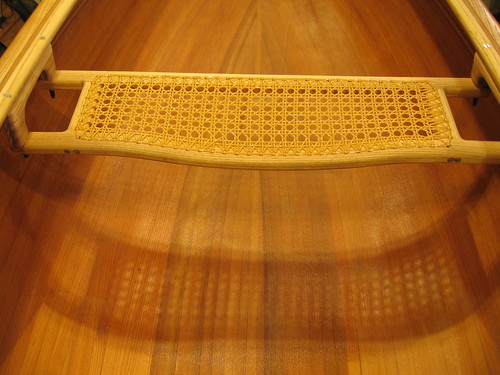
The drop blocks bring the forward edge of the seat down about a half inch. The rest of the cant is afforded by the "dip" in the front rail. I find this combination to be most comfortable for me. There is adequate cant to keep undo pressure off the bottom of my legs but the seat is still flat enough that there is minimal tendency to slide forward.
I fasten the seat/drop blocks in place with flat head screws , countersunk flush or slightly below the surface of the gunnels. I do the same with the thwarts and grab handles. Although this is not quite as strong as using oval head screws and trim washers, I've always found it to be adequate. If a boat over boat rescue is ever performed, I don't have to worry about gouging someone elses gunnels.
I use locking nuts and washers to hold it all together. Short lengths of rubber tubing are put on the exposed ends of the screws to prevent any possibility of catching or cutting a heel on one.
Illusion seat and drop block detail
http://farm4.static.flickr.com/3278/3067286999_f2db49113a.jpg?v=0
Illusion seat installed
http://farm4.static.flickr.com/3226/3067286773_4f8be57a2f.jpg?v=0
Modifying a hull part 6
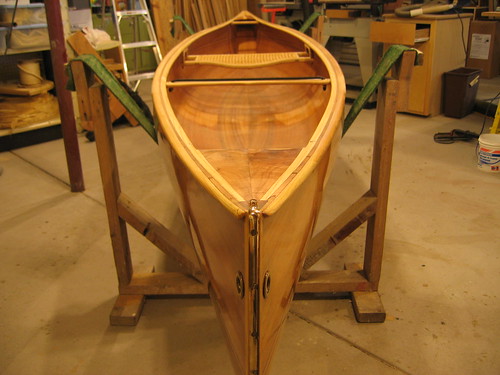
Well, the ex Batsto, now the Illusion is all put together and looks great. The only thing left is to wet sand and buff the varnish.
Prior to installing the seat, thwarts etc. I applied four coats of Cabot's spar varnish. After a day of curing I was able to turn the hull over without damaging it. This way the varnish could finish curing while I did the interior outfitting.
In my next post I'll go through the finishing process. for now I'll admire my pretty "new" boat and hope for a warm spell to melt the ice on my pond so I can take her for a spin.
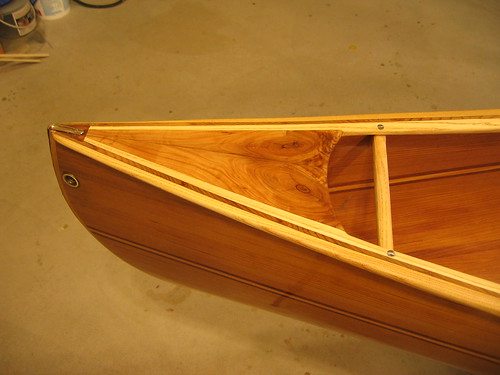
Illusion topside
http://farm4.static.flickr.com/3151/3071131780_6dfdd7e805.jpg?v=0
Illusion thwart
http://farm4.static.flickr.com/3008/3070293217_e1c84f4264.jpg?v=0
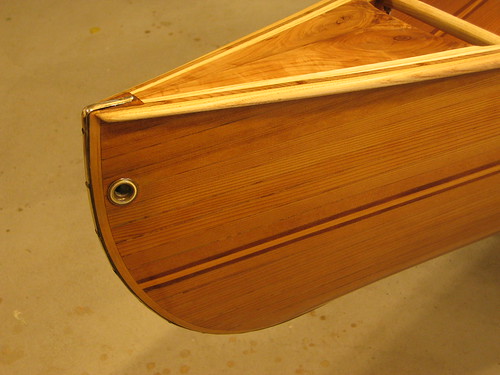
Illusion stem detail
http://farm4.static.flickr.com/3156/3071131348_158a08e467.jpg?v=0
Illusion bow profile
http://farm4.static.flickr.com/3070/3070292821_eba26d0903.jpg?v=0
Illusion bow deck detail
http://farm4.static.flickr.com/3177/3071131002_35ef9a976f.jpg?v=0
Illusion bow profile
http://farm4.static.flickr.com/3192/3070292515_874628abae.jpg?v=0
Wonder if you have thoughts on how to
keep a somewhat flexy composite canoe hull in proper form while installing gunwales?
Your strippers have a clear advantage, because the hull stays very close to desired form when gunwales are removed.
I had a similar problem some years ago.
Before removing the old gunnels I clamped a series of 3" long x 1"x1" wood blocks (soft pine)to the hull, beneath the inwales. For each block on the right side I clamped a matching block on the left side. I believe I spaced them approximately 2’ OC. I screwed temporary “thwarts” (cut from 1/2" plywood)to each of the blocks with a single drywall screw in each end. I drove the screws on an angle so that I could get at them to remove them after the new inwales were in place.
The clamps for the “thwart” blocks need to be large enough so that you can remove the old gunnels from behind them and insert the new ones. The installation and removal of the temporary “thwarts” was fairly quick and easy and did a fine job of holding the hull shape.
Marc Ornstein
Dogpaddle Canoe Works
Custom paddles and cedar strip canoes