Hi folks this is only my second post but have been reading a lot and want to thank everyone for all the information I’m gathering. We live up close to Lake Erie lots of inland lakes and waterways. She has been getting into kayaking with her friends and they want me to come along also. We live real close to French Creek and that is where they mainly go and mostly float. I have been around boats my whole life and at 65 a kayak is not my cup of tea. We plan to buy her a solo sit in Old Town and I was in the market for a solo canoe. A neighbor had this one a double and for 150 bucks I grabbed it. Here is where I’m at please be kind if I’m way off course.
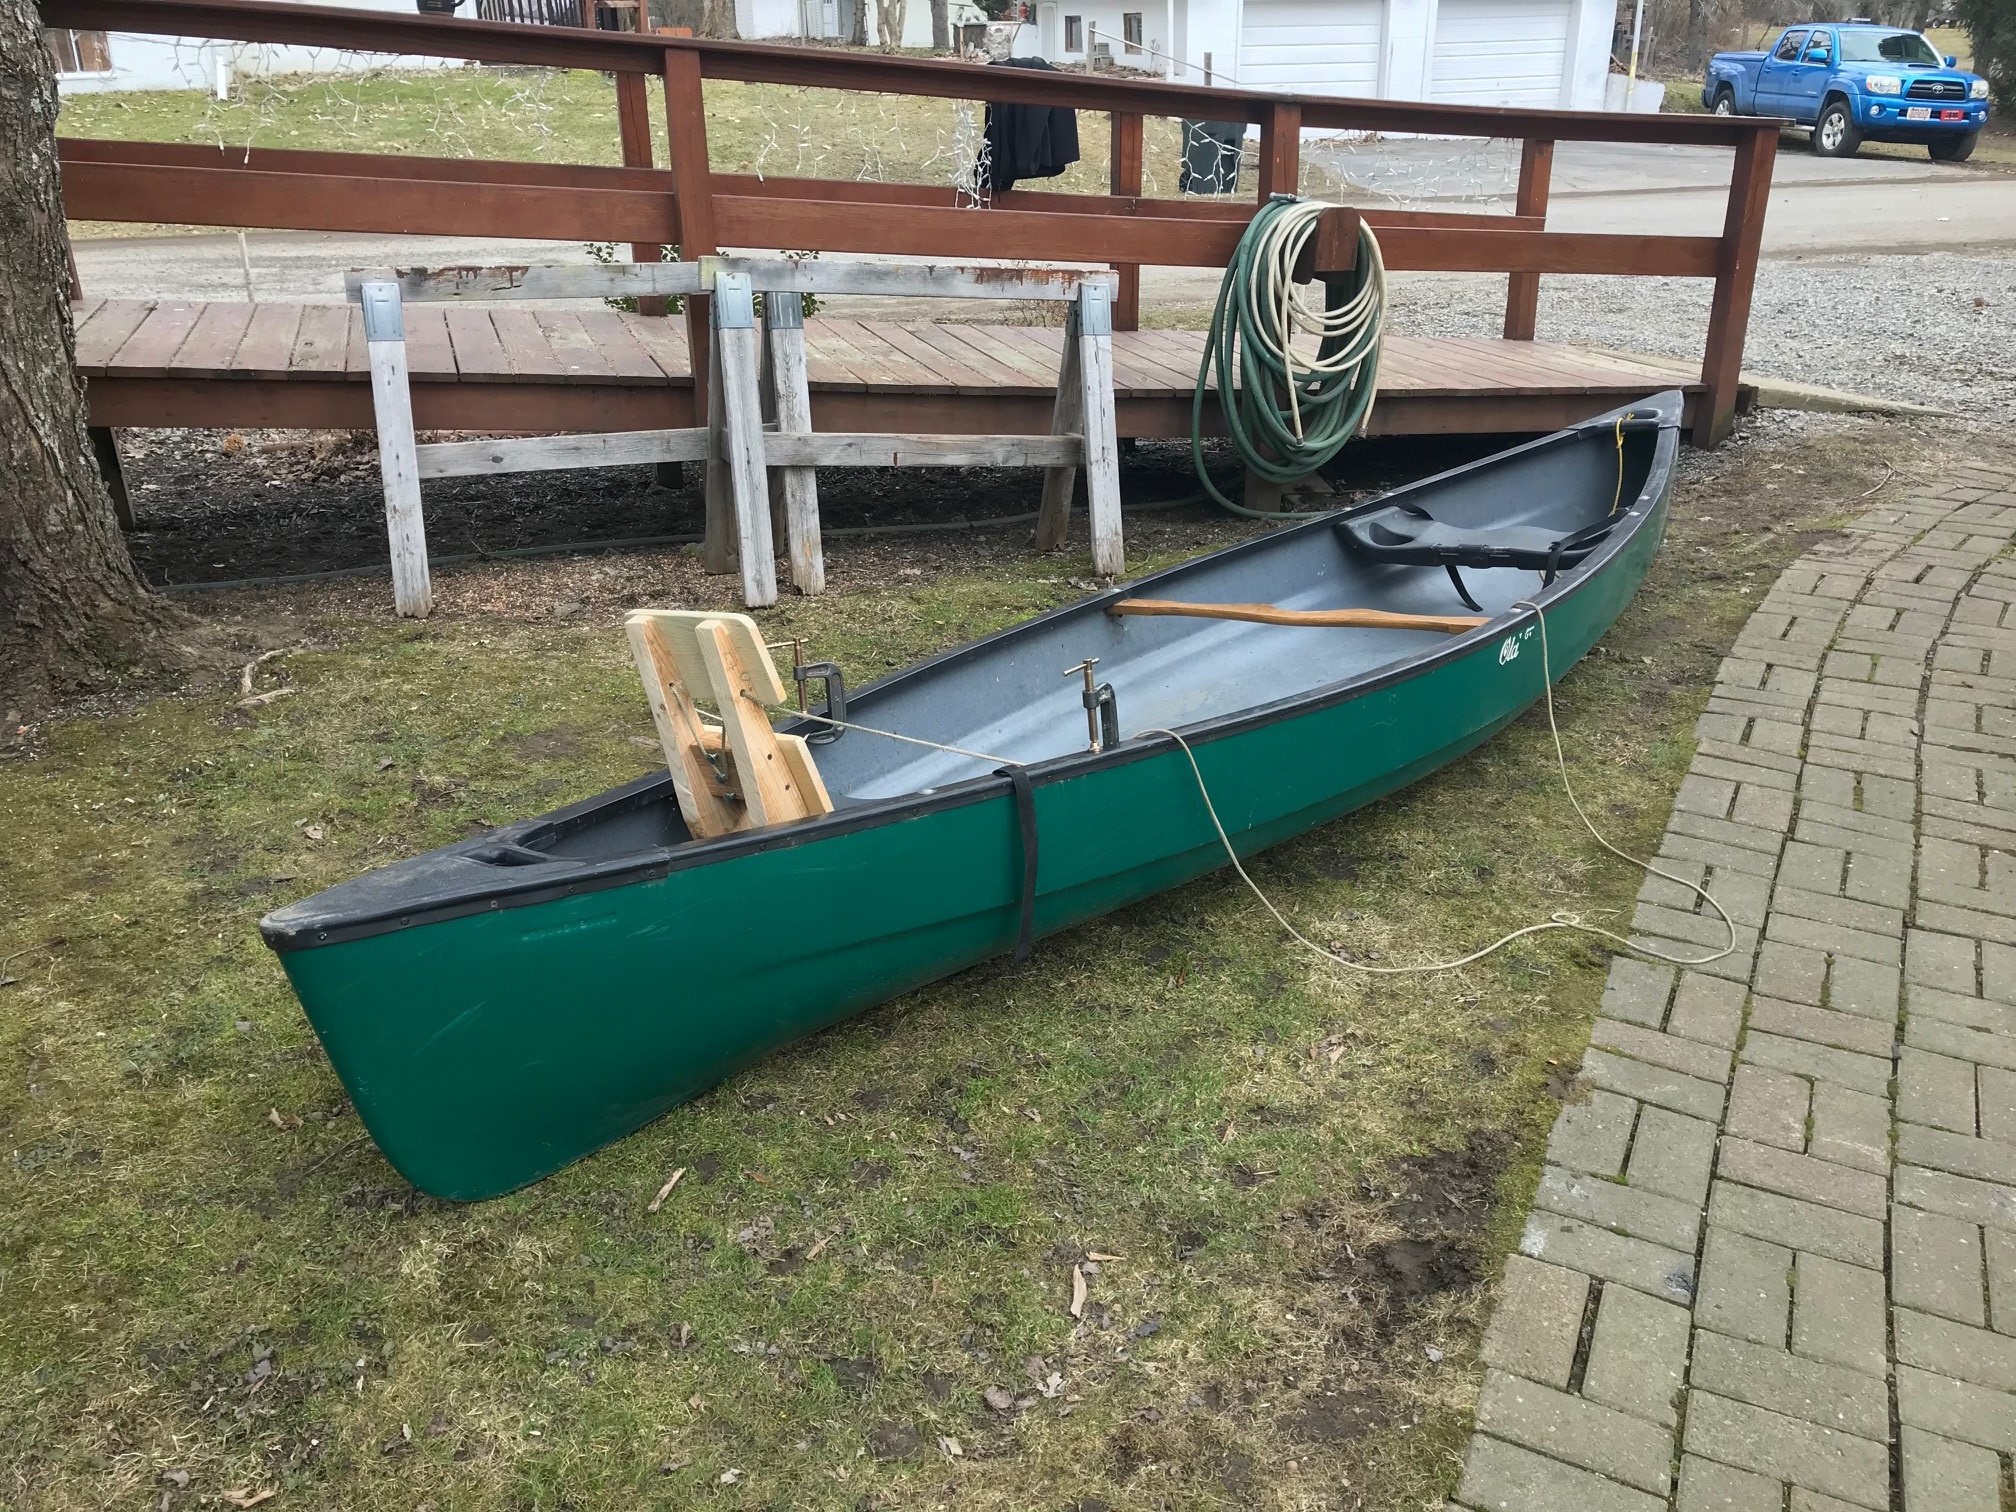
For me the solo canoes seemed to small and at 14’7” when I got this home seemed cramped for a double but what I would like as a solo. The first thing I did was sat in the bow seat and the foot box was pretty tight and I couldn’t picture ether of us liking it. The stern seat was fine but as a solo I know I wasn’t going to like the balance without a lot of counterweight up front. The way I always used a double as a solo was to sit backwards in the bow but the molded seat didn’t allow that and it still felt a little far back. The canoe didn’t come with the seat backs and when I saw the price I thought I could make one.
I took out the bow seat and turned it around and reused two of the four holes. Doing that it moved that seat about 8 more inches and looked like a good balance point for a solo. I cut two triangles out of 8-ply marine ¾” plywood and drilled two new holes thru the gunwales and adapted the seat to sit backwards. Doing this also lowered the seat ¾”. Seemed very ridged. I then had some old aluminum tent frame poles and I made a new thwart for behind the seat in the unused holes. That placed that thwart 48” from the tail of the boat. I then took out the old stern seat for good and made and added another thwart 48” from that end. Those plastic seats weigh quite a bit. I then removed the center yoke as I wont be carrying it overhead as I have a dolly. I made a thwart to replace it getting rid of the heavy oak piece. I wanted a front bench slightly ahead of center in case I do have a passenger and the plan is to use kayak paddles if the second person is to paddle. My thoughts are the boat is wider now at both seats. The seating spacing will be more like a tandem kayak. I’m not worried about paddling that way as it will be rare or the passenger will just be going along for the ride. I might even move up there when still fishing. I built a wooden drop for the bench seat to hang on and I can remove the bench completely if I am solo and need that space. The drop gave me an excellent place to mount my foot rail that I made like the thwarts and it is placed exactly where I need it in reach with no adjustments. I like to be able to move my feet wide or close or drift flatfooted and I also have a kneeling pad to further break it up.
I used a neoprene sleeping pad for the floor, bench, my plastic seat and seat back.
Another addition is I wanted capsize floatation as I will be out alone fishing a good deal and would like to be able to right the boat and get back in solo and at least limp back to shore. I started pricing air bladders and said no. Thinking outside the box I started thinking about yoga balls. We have a couple of them. I found they now sell long oblong ones called peanut balls. I bought two and stuck them inside two army surplus laundry bags. They add about 7 square feet of flotation to the boat and fit nicely into the two 48” ends with room for ropes and small bags in the corners. I strap them in with straps between the new thwarts and the deck handles. They can’t come out. The bags over the balls provide a little protection and keep the balls to a given size. the balls are pretty tough we have rolled on ours for years and never have to add air. They do come with a little plastic foot pump.
I plan to drill the hull on both ends and put in a rope loop to tie off to. I’m also building a DIY roof rack for the KIA soul I will be toting it with. I will add some photos of it so far and add more later as things change.
Any advice would be appreciated. I know it is a budget boat and it came with a little hog. I have a brace that I made that spans the gunwales and a board the runs a few feet down the center and I have a threaded rod between them that pushes the hog out. I have been putting it in and flipping the boat over on a couple sawhorses and the sun has been slowly working the hog out. I figure I will just always store it with the brace in and see what happens. Not too worried about it as I’m long past trying to go fast I just want to get out on the water and float the creek or drown some worms. Retirement is a good thing.
I often thought some manufacture should offer a blank shell and then let you design the insides spacing stuff how you would like it. Maybe offer advice if you are making a weak area. Let you pick the seats you want and at the height you want placed how you want them. Even with or without sponsons would be a nice option.
I’m sure high end canoes are more custom built like that. I’m thinking more of a design it yourself right on their website with the dollar amount changing the more you add.
Now that I’m thinking about it that would be easy but it is more fun DIY.
Too much risk and complexity for a major manufacturer, IMO. However, small custom boats can be done exactly like this. I only have experience with one company (Slipstream), but I can tell you that you can do all of the stuff you mentioned with them, however you do pay for it.
Nice job imo. Looks like a good relaxing set up. Only suggestion I can offer, would be to add a 12’ pole (6061 T6 AL, 1.125" dia. ) and try standing up in the skinny water. Looked at pix of your creek and this came to mind…other option is a closet rod, just offering another way to have some fun in your canoe, stretch your legs and exercise different muscles at the same time. Seems all the best canoe polers are retired, so you’re in good company. https://www.brockeng.com/AmusingRaven/pole.htm
Photo of the author of the above link.
@daggermat I might have to give that a try. It will be in late summer though as I’m pretty sure I will be getting wet a some point learning the skill. French Creek would be very good for pole. I’m sure I would be the only one doing it.
French Creek was originally called Venango River until in 1753 when George Washington went up it to see the French and boot them out of Fort Le Boeuf he called it French Creek and it stuck.
We are only 30 miles from the great lakes here on the divide and the creeks water flows south to the Gulf of Mexico. What a trip that would be.
Work on the boat will be slowed today as we woke up to an April Fools surprise.
I mentioned above the oilcan / hogged bottom on my second, third… hand canoe. I thought I would add a photo of what I quickly rigged up that seems to be helping work it out. For now it is being stored upside down on two sawhorses unless I’m working on it outside and the weather up till the late snow has been mild. Once I get things like I want them it will stay in the garage upside down hoisted about 10’ overhead and will be in two slings or hung with two spreaders similar to the sawhorse spacing. I will back the car in and lower it down. That should solve loading and unloading at home pretty well.
What I made to press back against the hog was just two strips of scrap wood with two holes drilled I’m placing them under my center seat drop blocks, but it could be done with a longer threaded rod pushing against the gunwales inner lip.
I only place them in when I’m storing the canoe. The first time I took them out it popped back 95% of the way, but I’m noticing with some warming from the sun and then cool nights it is slowly coming back out. I was tempted to try the hot water and I may still try that if no one here tells me not to. I have also thought about making a layout and cutting a curved rib and fitting it permanent to that location. I’m not sure if that would be a good thing or not because any river impacts there will not allow for any flex if I add a rib. I have read where others used a foam block.
Any way here is my little press setup if it might help someone else.
Thought I would add a little detail on the DIY air bag floatation I added to each end. It is still early spring here so this is untested in the water still. Once the water warms my plan is to capsize in some safe beach location and experiment with recovery and solo entry of an old guy. I haven’t found too much on line or on this site as to cost effective DIY solutions for canoe flotation except some truck inner tube ideas. These bags fit the contour of the hull pretty good and lock in between the deck and the thwart as they stick up above the gunwales a couple inches and are held down with a cam strap. Quick to put in and out as I will pull them for cleaning and storage. Cost was about $20 per ball and the bags were $3 each at the surplus store and $2 for each cam strap. Weight is 3 lbs per ball and another 2lb max for the bag and strap. They would likely work ok without the waterproof bag I just liked the protection and the look better using the army green bags. They add roughly 3.5 cubic feet of displacement each. The balls come with a tool to pull the plug and a small foot pump and hose and filling nozzle. You could fill them with just the hose and nozzle by mouth if you had to. The balls are 18" dia x 36" length roughly.
My hope is they will allow flipping the canoe solo and without it taking on too much water and being able to be entered and bailed the rest of the way or at least paddled to shore and dumped. My other hope is the 14’7” length has enough bow weight to enter over the stern.
Have you paddled Red Bank Creek? a little under 2 hours east from the French Creek area. My ex and I used to canoe it from Distant (just south of New Bethlehem) to the Allegheny using either our Guide 147 or the Mad River Adventure 16 we got later. Fun, moderately fast run in a pretty little shallow canyon. But my favorite canoe run was always the class I and II Red Moshannon, especially the section from the Peale Bridge to the Route 53 Bridge.
We haven’t but that sounds like a nice weekend destination we could do. Thanks for the tip. I’m sure as time goes on we will branch out some.
Seeing as how you had a Guide 147, how did you handle using it solo? Do you feel the mods I have made will be helpful as a solo? As far as turning the seat etc.
We never soloed it, but probably could have. Ours was an older model and did not have seat backs, just plain bench seats.
I have a solo canoe now, a 35 pound 13’ Curtis Lady Bug. I sold my share in the tandem canoes to the ex when we broke up since he had a couple of big barns and lived right on the Susquehanna River – I didn’t want to have to deal with such heavy boats.
By the way, the West Branch Susquehanna River is a delightful wilderness float only a couple of hours from you. It’s been recommended to be awarded national Wild and Scenic River designation. The Lumber Heritage Foundation has a set of waterproof maps for $20 for the whole 123 mile Water Trail route with all the information you need on launch sites, camping areas and conditions. And there in Clearfield PA (mile marker 119 on I-80) the Clearfield Creek is a nice lazy river to paddle for day trips…
Thanks for all the info. I will be looking into all your suggestions as with being retired all I have is time.
I liked the older style better with just the benches. Gave a lot more options and if you wanted a seat back you could just add something. I think the new molded designs appeal to new buyers until they actually start using it and find they are limited.
Weather is supposed to be nice tomorrow and I will be out messing around with the Guide doing something. Getting eager to get it wet.
I am impressed by your ingenuity. You have clearly made a usable solo canoe from what you had. It should work well for you. I would think you might want to put some lacing in from gunwale to gunwale over your “airbag”. It looks as though it could pop out in a capsize.
Thanks Peter. It has been fun trying out new ideas I haven’t found on line yet. I’m finding just about everything I think about has been tried and a whole lot of things I would never have thought about. Lots of information out there to pick and chose from and IMO not so much here but in general on the web there are some really not so great ideas. It is great to hear someone say I’m staying on track.
Today I added bow and stern loops and painter lines and found the yoga balls / peanut balls have that depressed area in the center and with my doubled straps that area in the center is a great place to coil and stow the lines, the balls act like a bungee I see people using. I ordered a couple little floats to put on the ends of the lines along with a loop. It should put the end right next to my seat for an easy grab if I need to toss a line.
As to the floats popping out I have learned to never say never. I have them tied in to the deck handles with the cords that close the surplus bags, so if they got out they would stay with the boat, but still popping out wouldn’t do me any good for flotation. They are really pulled down tight and the gap on both sides is much smaller than what they would fit thru. It would be possible for the cam buckle to get hit and they could get out so a second level of keeping them in place is something I will think about.
The seat back I made seems like it will work good for the Old Town seat and today I was thinking of making a similar one for the bench seat locking it on my foot bar and leaning it back into the new center thwart. I think it would look nice to have matching back rests when I have a passenger up front fishing with me. So yet another little project.
So far everything breaks down fast and I only need to add what I need for that day. I can already see where a few things like the seats I built as prototypes can be redone taking out a lot of weight. So I will likely do that once I get to try it all out.
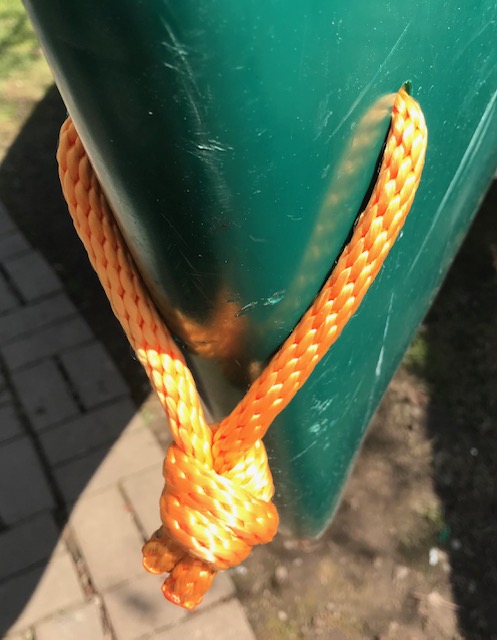
Well it looks like I’m getting close to done with the canoe for now. I drilled the hull for grab loops and the conventional method is to knot them on the inside for a clean look. As far as I could figure to get a tight loop and a inside knot I would have had to start with the rope a good 2’ longer tie the knot and then work it up into the point and tighten it. I didn’t feel like wasting 4’ of rope doing both ends and letting it hang inside. I got to thinking what an outside knot would be like and I actually liked the feel of that better. Without the painters on there you can get a couple fingers in the loop and then the knot is just the right size to get a good grip on. I have read a large loop can get caught easy and also it could be dangerous to put your hand thru it and then be flipped causing you to be locked in. So for me the function outweighs the looks. I strung the two painter lines to my air bags for the picture and added a loop and a small red float. The lines are .5” x about 15’ and have a nice feel and the floats add just enough weight if I want to throw a line. They have a 600lb rating, so way overkill.
I also finished the front bench seat back and glued .5” neoprene to it. Both seat backs are somewhat a prototype as is the bench seat and if it looks like it works out ok maybe over our long winter I will see about making them a bit lighter and better looking. Or I might just go with them and forget about looks. I think the spacing is about as good as I can do with a 14’7” boat as both seats have good leg room and both could kneel and paddle with double bladed paddles.
Both seats seem really comfortable and I have my solo stern seat laid back a little more as that seat has the footrest. The bench seat when occupied will be a little more upright. It is pretty easy to carve a little out of the seat back if I find she wants more angle. The PFDs we have are not the kayak style and add an inch of padding to the seat position so we will see how that factors in.
Here is the canoe on the $35 dolly I bought as I couldn’t make one that nice for that price. It came with one cam strap and I have been playing with that and have found I will use two straps and feed them under each end of the strap on the dolly. I also figured out the way I have it on in the photo is backwards. The kickstand wants to be on the end I will be lifting to keep it from catching.
Now on to the DIY car rack and then hopefully the water will be just right for the maiden voyage. So far including new PFD and paddles, launch permits and lifetime fishing permit i’m around $350-$400 for the project. At least that’s what I’m telling her.
Tonight I fiddled around with the kayak dolly again trying to get it strapped on tight and after watching a few videos and finding a page where they explained the best way. I tried using two cam straps with hooks on the end. Hooking them to the cart just outside the hull protector foam things. The best place for balance was directly below the new bench seat and that just happened to be the place where the hull is most susceptible to oil can and where I have been slowly coaxing the hog out. I got looking around the garage and found some fairly firm foam insulation scraps that could be cut to fit tight under that seat and push on the inside of the hull. The seat is bolted down so I cut the block to about 8”x10”x24” and unbolted the seat slipped in the foam and tightened it back down holding the hull just perfect. The blocks weigh next to nothing and can stay in all the time. When I put the cart under now and strap it nothing moves.
I would say when I load up the bow of the boat with fishing gear, paddles cooler etc the effort to lift the stern will be just a few pounds and I should be able to roll it just about any distance I need to. I actually think I could leave the dolly on from home to put in on the car top.
Here is the foam block i’m using to hold the hull shape. I can’t think of anything simpler.
As I have been reading on the Old Town Guide 147 this hull oil canning seem like a common complaint. Maybe this will help someone else looking for a solution. The foam is strong enough to do the job but flexible enough if it took a hit from below it would give a little.
Tonight I found the time to try out the DIY loader for my DIY rack.
All in all it went pretty good. I got the boat on top of the car without damaging the car, the boat or myself. I attached the ladders to the rack with a pin and then rolled the canoe along side the car and flipped it over leaning on the ladders. I want to be able to leave the wheels on but I had them in the wrong location and they were getting in the way of the ladder climbing so I took them off for the first test. I have the steps spaced at 12” and that worked but smaller steps will work better and tomorrow I will put one in between so the steps will be 6”. I alternated ends lifting the gunwales up to the next step. Once I hit the top I stood between the ladders and pushed it up and slide it across the rack.
It came off even easier as gravity was helping.
With two people it would be pretty easy to just lift it on but it would be really easy doing the ladder with two people. The whole process took just a few minutes and I was only lifting a small fraction of the weight at a time.