I have an old 17’ fiberglass flat bottom canoe that was sold by Sears as per the capacity plate. It’s green and says “Free Spirit” on both sides. I haven’t been able to find much on it-no pictures online, and only a few references from folks who have one. I’ve only used it a few times in the past few years after inheriting it from a deceased uncle. It will take a 3 HP motor, and I just picked up an air cooled 3.5 HP Gamefisher (also sold by Sears, ironically) for free that only need a good carburetor cleaning-it runs like a top now.
What I’d like to do is refit the canoe so that it will be suitable for mounting the motor and taking my wife and small kids (2 and 4) out on the local lake. I could just throw one of those removable thwarts on it to sidemount the motor and be done, but I’d like to put a little more work into the canoe to make it look and work better. First, the finish-it’s painted green (or gel coated-not really sure) over the fiberglass. The fiberglass is not woven cloth, but rather a random amalgamation of fibers-it’s hard to describe. It’s a little banged up and has been patched in places with some sort of epoxy. I’d like to sand the entire canoe, patch any little dings, and repaint it. What should I use to make repairs (polyester or epoxy resin?) and what should I use for paint?
Next, the gunwales and thwarts. They are made from cheap aluminum tubing-almost like electrical conduit, but thinner. Everything, including the seat mounts is held on with aluminum rivets. I’m thinking of pulling the old gunwales off and making a sheer clamp and rub rail from oak stock and gluing them inside and out, maybe using some stainless steel screws for good measure. More oak stock would be used for a cap rail to cover the gap between the sheer clamp and rub rail. The other purpose this would serve would be to provide more secure mounting points for the motor thwart and seats. Again though, given the hull material, I’m not sure what to use to glue wood to the boat.
I’d appreciate any advice anyone can give on this project!
American Fiberlite
This canoe is one of the inexpensive chopper-gun canoes made in the 60’s and 70’s by different fiberglass products companies for big retailers. It was made by shooting a mixture of chopped fiberglass strands(just like in loose fiberglass insulation) and resin into a mold. The result is a thick layup with poor resistant to puncture. The interior was painted over to cover the ends of the loose fibers that tended to get into your feet, legs, and any other parts making contact with the hull interior.
The trim as you have noticed is low cost, hardware items, not marine items.
Sidemounting a light motor is probably your best method. A clamp-on side mount, like the Old Town, is easy to use and as solid as your gunwales. Drill out and replace any loose rivets.
I personnally would not spend much time or money or refurbishing this hull. Just enjoy it as is, and find a better hull for the future.
Bill
I agree with plaidpaddler
If you need to make repairs I would cut patches out of 6 oz/sq yd plain weave fiberglass cloth and use a decent epoxy resin. I have no idea what type of resin American Fiber-Lite used for their chopper gun boats, but epoxy should bond to both polyester or vinylester resins. Polyester resins, however, may not cure over some other types of resins.
For exterior patches, sand off any gel coat until you start to see the short 'glass fibers to get a good bond. For interior patches, sand the paint off likewise.
If you want to paint the boat, no problem. Sand the hull but you don’t need to sand off all the gel coat. Just about any spray paint will work. If you want something a bit more durable and nicer looking, a 2 part marine polyurethane paint like Interlux Perfection would work but is more trouble and expense.
As for doing much more, realize that you are investing money in a boat that is not really worth all that much to begin with. But if you really like the boat and wish to proceed, so be it. If you want to replace the gunwales, ash, mahogany, spruce, or cherry would be lighter than oak, which would add considerable weight, assuming you can find long enough stock roughly 3/4" square. You need 4 lengths. The pieces would need to be about 6 inches longer than the overall length of your boat.
For canoes, rather than “sheer clamp” and “rub rail” we generally refer to the “inwale” and “outwale”. Rather than using a 3 piece gunwale, you could save wood, weight, and money by rabbeting the outwales so that a thin lip of wood covered over the hull.
You could bond the gunwales to the boat with epoxy if you wish, but there is no need to. Just use stainless steel sheet metal screws (#8 flat head, approx 1 1/4" long) with the majority of the screws going through the inwales and hull into the outwales, spaced about 6" apart. You will have to insert the last 4 screws or so at each end from the outwale into the inwale since there won’t be sufficient space to work inside the hull at the stems.
This motor mount is a bit cheaper than the one sold by Old Town Canoe:
http://www.basspro.com/Bass-Pro-Shops-Canoe-Motor-Mount/product/67133/?cm_ven=bazaarvoice&cm_cat=QA_PSVP&cm_pla=67133&cm_ite=description_link
Thanks!
Lots of great info-thanks! The canoe sat under a garage overhang for a very long time for two reasons-first, it’s too heavy for my wife to lift over her head for cartopping. Next, she’s not up for paddling all day on the lake, especially if there’s a bit of wind. What’s changed is that in the last six months I came into a trailer and a 3 HP outboard. These will make it much easier for the family to tool around the lake. The shoreline is mostly gravel-not a lot of big rocks to hit, and the lake is very deep, so the brittle nature of the chopped glass shouldn’t be too much of a problem. I think what I’m going to do is find some cheap wood for the gunwales (anything is better than the crappy aluminum that’s on there now) and thwarts.
For the hull I’ll just sand it well, fill in any chips and scratches (there are no holes or major cracks), and knock down any poorly made repairs. Then I’ll roll and tip a good exterior paint and call it a day.
Thwarts and seats
If you do rerail the boat with wood replacing the thwarts and seats is no big deal, and not horribly expensive.
You can find reasonably inexpensive but good quality seats, yokes, and thwarts at Ed’s Canoe:
http://edscanoe.com/
or Essex Industries:
http://www.essexindustries.org/
Essex also has some reasonably inexpensive motor mounts.
If you use inwales that are around 3/4" thick (which is pretty standard) the biggest machine screw you should use is probably a number 10. Anything larger makes a hole big enough to weaken the inwale.
You can find stainless steel machine screws in #10 size with either 24 or 32 threads per inch but the #10 x 24 tpi is sort of a standard. Obviously, either will work fine with the appropriate nuts. Ed’s canoe also carries stainless steel seat hardware.
If you want to mount the seats lower than gunwale level you will either need to buy some hangers, or make some out of hardwood dowels.
don’t be too quick to judge
I am reading a lot of guesswork comments, but nobody is really speaking with convincing authority about this old Sears canoe.
Not having even seen a photo of this canoe in question, I have to fall back to what I know about Sears products from three or so decades ago.
The Sears corporate buyers were knowledgeable professionals in their fields. When Sears did not have specialists on staff, they hired consultants to help make purchase and design decisions.
Sears outdoor and sporting goods were often not the very top of the line, but they were typically very good: good quality products at reasonable prices manufactured by reputable companies.
Are you CERTAIN that the canoe is 100% sprayed glass? Good technology of that era was to use fiberglass cloth and resin in the center layer, gel coat the exterior, and blow glass the interior of the hull. So if you look at the inside of the hull, you would only see blown fibers.
Aluminum thwarts were the lightest and strongest structure material of that era, so you can replace it, but going with wood is not a superior material over aluminum tubing.
Read these forums for suggestions on refurbishing old canoes. I have refurbished several old fiberglass canoes. It is not difficult toput more money than it is worth into refurbishing an old canoe. If you put more than $100 TOTAL into refurbishing an old fiberglass canoe, you probably spent too much
A little guesswork perhaps
lacking any photos of the boat, but less guesswork than you might imagine.
"Free Spirit" was a label that Sears applied to all sorts of discount sporting gear including canoes. Sears sold some aluminum and lots of fiberglass boats. It is possible that Sears sold fiberglass canoes made by manufacturers other than American Fiber-Lite (although I haven't seen any) but Fiber-Lite was certainly the most common maker and I have seen a lot of them.
This thread shows an American Fiber-Lite canoe typical of the type sold by Sears:
http://forums.iboats.com/forum/boat-repair-and-restoration/boat-restoration-building-and-hull-repair/448571-american-fiber-lite-patriot-15-canoe
The interior and exterior wear spots clearly show a chopper gun type of construction. The photos also show the rather narrow diameter aluminum gunwales and thwarts that were the standard for this maker.
I am not saying that chopper gun boats are worthless. But that method of construction does result in a much higher resin to fabric ratio than is ideal (meaning more weight) and since the fibers are short, the hull is more puncture-prone.
As for makers using a combination of cloth and sprayed chopped resin, perhaps some did this but I have not heard of it or encountered such a boat. Sprayed chopped 'glass hulls were a very common method of construction in the 1970s through the 1980s, but if a hybrid of cloth and sprayed chopped fiber was used it certainly was not the norm for that time period.
I have a fiberglass boat from Sears
My motorboat for fishing is from Sears. My dad bought it back in 1977. It was made by the chopper-gun method. Cracks around the transom allowed the encased wood to rot. I spent more money having someone fix that than what the boat's worth could justify, but it was no worse, and quicker, than trying to find a used replacement boat of similar size and better quality. As far as an illustration of puncture resistance, it's a tri-hull configuration, and it must have been shipped with another boat stacked on top of it. Where the center stem of the piggy-backed boat contacted the back edge of the front seat (a molded, chopper-gun seat), a hole was punched, and you can see the chopper-gun fibers around the edges of the hole.
More comments on build quality: The molded seats are glued to the hull, and the center seat, which is subject to more hull flexing and is a less rigid design than the other seats anyway, is coming loose. Sooner or later I'm just going to bolt the flanged edges of the seat right through the hull, using thick aluminum or brass plates to spread the clamping force of the bolts. It's not something that would happen with a good boat.
Funny how boats can have appeal even if crappy though. When my boat was in the shop getting new wood and glass for the transom, several people saw it and asked if it might be for sale. Last year I was canoeing in a place I sometimes fish for catfish, and a guy was there catfishing in a familiar-looking boat. It was a Sears tri-hull just like mine. He'd recently bought it, and fixed it up with a very nifty paint-job. I talked to him for a bit and it was plain that he really loved that boat.
Pictures!
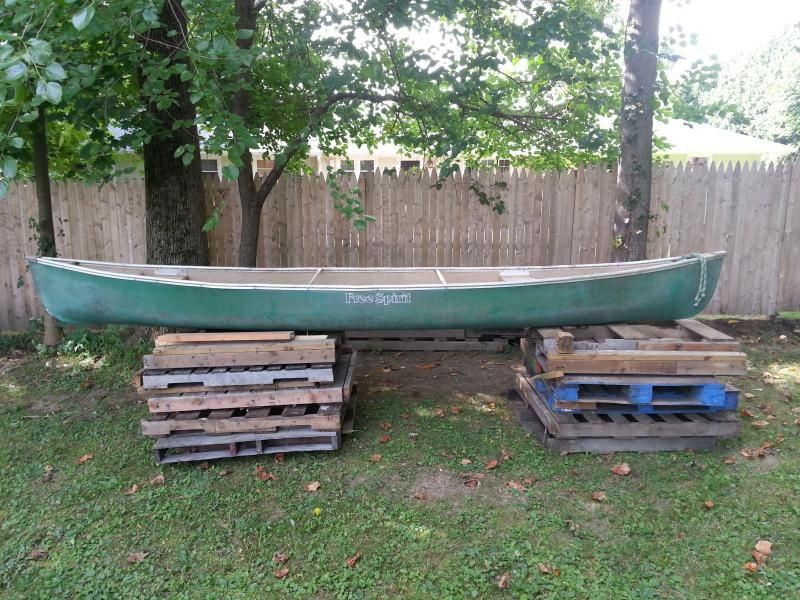
I finally got around to snapping a few pictures of the boat:
http://i25.photobucket.com/albums/c68/Badfish740/20140816_095532_zps356d99a9.jpg
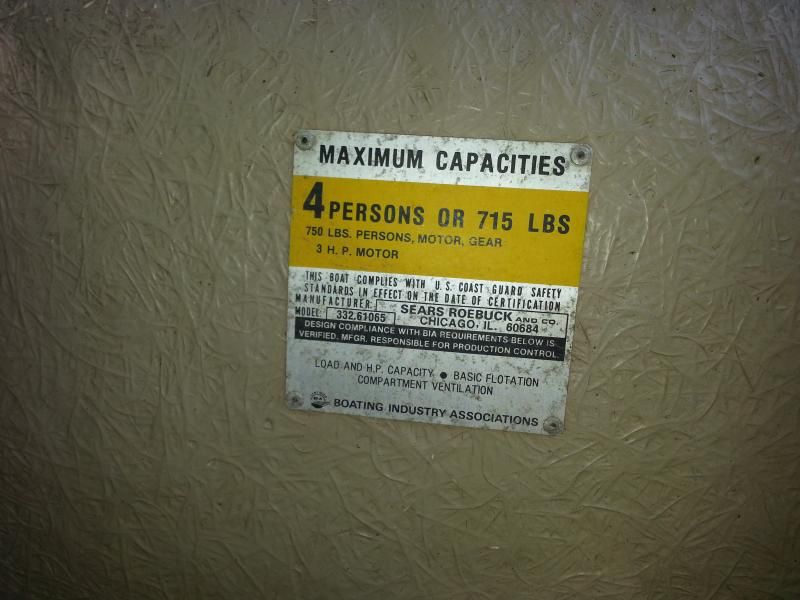
Here’s the capacity plate which also shows the chopped construction:
http://i25.photobucket.com/albums/c68/Badfish740/20140816_095547_zps18a00be2.jpg
Interestingly, I’ve seen other capacity plates which look exactly the same but list American Fiber-Lite as the manufacturer, whereas this one says Sears, but I guess it’s a licensing thing. Anyway, I have no intention of dumping tons of money into this canoe, just sprucing it up a bit. I have a bunch of .75" x 1.5" x 8’ stock laying around that I’m going to scarf into long lengths for inwales and outwales. The inwales and outwales will be glued and screwed which I think will stiffen up the hull some. Then I’ll add some wooden thwarts and seats made from material I already have.
I’m also working on side mount for the outboard that will be incorporated into the in/outwales. After looking at them online I can’t see spending the money for something so simple, especially since I have 90% of the materials here. Finally, the boat will be roll adn tip painted inside and out with whatever cheap exterior paint I can find in green after a good sanding of the gel coat. The wales and thwarts will probably be painted black. Depending on how she sits with a motor and a crew of three I may eventually add sponsons too. If I do that will be the most expensive part.
Scarfing gunwales
Certainly make sure you stagger the scarfing to maintain structural integrity. Even quality manufacturers occasionally screw up and make the inwale and outwale scarfs at the same spot which is obviously bad. My 1985 Old Town Columbia which is 18.5ft long required scarfs and on one side they scarfed both inner and outer gunwales at the same spot and I have a little structural compromise going on there.
Work started
Well I decided to take the plunge and fix up the old canoe. So far I've spent $0.00 (materials are what I had laying around) but am enjoying the work:
http://i25.photobucket.com/albums/c68/Badfish740/20140816_095532_zps356d99a9.jpg
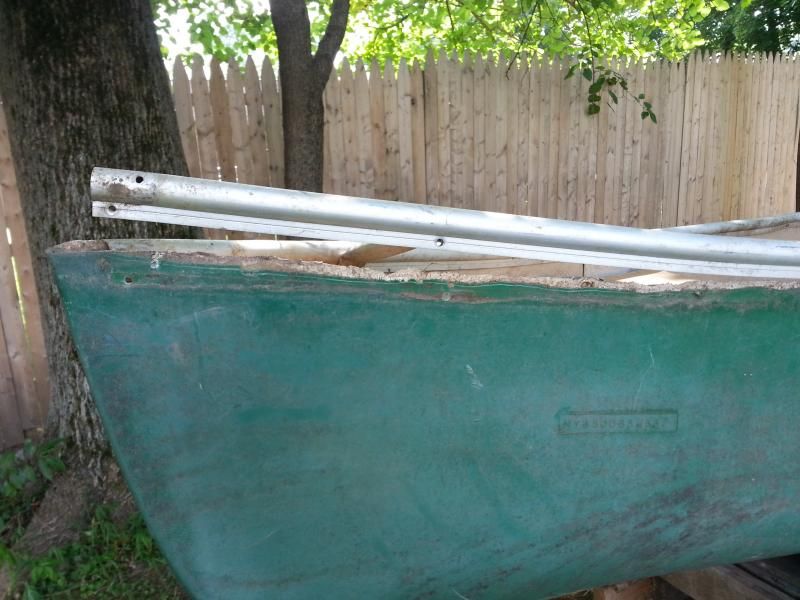
Beginning to remove the old aluminum gunwales:
http://i25.photobucket.com/albums/c68/Badfish740/20140817_134949_zps49dbce35.jpg
Drilling out rivets can be annoying, however, I discovered a tip: When you have a stack of them on the bit like this one, grab them with a set of vice grips firmly. Keep a firm grip on the vice grips and slowly speed up the drill. The pressure from the vice grips will hold the inside of the rivet against the sharp edges of the bit, hogging out the hole and allowing them to fall off:
http://i25.photobucket.com/albums/c68/Badfish740/20140817_135335_zps742ab476.jpg
All aluminum parts off-just the bare hull:
http://i25.photobucket.com/albums/c68/Badfish740/20140817_135538_zps455354f9.jpg
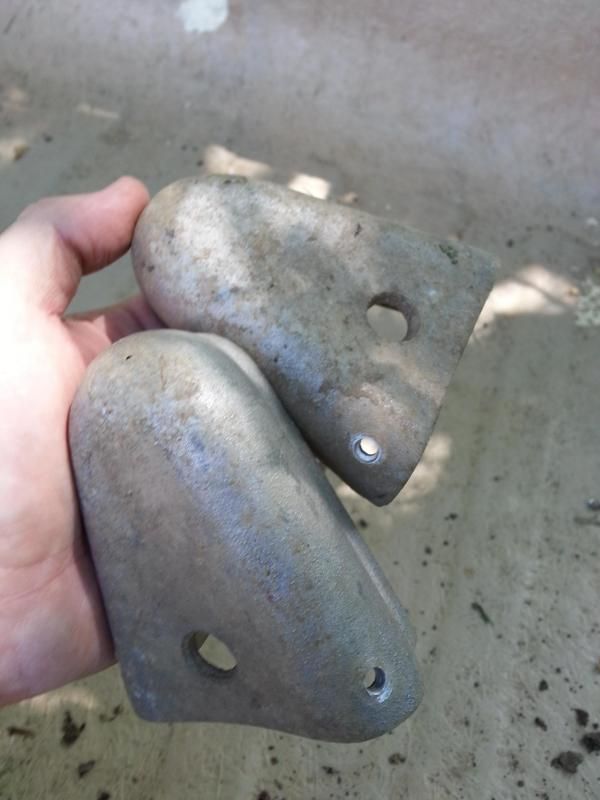
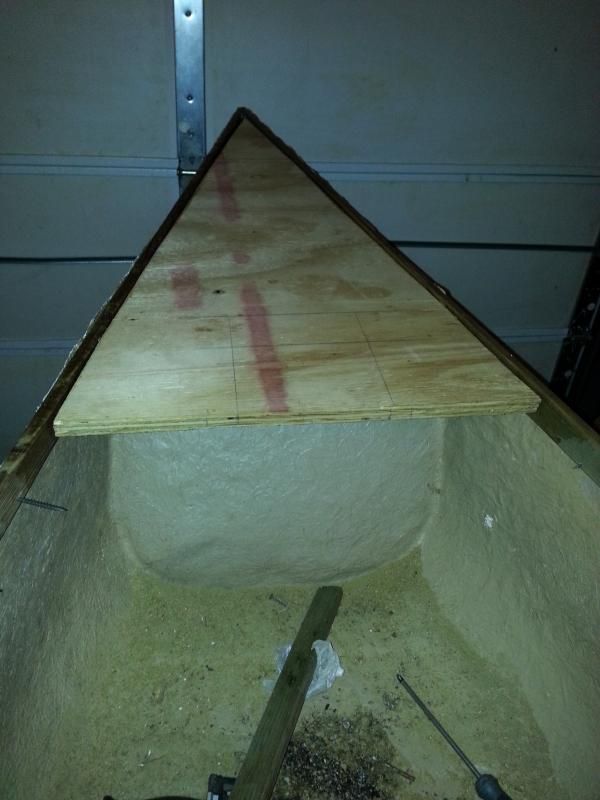
These cast stem and stern caps I'll save to be incorporated into the new gunwales:
http://i25.photobucket.com/albums/c68/Badfish740/20140817_135634_zpsc31e60bf.jpg
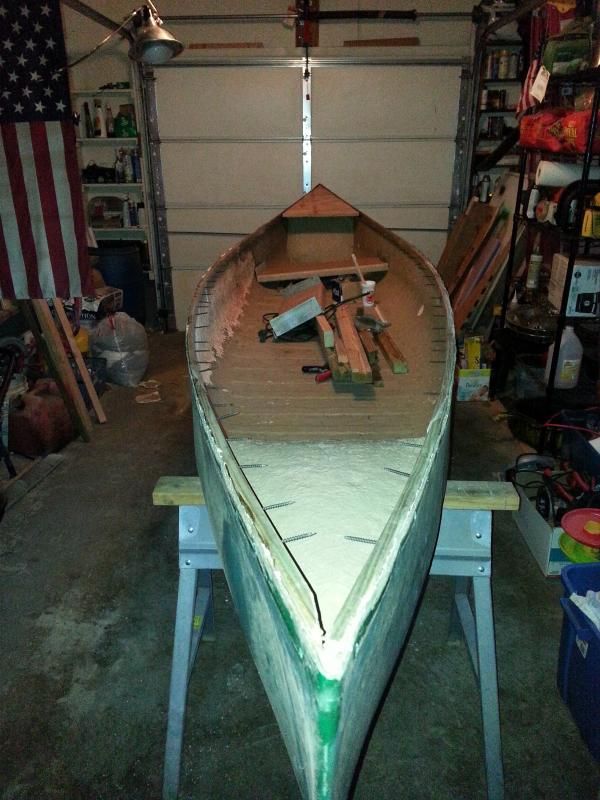
Measuring for a deck that will be the base for the motor mount in the stern. Two pieces of 3/4" CDX plywood will be laminated with a polyurethane glue to form a deck that will flush mount with the sheer. Once the new wood gunwales are on, those plus the deck will make the hull super stiff in the rear, providing a strong mounting point for the outboard-the old seat was clamped in place because with no thwarts or seats the sheers are very wobbly and I wanted to make sure everything was in alignment before I measured:
http://i25.photobucket.com/albums/c68/Badfish740/20140817_141431_zpsff4242c4.jpg
Other plans include a new paint job (maybe even some type of DIY bedliner material) inside, sanding out the gel coat and painting the exterior, and of course the new gunwales and thwarts. I plan to scarf the gunwales at some point this week with a router and a homebuilt jig.
Inwales scarfed, sanded and glued to the sheer:
http://i25.photobucket.com/albums/c68/Badfish740/20140824_193142_zpscfaf1b56.jpg
Drywall screws for clamping. They'll be removed before the outwales go on-the holes will be covered. At the stern you can see the plywood deck which the outboard mount will be secured to:
http://i25.photobucket.com/albums/c68/Badfish740/20140824_165910_zpsc0e9889e.jpg
After cutting the shape from 3/4" CDX plywood I installed cleats on the underside with glue and screws. The athwartship cleat will serve as the mounting point for the thwart that the outboard will hang from. The two fore and aft cleats just serve as blocking for screws to bite into, making sure that the deck is well attached to the sheer. After assembly, it was coated liberally with Titebond III wood glue, which will seal against moisture. The topside will be coated with TBIII as well and then topcoated with black latex porch paint, as will the gunwales, thwarts, seat mounts, etc...
Stern deck installed:
http://i25.photobucket.com/albums/c68/Badfish740/20140824_193215_zps4d35dc93.jpg
One of the neat things about getting rid of the old banged up and crooked aluminum coping is the fact that the boats lines really show now. It should look really nice once the outwales go on. I'm planning on going with a hunter green porch paint on the hull and have been reading up on how to do a good roll and tip paint job. It should look nice on the sanded gel coat.