Royalex Repair (2 issues)

I recently purchased a well used Old Town Penobscot 16 (Royalex). It came with a couple of issues, any advice would be much appreciated…
The first issue I need to deal with is damage to the royalex material. A previous owner had covered up some extensive wear with some rather rough skid plates. On the stern skid plate one edge was slightly lifted and pulling with my fingers I was able to remove about a 6 inch section of the skid plate revealing damage through to the foam core.

It appears the previous repair was done building up the damaged area using some sort of resin (no cloth) and then the skid plate applied over the repair.

I removed all of the skid plate and resin filler to reveal quit a bit of damage all the way to the foam core. Which is where I am now.

The cloth for the skid plate was fairly well adhered to the vinyl skin, but not so well to the resin filler or ABS. I assume this would be related to surface prep?
My thoughts are to repair the damaged material, using G-flex and S cloth. So some questions:

  1. Would is be best to build up the area using G-Flex and S cloth, or would just using thickened G-Flex be just as good?
  2. If using S-cloth would I use thickened or unthicken G-Flex?
  3. Or put thicken G-Flex on first, let it be absorbed by the foam, the proceed with S-cloth wetted out with G-flex (thickened or not thickened?)
  4. Any idea how much G-Flex I would need. G-Flex is not inexpensive, so I don’t want to buy a lot more then I need, but I don’t want to run short if I am wetting out cloth.

On to second issue:
There is a large dent or deformity, approx. 14" by 5" on the hull.


I have read that royalex can for heated and manipulated back into shape using heat. The suggestions I’ve read call for using hot water or a heat gun. If using hot water are we talking about hot tap water. Such as connecting a garden hose to a utility sink facet, or are we talking pots of boiling water dumped on the subject area? If using a heat gun are we talking a hair dryer blower, or a paint stripper heat gun? Or is there a better way to heat the area? Any suggestion oh how best to manipulate this area back to its proper shape?

Any suggestions or comments on how best to deal with these issues would be much appreciated.

You sound well informed.

Regarding your first question. What was recommended to me in this thread:

https://forums.paddling.com/discussion/2936942/skid-plate-prep-work-on-damaged-bow

was to use G/Flex thickened with silica powder to fill out the missing foam core, then use two layers of S-glass cut on the bias with unthickened G-Flex to replace the missing ABS. Your number 3)

Before G Flex became available, people used conventional epoxies to repair Royalex and often used urethane adhesives to apply Kevlar felt skid plates. These agents often had weaker adhesion than was to be desired. A repair would sometimes look OK for years, then the entire thing would flake off. It is very common to find old Kevlar felt abrasion plates poorly bonded to Royalex canoes.

In your second photo, it looks as if you still have some of the old Kevlar felt material stuck to the hull at the front end of the area of exposed foam core. I would get that off before doing anything else. Sometimes it is necessary to sand off segments that are well-adhered.

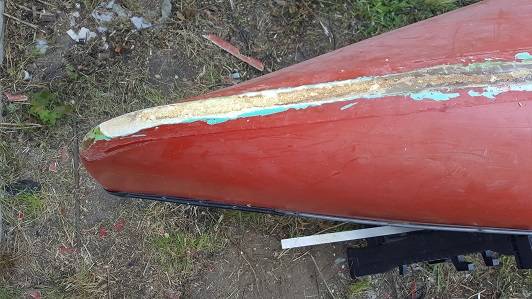
You are probably aware that the red areas are where the outer vinyl color layer is still intact. The green (discolored in some areas by the prior repair) are areas where the outer solid ABS stratum of the Royalex is still present, but may be thinned out. The almond-colored areas are exposed foam core.

As for repairing dents and deformations, I have never had much luck with Royalex. It works better for single-layer polyethylene hulls. By the time Royalex is significantly deformed, the foam core is usually compressed, crimped, broken, or deformed in such a way that it will not return to a normal configuration. Local application of heat with a heat gun or hair dryer can potentially apply enough heat to further crimple the foam core if you are not careful. Unfortunately, that can occur very quickly without much prior warning.

You could try putting the boat out in the sun on a hot day and filling the interior over the dent with very hot water. It would probably need to be simmering hot to have any effect. Sometimes it helps to position a thin, flexible board inside the hull over the dent and "“jack” the area of indentation out by clamping one or two 2x4x crossways to the gunwales with C clamps, the driving an appropriate sized stick in between the flexible board and the cross pieces. I did something like that during the repair of a Royalex canoe for which I made a photo album of the process that I will post a link to later. If you have an indentation that is really bugging you, you can fill it in using multiple concentric patches of fiberglass cloth but it will increase significantly the time required for the repair and cost of the materials.

As for repairing the areas in which the Royalex is eroded and applying abrasion plates, here is a link to a thread on another forum that is a long read, but may save you some time in the long run if you at least go through part of it:

http://www.canoetripping.net/forums/forum/general-paddling-discussions/diy/17299-​skid-plates-an-evolution

For the purposes of filling in the areas of missing ABS where the foam core is exposed, and covering it with an abrasion plate, a couple of yards of S cloth (6 ounce/square yard weight) may be sufficient. You need to measure the area of damage to be certain. You will want to cut the longer pieces for the abrasion plates on a bias so you will get a little longer patch than the length of the material you buy. It is possible that the kits of G Flex epoxy that come with 4 ounces of resin and 4 ounces of hardener will provide enough epoxy for the repair, but I can’t guarantee it. If you want to fill in a dent, you will likely need more. There are several such kits sold by West Systems. If you do not already have silica powder, I would start out with a 650-K kit. These are labelled “Aluminum Boat Repair Kit”. Ignore the aluminum bit. The 650-K kit comes with unthickened resin and hardener which is definitely what you want for wetting out cloth. It also has silica powder which you will want to moderately thicken the epoxy for filling in the areas where the foam core is exposed and the outer solid stratum of ABS is missing or thinned out.

If it turns out that you need more epoxy, West Systems also sells a 650-8 kit, which comes with only the 4 ounces of hardener and 4 ounces of resin, and no other materials or do-dads. Before filling in the areas in which the foam core is exposed, check and see if there are areas in which the green, solid ABS has delaminated from the core and is overhanging it significantly. I would remove any loose material. If there is a little bit of overhang of delaminated ABS over the foam core, you may be able to inject epoxy beneath it and into the crevice using the dental syringes that come in the 650-K kit. Mix up small batches of epoxy and moderately thicken it with silica powder. The silica will make the epoxy a better “glue” and will thicken it enough to resist running and sagging somewhat. Position the boat so that gravity assists you filling in one area at a time. You want to completely fill and slightly overfill the areas similar to using wood putty, then sand the excess fair and flush before applying your cloth. The epoxy will settle into the interstices of the the foam core, so you will need to make multiple applications. As soon as the epoxy has set sufficiently that it will not run, you can apply more or reposition the boat to fill another area.

Once you get the eroded areas filled in, built back up, and sanded fair and flush you can apply your first layer of fabric. I would make the patch large enough to completely cover the areas in which the foam core was exposed and the green ABS stratum thinned out or replaced, and overlap the adjacent intact hull be at least an inch. To fully fill the weave of 6 ounce fabric will often require a second application of unthickened epoxy. Once that first patch has fully cured, you can feather the edges of the patch and then apply an abrasion plate over the entire area.

Here is the photo album that shows a repair of a Royalex canoe that included filling in a dented area, applying a keel strip, and applying abrasion plates. If you click on individual photos that are of interest to you, there will be a caption explaining the process:

http://www.flickr.com/photos/42020723@N02/albums/72157657942924708

@pblanc
Thank you for your input and links. They are much appreciated. I have read the canoetripping “skid plates an evolution” post several times. It and the post for melenas repair he linked above have been the base for what I have done so far.

The original skid plate was a cloth, not kevlar felt, but that doesn’t much matter now.
I have removed all of the original skid plate and remove any cracked ABS. There is no more loose ABS over hanging the foam. I have removed the vinyl 1.5 to 2 inches back from the damaged foam core. I have sanded the ABS with 80 grit and used a wood chisel to bevel the edge of the ABS where it meets the foam core, and wiped it down with denatured alcohol. There are some brown areas in the ABS substrate. Are these a problem, should I remove this area of ABS? See photo below. This is where I am now.

I think I am ready to start building up the foam core, but have a couple of additional questions:

  1. The foam core will need to be build up approximately 1/16 of an inch in at least one area. Would it be advisable for me to use 6 oz cloth in the area or will thickened G-Flex be sufficient?
  2. Would you advice using peel ply? And can peel ply be formed over a curved area. I was under the impression that it was for flat surfaces and would not form to curvatures. ( I think I read that on the CLC site.)

Thank you for the information regarding how much epoxy might be needed.
I will let the dent go for now, but much appreciate your input in regards to it.

@melenas said:
You sound well informed.

Regarding your first question. What was recommended to me in this thread:

https://forums.paddling.com/discussion/2936942/skid-plate-prep-work-on-damaged-bow

was to use G/Flex thickened with silica powder to fill out the missing foam core, then use two layers of S-glass cut on the bias with unthickened G-Flex to replace the missing ABS. Your number 3)

I am only well informed because of the advise provided to you and other posters concerning royalex repair by the very knowledgeable people on this forum. I think I have read every post on this forum concerning royalex repair and skid plate installation going back 4 or 5 years. I hope your repair came out satisfactory. This will be the first time I have worked with glass and epoxy and am a bit intimated by it, but also somewhat enjoying it. Hopefully I can do a structurally sound and not a butt ugly repair.

I don’t know what the brown areas are. I would probably try to make them go away by sanding them if possible. Otherwise, it looks as if your preparation is good.

Fiberglass and resin will always be stronger and more rigid than resin alone, but 1/16 inch is not all that thick to fill in with thickened resin. If you already have some fiberglass it won’t hurt a bit to cut a piece to go in the deeper areas you need to fill. Some folks mix cut up fiberglass fibers and mix them into the epoxy, but I really don’t believe that cut up, short pieces of fiber add much strength.

You can use peelply on any surface. However, it will pleat going around a tight curve. Most aramid and fiberglass fabrics used for repair are loose, open weave where the fibers of the warp and weft can move relative to each other, so you can horse it around some pretty tight curves without pleating. Peelply is a tightly woven material that won’t do that nearly as well. I have used peelply to apply abrasion plates around curved stems, but in order to get it to lie flat you may need to cut some darts out at the edges. You will probably have a line or some uneveness to sand out where the peelply has overlapped.

@pblanc
Thanks for the input. Since I have to order fiberglass for the repair anyway I think I will probably cut a small strip to use in the deeper area that needs filled. I’ll make a final decision on this after I work a little with the thickened G/fex. I will be ordering the materials on Monday to get started on the actual repair.

If you have not already purchased S fiberglass, a good source is Sweet Composites. I have used a good deal of their style 6533 6 oz./sq. yd. S Glass fabric. Since it comes in 5 foot widths, you can cut quite long patches out of a piece a yard long, especially if your patch is cut on a bias to the weft and warp.

http://sweetcomposites.com/Fiberglass.html

Sweet also sells the 650-K and 650-8 G Flex kits as well as the much larger 32 ounce total (16 ounce resin and 16 ounce hardener) 650-32 kits. Their prices are just about as good as anywhere else, so you might use them to buy G Flex if you are already buying cloth from them to save on shipping costs:

http://sweetcomposites.com/WEST.html

G Flex is significantly more viscous than conventional epoxies. Depending on ambient temperature, it may be as thick as honey. You need to be patient when wetting out 6 ounce fabric as it takes a while for the resin to saturate the fibers. It is often necessary to go back and apply a bit more epoxy 15 minutes or so after you initially wet out the cloth to make sure the fibers are fully saturated. Fortunately, with G Flex you can very quickly mix up batches of any size down to very small, since you can mix it 1:1 by volume by eye.

If you want to speed up the process and make the epoxy less viscous, you can warm the mixed epoxy a bit with a hair dryer or heat gun. You can also prewarm the surface to which you are applying the epoxy, and waft a hair dryer or heat gun over it after application. Warming the epoxy will decrease the working life, but this is usually not a problem with the size patches you will be applying.

I was planning to purchase most everything from Sweet Composites. So far they are the only source that I have found for 6-oz glass cloth, and all of their prices are reasonable. It looks like for the length that I need (54") and cutting on a 45 bias that I will probably have to get 2 yds of S-glass fabric. I will have a bunch left over, but such is life. Once I have this repair finished, I will probably pull off and see what is under the skid plate on the other end of this boat, so I will use some of it for that, and it wont hurt to have it on hand for future projects. The nylon fabric they list for peel ply doesn’t specify that it is treated with a release agent, so for peel ply I may order from CLC. Are there any alternatives to using nylon cloth peel ply? I seem to remember reading someone suggesting that wax paper could be used. When using peel ply (treated with a release agent) do you wait for the epoxy to cure before removing it? I understand if using untreated peel ply it should be removed before the epoxy cures, at a point the fiberglass doesn’t pull up, but the epoxy is still somewhat “green”. Is my understanding on this correct? Also, does the G/flex have a decent shelve life for any unused portions that are left over. If it has a shelve life, I will order both the 650-K kit and the 650-8.

West Sytems release fabric (peel ply) is what I have always used so I can’t offer any advice on alternatives. My practice has been to apply the peel ply after I’ve made all the final touch ups to the epoxy; pushing loose strands of fabric into place, etc. Using a plastic scraper, I smooth the peel ply so that it is in continuous contact with the underlying fabric. You will be able to see the peel ply absorb the excess epoxy as it darkens as you press down with the scraper . Try to avoid using sections of peel ply with folds in the fabric otherwise the fold line will replicate itself in the underlying fabric.

I let the peel ply cure with the epoxy over night and pull it off the next morning. I’ve always been afraid that pulling it off too soon might take the f/g or dynel off with it. I’ve never had a problem using the overnight (8-12 hours) waiting period.

GFlex has decent shelf life. I’ve got 2-3 year old product that still works fine.

@Waterbearer
Thanks for the information on the application of peel ply. I haven’t really understood how to best apply it. Have you had success with using West Systems release fabric over the stem curvature of a canoe without folds or cutting darts? I understand if I have to cut darts or have folds in the fabric that I will have to sand out any lines left. Good to know about the G/flex shelve life. Much appreciate the information.

After quite a few tries at getting fabric and peel ply lie lie flat on the hard curves of the stem, my best results have been to keep revisiting the project as the epoxy sets up and repeatedly flatten the fabric to the hull with a popsicle stick. Early on pushing down in one spot will have fabric rise in another spot. But as the epoxy stiffens into a cure you will be able to get most all of it to lie flat. Patience and frequent revisits are the key.

On really difficult curves that continue to bulge up, despite my determined efforts, I will cut the fabric bulge on its high point to create two flaps that will overlap each other as you get them to lie flat. When it cures you notice this in your finished product.

The transition area from skid plate/epoxy to hull has never finished perfectly smooth for me and I’m too lazy to fair the edge. If I want a cleaner look, after the peel ply is removed I will apply blue painter tape to both the skid plate and hull leaving only the transition area exposed and spray paint black (my skid plates are black) the irregular transition area. Textured Rustoleum is a nice complement to the finely pebbled peel ply finish

Most epoxies actually have a pretty long half life, although the hardener often turns reddish. I don’t know specifically what West Systems advertises as a shelf life for G Flex but you can call their technical support staff and find out. Technical support at West Systems is very good, which is one reason I favor their products even if they cost a little more. I know that I have used G Flex that is at least 2-3 years old with no issues.

The nylon fabric sold by Sweet Composites is not treated. It will work as peelply but if you leave it on too long it will be very difficult to impossible to remove. How long it can be left on will depend on what epoxy you are using, as well as ambient temperature and humidity. You can only determine it by trial and error. Try pulling up the edge of the cloth after and hour or so and see if the fabric lifts. If it does, smooth it back down and wait longer.

It is unquestionably easier to use treated fabric. I have head that the material sold by West Systems is very good. I have personally used a treated nylon release fabric sold by Jamestown Distributors that works very well. It is blue in color and can be left on until the epoxy is pretty fully cured. It is hard to find on their site because it does not appear if you search for either “mold release fabric” or “peelply”. It is listed under their “Vacuum Bagging Supplies” section and can be found here:

http://www.jamestowndistributors.com/userportal/show_product.do?pid=3754&familyName=Vacuum+Bagging+Release+Fabric

Jamestown Distributors also has a pretty good price on the G Flex 650-K and 650-8 kits:

http://www.jamestowndistributors.com/userportal/show_product.do?pid=336316&familyName=WEST+System+G%2FFlex+650-K+Aluminum+Boat+Repair+Kit

http://www.jamestowndistributors.com/userportal/show_product.do?pid=8694&familyName=WEST+System+G%2Fflex+650+Liquid+Epoxy

If you are planning to use a least two layers of cloth to cover the damaged area, I would cut one layer on the bias and one along the line of the weft and warp of the cloth. This will provide for the maximal number of fibers crossing over the area of repair. I probably would not bother with peelply on the first layer but just feather the edges of the first patch when the epoxy cures, then use peelply on the final layer. But if you really hate sanding fiberglass (because of the itch or other reasons) using peelply will reduce the amount of sanding you need to do.

As waterbearer said, fully wet out your cloth and then lay the peelply over it. You don’t want any air bubbles trapped under the peelply and these will show up as white areas. You may need to apply a little more epoxy over the peelply to get rid of them and make sure that your repair fabric is not resin-starved. Use your squeege to smooth any excess epoxy out the edges of your repair fabric onto your masking tape. This will smooth out the edges of your repair fabric where the cut ends of the fibers would otherwise have a tendency to swell up. I find I do wind up using a little more epoxy when using peelply, but the difference is not very great.

I used the peel ply from Sweet Composites and pulled it the next day without problem, maybe 12-16 hours after putting it on. I was careful, applying even pressure etc, like peeling a sticker without ripping it.

Express Composites is another source.

You can mostly iron out peel ply wrinkles with an iron and towel.