Hello!
I just purchased my first (new to me) canoe, a Old Town Penobscot 16 (royalex) and I’m couldn’t be more stoked about it. I appreciate the countless reviews and posts I’ve already read on there that helped me pick the Penobscot (for slow river trips, some lakes, for camping and day trips solo and with a partner) and get started on repairing the seats.
I’ve been browsing earlier threads about royalex repair, but would love to have some more experienced eyes on the spots I’m looking at so far just to be sure I go in the right direction.
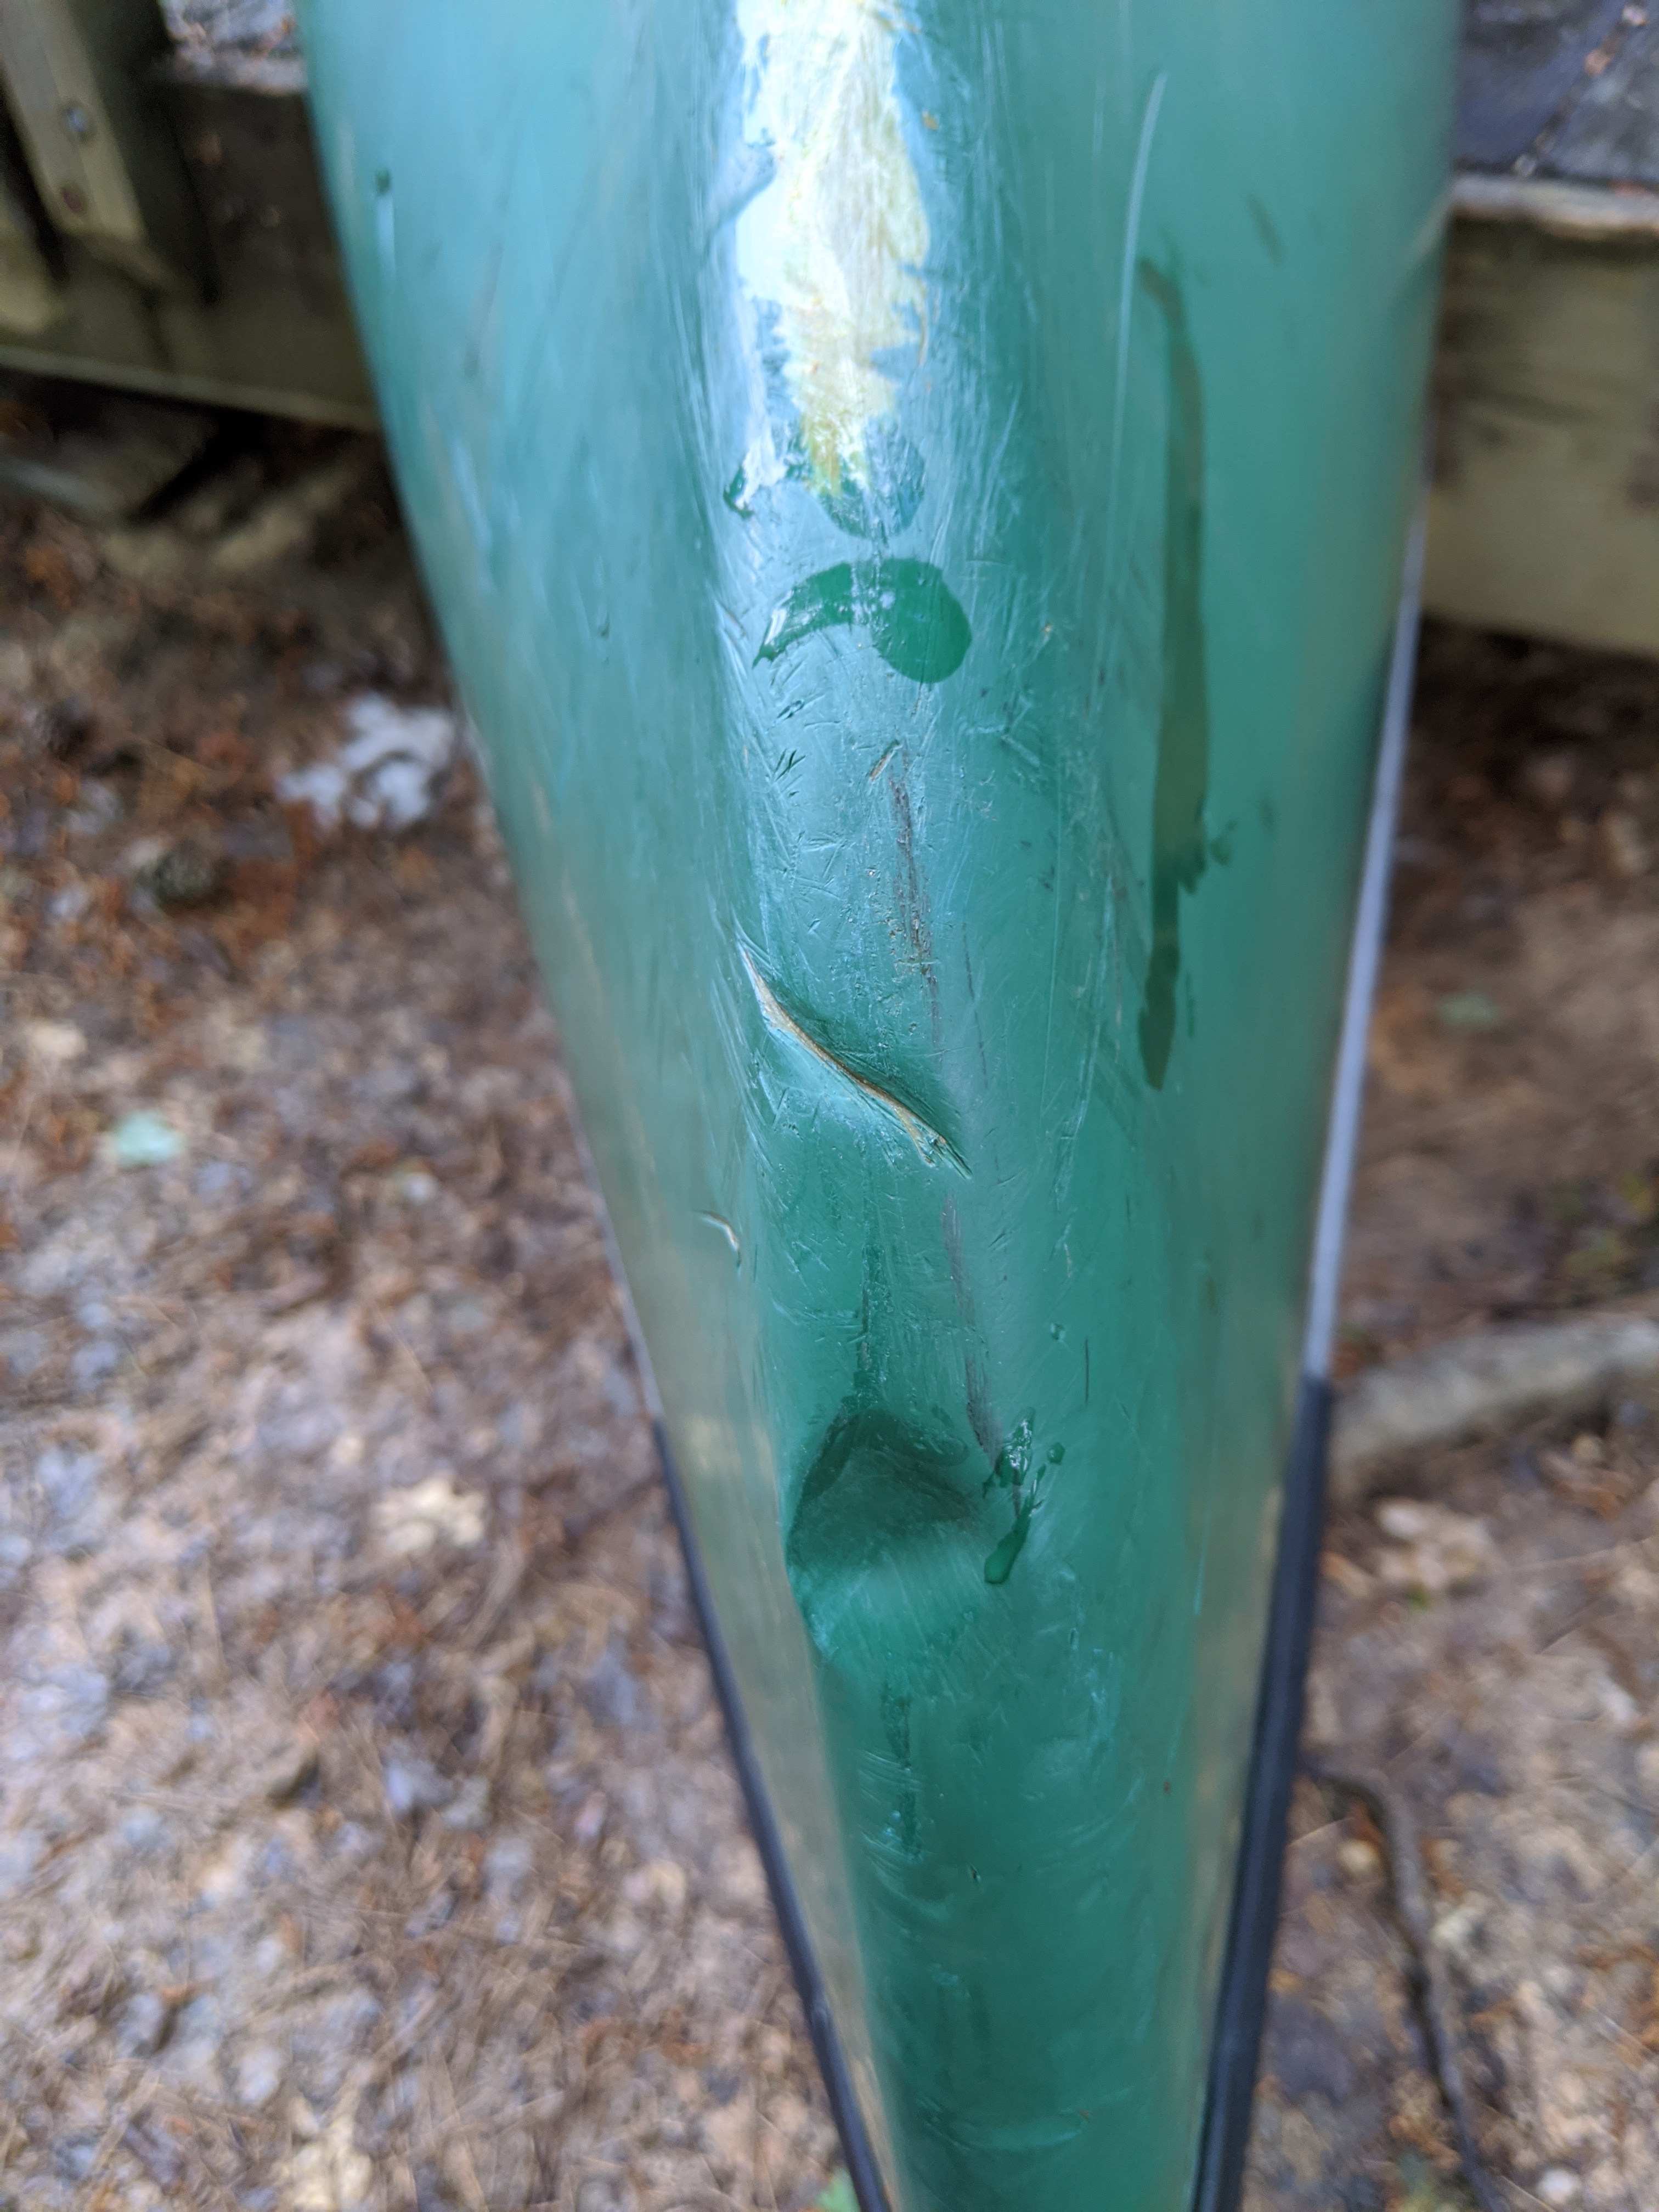
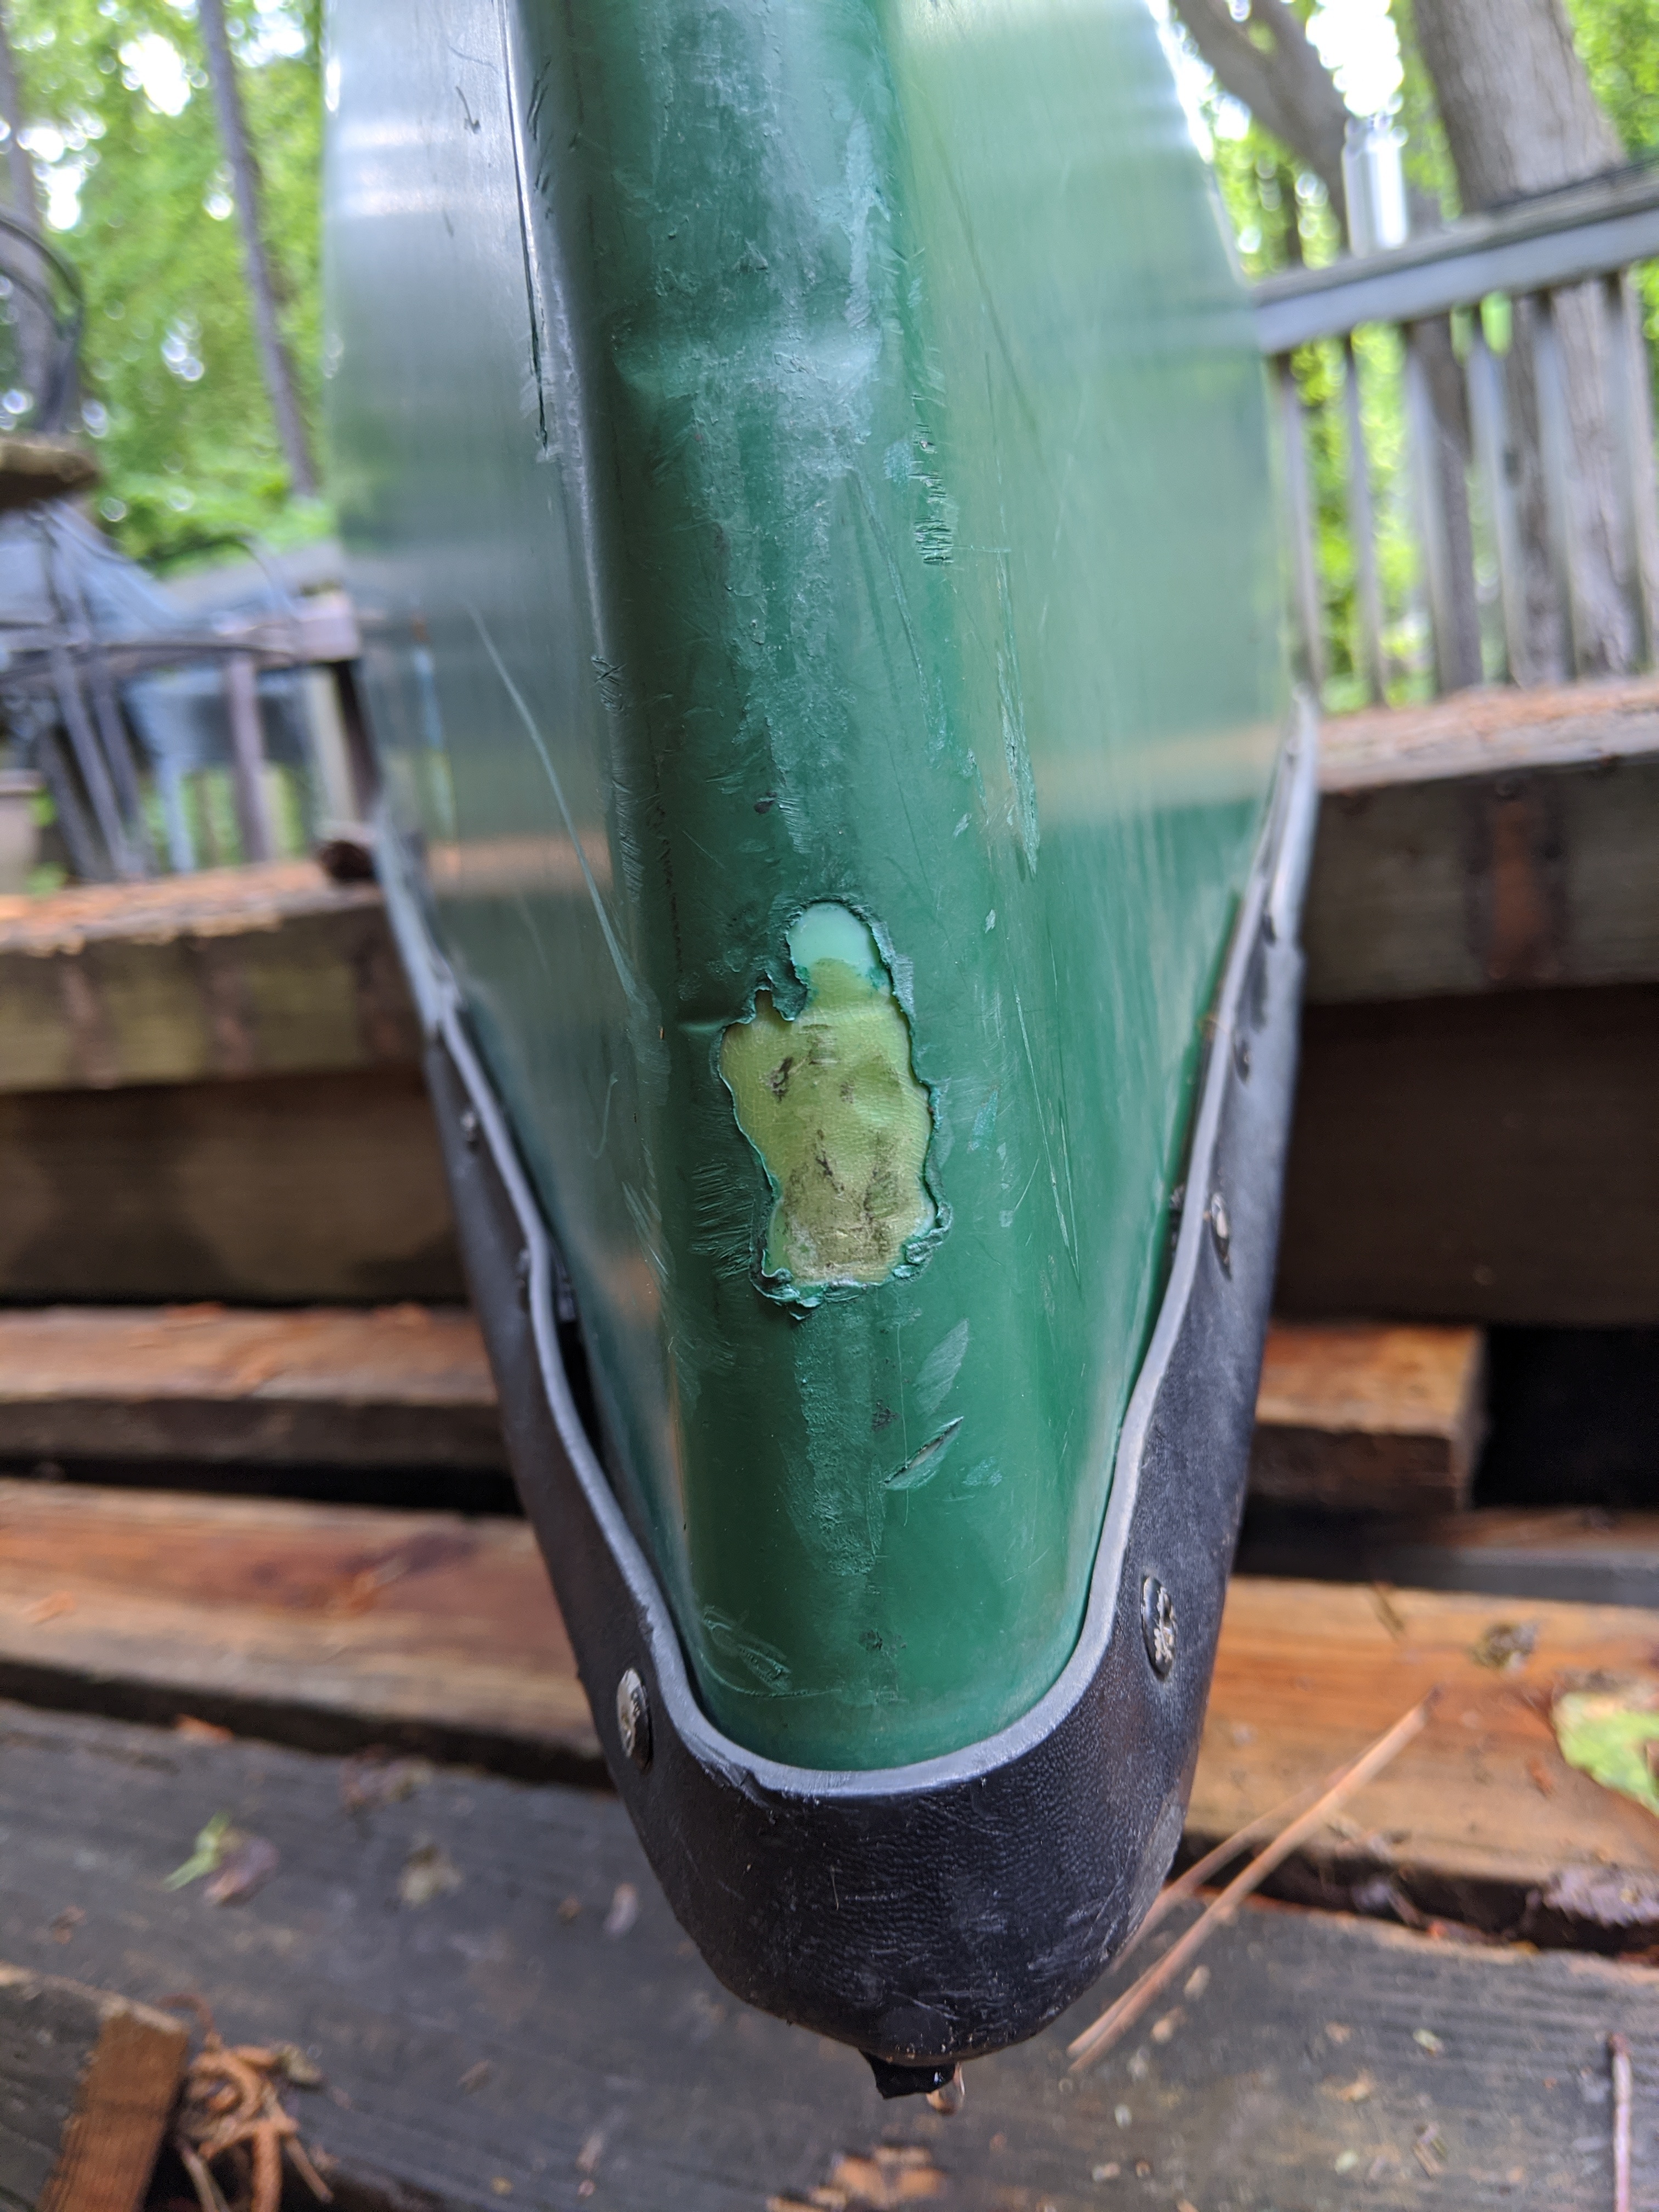
As you can see from the pictures, there’s a lot of wear on each side in the area where a skid plate probably belongs eventually. I think if might have worn to the foam in these spots (since it’s almost white in the middle, and maybe feels a little softer. It doesn’t feel like a lot of the foam has been damaged or worn off, but I could be wrong. My biggest question is, what would you all do in this area? Paint… filler… skid plate… or some combination of those things?
Besides that, I’d be curious what you all would recommend for some of the other damage spots in the pictures. Do the dents at the sterns, or on the hull (that look like they’re from being strapped down too hard) seem like they could be worked out with some heat? How about the handful of other nicks? I should say, none of the damage is shows through on the inside of the boat.
If you have an opinion about a specific product for any of the repairs you’re suggesting, I’d love to hear that as well.
Thanks so much. I hope to be half as helpful to someone else in return one day.
I really can’t tell from your photos whether there is exposed foam core anywhere. I don’t see any obvious evidence, but I can’t rule it out, especially in that area that has a cobblestone appearance.
I agree with Rival51 that the dents and gouges are really cosmetic and won’t affect structural integrity of the hull or performance in any way. You could fill in the deep gouges if you wish.
I also agree that the first thing I would do is clean the hull up. Remove any colored vinyl that has raised up off the underlying ABS by slicing it off with a sharp knife. Then go over the light colored areas where the vinyl has been abraded off with a scrub brush, soap, water and rinse it well.
Royalex is a five-layer sandwich. The blue exterior and gray interior layers are vinyl that is bonded to the underlying ABS material. The ABS layers provide the structure and strength of the hull. The vinyl is there because it looks good, it protects the ABS layers from ultraviolet light degradation, and it provides a little bit of abrasion protection. It really doesn’t provide any additional strength to the hull.
The ABS skeleton has three layers. The inner and outer layers are solid strata that vary in thickness at different points in the hull, being thicker at the stems. The interior layer is the “foam core” which is an ABS material that expands when the Royalex is heated up in an oven before being drawn over a male mold when the hull is formed. It is a thermoset material that retains its Swiss cheese-like structure when the Royalex cools.
The foam core is usually pretty easy to recognize. It is possible that some former owner might have applied some type of goop over areas of exposed core in the past. When you clean up the hull, I would try to remove anything that does not seem to be well attached to the underlying hull material. If you don’t see any exposed foam core but the hull surface seems spongy to strong thumb pressure then the outer solid ABS layer has probably been thinned out by abrasion. In that case I would apply a fiberglass patch over it.
If there is exposed foam core I would fill all the voids in with moderately thickened G Flex epoxy, let it cure well, sand the surface smooth and fair with the surrounding hull, then apply a fiberglass patch. You could also then apply abrasion plates of either fiberglass or Dynel over the worn stem areas.
If you need more information regarding source of materials are details of how to proceed please clean the hull up as best you can, take some more photos of the damaged areas afterwards and post them in this thread.
Thank you both very much for taking the time to respond and offer some help @rival51 and @anon64780766. With your direction and reading lots of other threads, I went ahead and bought some g-flex and s-glass as well as some fusion spray paint for later on. I was all set up to get started on the skid plate last night, and I realized that I’d want the cloth to go over where the large dents are on both ends (you can see both of these in my pictures, one is bigger than the other). I was worried the fiberglass might lay poorly with those dents, so I got started on drying to smooth them out. First I tried the heating it with a hair dryer to soften them enough to push out, but didn’t have any luck (I don’t have a heat gun). Then I decided to just try to fill them in with the g-flex. The problem is, since they are both on the tip of the bow and stern (not sure if there is a name for that edge) it’s super hard to position the boat so that the epoxy will sit flat with gravity unless I somehow stood the canoe up on one end and used a ladder, so I angled it on a hill as best as I could, and sat there for an hour pushing the main gob of resin pack up the slope, until it hardened up a little, but of course it still slid down more after I left, and the dent is not totally filled. Now with the bigger dent partially filled, both dents have about the same size hole…
My question for you guys is, how concerned would you be with having everything smooth/flat before adding the fiberglass later/skid plate? If the dents on both sides are about the size of the one in my last picture, would you put the plate over that, or do another layer of attempted dent filling? (I’m anxious to be done with it and get this thing back on the water, but don’t want that to stop me from doing a quality repair.)
You can thicken G Flex by adding colloidal silica powder (cab-o-sil) which will increase its viscosity and reduce somewhat its tendency to sag or run. I have never had much luck trying to get dents out of Royalex hulls using heat. A very broad-based “dent” like a pushed in hull bottom from a pin will sometimes pop out if the boat is left out in hot sun.
For a deep dent, I would fill it in by applying multiple concentric layers of fiberglass. Only a small amount of unthickened G Flex will be required for each layer of 'glass. Cut the first patch to match the outline of the dent, apply a thin layer of G Flex to the hull and apply the patch, then thoroughly wet the patch out with more G Flex.
Then apply concentrically smaller fiberglass patches. The next patch can be applied over the preceding one as soon as the epoxy for the prior patch cures to the point at which it is solid enough to remain in place. Continue this process until the dent is filled it. Vary the orientation of the fibers of the cloth for each patch.
You may need to do a bit of shaping by sanding the cured epoxy to achieve a surface that is fair and flush, and to restore the natural curvature of the hull’s stem. Fortunately, G Flex sands quite well after it has cured. You can overfill the dent with G Flex and 'glass and then sand off the excess to restore the natural convexity of the stem. For narrow gouges, just fill them in with epoxy and skip the fiberglass.
G Flex can be mixed up in batches of any size by simply mixing what appears to be equal volumes of resin and hardener. In order to avoid wastage, keep the batches small in size because you can mix up a new batch very quickly. Epoxies also generate exothermic chemical reactions so a big batch can heat up enough that the pot life becomes so short that you can’t get all of it applied before it “kicks”.
Just wanted to give you all an update and thanks one more time for your replies and comments in other threads that helped a lot. I ended up finding some q-cell in a surfboard repair kit I had along with a flexible plastic square (kind of like laminated paper) that worked really well to tape on top off the resin, to keep it in place and flat when filling the dents, and those things really did the trick on my second attempt.
I’m posting a few pictures of one of the filled dents, one of the freshly glassed skid pads, sanded skid pad, and painted, and a glamor shot with the seats I also redid.
I ended up following most of your steps @anon64780766 from another thread. I used s-glass and g-flex epoxy.
It was a lot more work than I originally expected (a lot more hours and supplies and beer) but I’m really happy with how it came out, I feel like it’s well protected for a while now, and I have more love for this canoe after all the sweat that went into it.
Very nice work. I am always much happier to see an old and basically irreplaceable canoe like that back out on the water as opposed to cut up and laying in some land fill. The Penobscot 16 is a really cool boat.