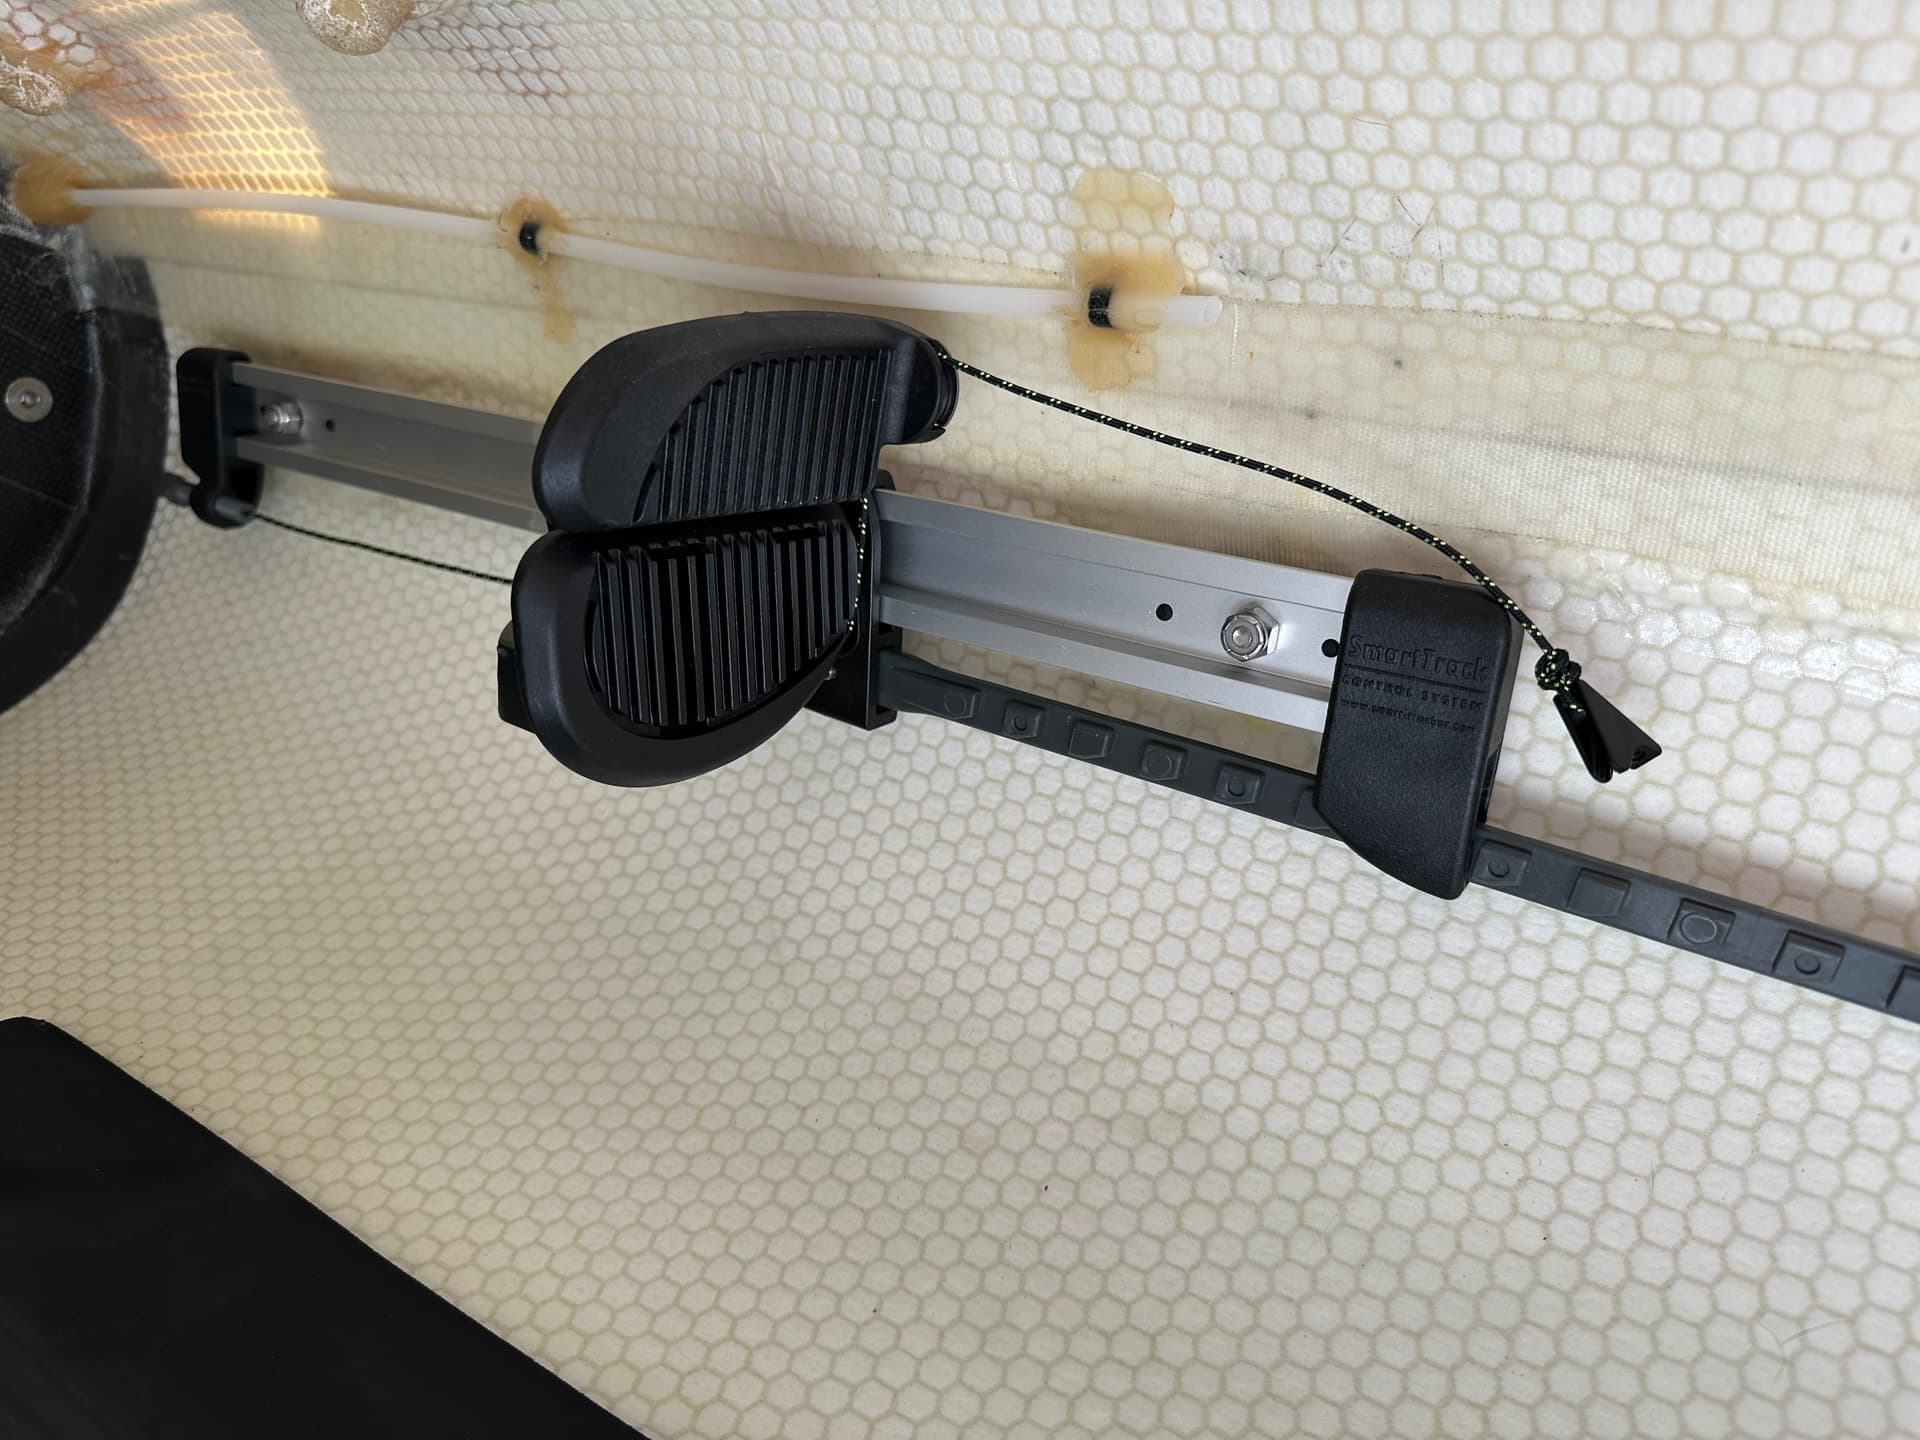
This is a followup to a previous post I made. I bought used Seda Glider that has a Smart Track rudder. I have never owned a boat with a rudder. This one looks differnt from the other rudders I have seen. It has a tiller bar on top and instead of using cable it uses a very fine string. The foot controls are strange as well, but I am replacing them with the standard Smart Track foot controls.
Can anyone tell me why this rudder has the tiller bar on top? Or why this rudder is run with string rather than cable? Is there some advantage to this?
In conjunction with replacing the foot controls I am probably going to run cable instead of the existing string. When attaching the cable to the rudder it appears that I could use the existing tiller on top or remove it and attach the cable directly to the rudder.
I’m not sure what the purpose of that bar is. I assume it is to widen the attachment points for the cable and therefore provide more leverage which may be an good thing, but it also just seems like something that could easily get hung up on something and break.
The rudder housing is typical of what is used on surf skis. Dyneema line is common instead of cable and works well in addition to being able to tie knots in it whereas cable usually requires crimping sleeves onto it. Far easier to adjust and work with. I have no idea why that monstrous bar is attached to the yoke. You’ll get leverage but exactly why…?
Okay, thanks. Maybe then I should stick with the dyneema line; however the Smart Track rudder foot pedals that I got are cabled. I would probably cut the cable down and make a loop in the cable to attach the line to. I will have to check out the knots to see if they are adjustable. It appears that they might be a taught line hitch which would allow for lengthenging and shortening the line without having to re-tie the knot.
Don’t know about that particular rudder, but I’d advise against the Smart Track foot pedals. My wife’s QCC600X came with the Smart Track rudder system. The way the cable is routed around the pedals apparently puts a lot of wear on the cables. We went through 2 cable sets before switching to the Sea-Lect pedal system on the advice of Annapolis Canoe and Kayak. So far the new pedals and cables have worked for years with no problems. The Smart Track pedal system is also constructed with aluminum components which corroded in salt water and were difficult to repair and remove as the fasteners were seized. The Sea-Lect pedal system is Injection Molded Polypropylene Fiberglass/Nylon and will not corrode.
I suspect the Dyneema line used was because the stainless cables kept breaking.
The Sea-Lect pedals are usually easy to install in place of the Smart-Track pedals.
Not that it matters much, but it looks like a trucker’s hitch to me. Basically there’s a loop coming out of the line (which can be removed if not needed anymore), and the tag end goes out to the leverage bar and comes back to the loop to tie off, and the loop provides leverage for drawing the line tight. I use it to tie down my kayaks. Dyneema is sailing cordage and excellent stuff; I use 3mm on my kayaks for skeg control line and 8mm for painters.
I agree with Marshall that the aluminum angle must have been added to increase the leverage, and when you remove it from the system you will probably find out why. But changing the pedal system might do away with the need for it.
What I’m curious about is the weak electrical ring terminal with the zip tie and the huge pancake washer. What’s that all about?
You could use some Micro Line Locks as at the end of the pedal cable as the adjustable cleat for the line. See picture of the hybrid SmartTrack brace and Line Lock on the ST19MOD I have here in the store.
If the OEM stainless cables kept breaking, which tends to occur with some of the Smart track pedal systems, the larger aluminum angle might have been added in an attempt to reduce the strain on the cables. Same reason for replacing the cables with Dyneema cord. The aluminum angle should not be needed with a better pedal system.
Most all surfski (and others) makers use cord instead of wire for rudder lines. It probably has nothing to do with SmartTrack pedals. The rudder housing looks modified with the extra wide tiller bar. The zip tie off to the washer thingy looks like a jerry rigged anchor/retainer for the rudder.
I am guessing the boat may be used in big waters and rolling. Some housings (“ski” housing for sure) are made to be removed easily by turning the housing to one side (and it slides right out). That “race” housing may work the same way.
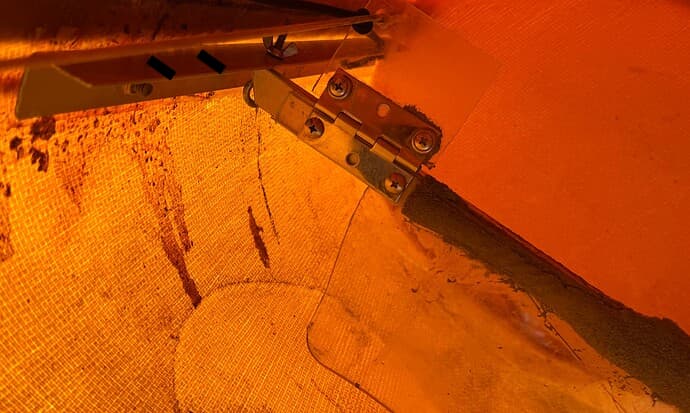
This is all starting to make a lot more sense. I think I figured out why it has that big tiller bar. The rudder has a weird foot pedal system that uses plexiglass “gas pedals” I imagine that is why the extra leverage is needed as a function of the lack of rigidity of the pedals.
It’s the pedals that are the problem. They are not adjustable for length and I got the boat from someone much taller than I am. Adjustment of the length is achieved by moving the pedals to a different hole on the metal bracket to which they are attached; however, there are only two holes for adjustment!
I would take the brackets out and drill new holes, but they are secured with a bolt adn nut rather than a bolt and a threaded nut integrated into the track. It will be a huge PIA to secure the nut on the one that is located near the bulk head.
My solution is just to replace them with a new rudder pedal system.
To complicate matters, the holes for the existing rail are not drilled at the standard 14.5 inch CTC. They are just a bit shorter. So I am going to have to fill the holes with epoxy and then re-drill. I had this problem when changing out the stock foot pegs on my older P&H kayaks to Yakima braces.
Here is a pic of the foot braces . If you look closely you will see the plexiglass gas pedals and bulkhead.
That is definitely a home built pedal system, neither a Smart Track or Sea-Lect system. Maybe they got tired of how the Smart Track system kept breaking cables or they were fanatical about weight. The tiller bar is probably to compensate for the flimsy plastic pedals.
I would replace it with a Sea-Lect pedal system. Fully adjustable and non-corroding. You could go back to the original attachment points on the rudder and get rid of the tiller bar.
I am going to replace the footpegs (which will require me to fill the existing holes and drill new ones).
I am going to get rid of the extended tiller bar and existing line system.
I found a cable / line clamp that Smart Track offers that allows you to adjust the line or cable length at the rudder attachment. I will use that.
DECISIONS TO MAKE:
I can use the exising cable that is attached to the foot pedals. Or I can purchase some 3mm dyneema cord and use that. The cable housings appear to be large enough to where I could thread it through; although this could be a PIA. I know that sometimes it is very difficult to thread flexible cord throught a tube.
If I do use the cord instead of the cable and have the adjustment clamps at the rudder attachment, do I ALSO need to use linelocks or something like that in the cockpit for adjustment?
I assume that would not be necessary but that it would allow for easier adjustment from the cockpit itself.
Thoughts / recommendations?
Thanks again for your help. I never anticipated having these issue when I bought this boat and rudders are completely new to me so I had no idea what they entailed.
Any reason to go with Smart Track pedals? Smart Track and Sea-Lect pedals both work perfectly with a Smart Track rudder. There’s nothing wrong with a Smart Track rudder itself.
3mm line may be too thick. The Stellar line (new stuff is really nice to work with) is 1.5mm. The SmartTrack Hybrid footbraces are super simple and you shouldn’t need a mid line adjuster or Line Lock if you are replacing the footbraces.
Yeah, the dyneema or spectra cord I have seen is labeled 1/16"…prob same as 1.5 mm. Also, can’t a person buy the smarttrack thingy (slab of abs plastic with holes) to move the pedal location without having to drill new holes. If you do drill, you only have to drill one adjustment hole per side, not two?
Oh wow. Thanks. I did not know that they made an adapter like that. I’ll have to look for it online. That would be nice not to have to drill new holes. And yes, I would only have to re-drill one set of holes
As I said, I had this happen with other books in the past. My guess is that some of them are thrilled based upon metric measurements, which are just slightly off from imperial as I assume they try to drill metric at an even number of centimeters just like with imperial we try to drill at an even number like 14.5. I was hoping I was not going to run into this problem again though. Lol.
OK, well I ran into another snag. I tried to remove the existing foot pegs, but they are a nut and bolt rather than having the bolt threaded into the foot rail itself. I was hoping this would not happen but when I turned the screw the nut turns with it and must be helped in place with a wrench
The problem is that I cannot reach the nut on the bolt that is closest to the bulkhead. It’s just way too far for me to reach with my arms.
I saw another post that someone recommended taping a box wrench to a pole. I could try that, but it sounds a little dicey. Anyone else have any suggestions on how to deal with this?
I have to say that this Kayak purchase is not turning out to be one that I am pleased with of course, buyer beware, but it was a reasonable assumption to believe that the Rutter petals would be adjustable in length. This is turning out to be a real PIA
OK game over on this one. I got one of the bolts out and now have realized that these freaking things are epoxied in.
This is ridiculous
My only hope now is if I can somehow drill new holes in this thing
The problem is that it’s going to be very difficult to do it while it’s in the boat. I have an angled drillbit thing that I can use, and I tried drilling holes in it already, but I can’t make a dent in the stainless steel.
I guess I can try different drill, bits and some drilling compound or whatever they call it, but I just don’t know if this is going to work
To drill stainless steel you need a cobalt alloy bit, low speed, cutting oil, and high pressure. If you spin the bit without it cutting into the stainless, but heating it up, you just make the stainless harder. A standard bit at high speed will burn up the bit in no time.
A box end wrench on a pole will work if you haven’t already stripped out the phillips head bolt. It is a 2 person job. If the phillips head is damaged, you can sometimes use a Dremel carbide cutter to enable the use of a large slotted screwdriver or, with great care, you can just cut off the head.
I’m assuming you are trying to remove the foot rails to replace them with a standard new pedal system.
I think that my onlly hope now is to be able to drill new holes in the existing rail without removing it.
I can get the right bits, but applying high pressure is the challenge. Since I can’t remove the existing rail I have to drill it while it is attached inside the kayak and must drill from the top or bottom. The only way to do this is to use a 90 degree drill attachment but it will be very tight quarters and very difficult to apply pressure unless there is some trick that I am not aware of.
Of course, I will give it a try
Here is what I have to drill into from the top or bottom
bowler1 - I assume the bar holding those foot pedals goes across the width of the kayak, so it’s a fixed length (not the mounting bar on the side, but the bar with the pedals). If so, you’ll be limited in how far you can move it back and forth because the holes to be drilled in the mounting bar have to match the fixed length of that foot bar. For example, the kayak gets wider as you move the foot bar back, so the holes have to be closer to the inner edge of the mounting bar.
It might be easier to cut slots in the mounting bar. The bolt with the wingnut could slip into the slot. I added two black lines to your photo to show the direction of the slots I’m talking about. It would probably also be easier to cut the slots with a angle grinder (go slow, watch out for heat) than trying to drill those holes.