Skid plate prep work on damaged bow

I’ve been meaning to put some black Dynel skid plates on my Royalex Mohawk Odyssey at some point, following the excellent instructions by Mike McCrea and PBlanc at

https://tinyurl.com/y8ls4akc

Now, I hit a rock pretty hard and head on on a camping trip over Christmas, damaging my bow, so I have to do it right away.

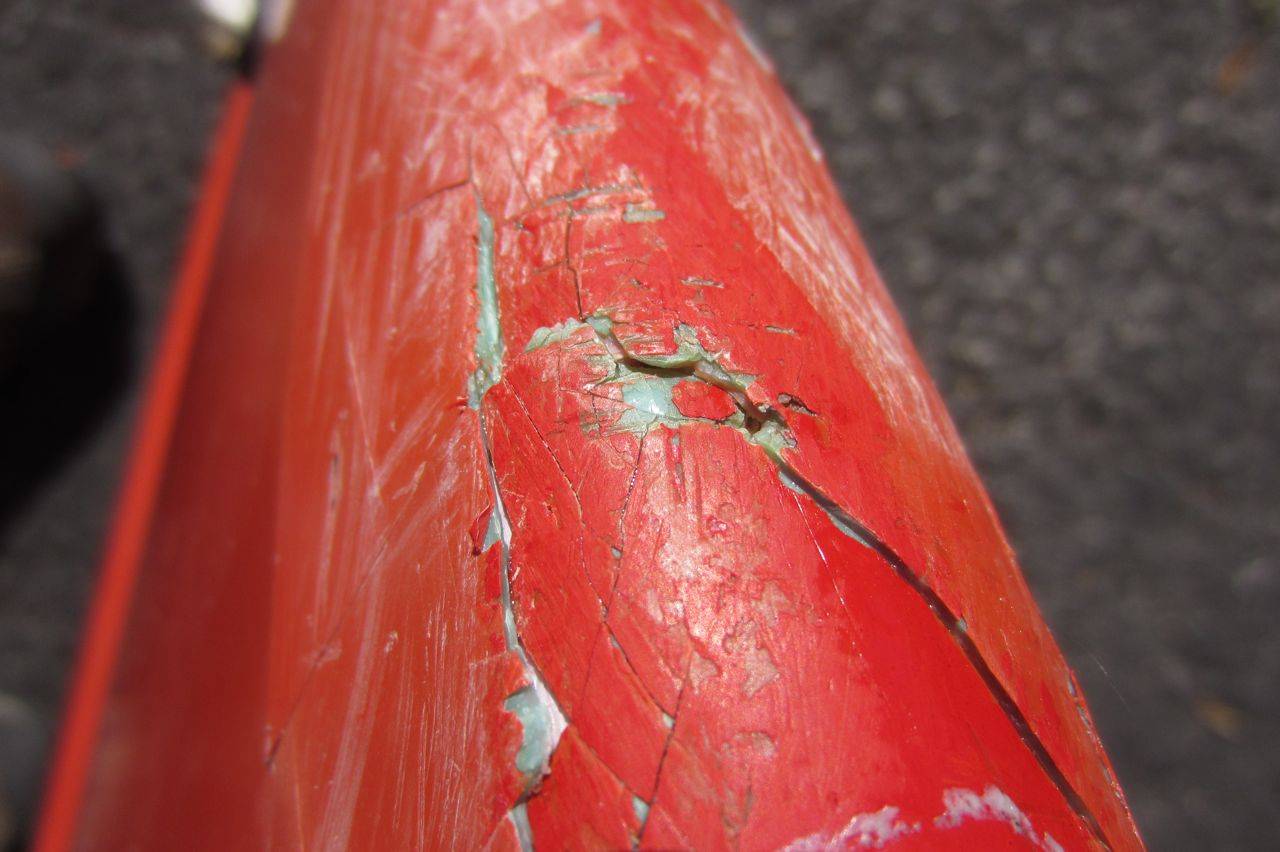
At least the outer vinyl layer and ABS layer cracked. I don’t know about the inner foam layer, but I suspect it’s cracked as well. There’s no damage visible from the inside of the boat. Here are a couple of photos:


My questions: Can I save the boat with a skid plate? What prep work do I need to do to the damaged bow before I can follow the instructions mentioned above?

You can certainly save the boat. The only question is how much time, money, and material you want to invest. I have seen Royalex boats which had the entire bow stem ripped off, fixed and returned to the water, although they never looked quite the same.

It looks as if the area of damage is larger in extent than what would be covered by the size of what most people think of for a skid plate. I would worry about fixing the cracked area, then put whatever size skid plate you want over the repair.

Is there any visible damage on the canoe interior opposite the external damage? I have seen Royalex boats cracked all the way through the ABS component in which the internal vinyl, which has a bit of elasticity, was still intact and hiding the full extent of the damage.

I would start by removing the external red vinyl layer anywhere it was loose, and for a minimum 2" periphery around any crack. Try peeling it up using a fairly narrow wood chisel, and finish up with sand paper. After doing this, if you find that any of the solid external stratum of ABS is loose from the foam core, trim it away. Any solid ABS which still seems adherent to the foam core, needs to be guttered out with the edges beveled at a 45 degree or greater angle, which will increase the bonding surface of your fabric later.

In the coarse of doing the above, I think it will become apparent to you how badly damaged the foam core is. If it appears to be cracked all the way through and the interior solid ABS stratum is also cracked, I would consider removing the interior vinyl over those areas and guttering the interior solid ABS layer as well.

I repair broken and cracked foam core using G Flex epoxy thickened with colloidal silica powder (cab-o-sil). I know of some who have used Gorilla Glue for that purpose and reported good results. I like G Flex because it can be mixed up and applied in small batches and does not expand unpredicatably like Gorilla Glue. You can also make multiple applications in the same day. You will likely need multiple applications to fill in any damaged foam core as the epoxy settles into the interstices of the core material. Once you get all the cracks filled in with epoxy, or slightly overfilled, you can sand the excess fair and smooth so that your fabric lays down smoothly.

As a general rule, I would use two layers of fabric externally to repair a crack like this, with 6 oz/sq. yd. fiberglass (preferably S 'glass) with the first layer of repair overlapping the intact ABS by 2 inches in all directions, and a second concentric patch 1" or so smaller in dimensions over the first, applying both with unthickened G Flex. Cut the second patch so that its fibers run at a 45 degree bias to those of the first patch, an I would orient both patches so that their fibers are at somewhat of a bias to any longitudinal crack. After the epoxy on the external patches is cured, you can sand and feather the edges of the two patches,

If you find that the interior solid ABS stratum is cracked, I would lay at least one, if not two layers of either 6 oz. fiberglass or 5 oz. Kevlar over that area in the same fashion.

Once you have down a structural repair of the cracked areas, you can decide how big a skid plate you need and apply that over the top.

I’ve restored Royalex canoes in worse condition than what you ve shown and used the process Pete excellently describes in detail. Repair the underlying problem and then apply your skid plate.

Dynel, gflex mixed with carbon powder has been my choice for skid plates for quite a while now. That combo has yet to fail on me.

@Waterbearer said:
Dynel, gflex mixed with carbon powder has been my choice for skid plates for quite a while now. That combo has yet to fail on me.

Slightly off subject from a kayaker who is not a diy person … would the mixture suggested by waterbearer work as a keel strip for a kayak?

Dynel cloth can be used to repair any type of boat, so long as the resin used to wet it out bonds to the hull material. Some feel that graphite powder mixed into the resin increases the slipperiness and abrasion resistance of the fabric. It does produce a nice, opaque black skid plate, and the opaqueness helps protect the epoxy from UV abrasion if the plate is not painted.

As for whether G Flex will work on a kayak or not, it depends on what the kayak is made off. Few kayaks were ever made from ABS which is the structural component of Royalex. Most are either composite, roto-molded or blow-molded polyethylene, or some thermo-formable plastic material.

G Flex will bond to the resins that composite kayaks are made with, but for repairs to those hulls I prefer using a conventional type of epoxy which is cheaper and less viscous. G Flex was specially formulated to provide better adhesion to plastic materials. It will bond to many plastics (not polypropylene) but polyethylene must be pre-oxidized prior to application of the epoxy. Polyethylene is quite chemically inert so not much bonds to its surface. Oxidation increases the chemical affinity of the material to resin bonding. Although chemical oxidation is often used in industrial applications, for home repairs flame oxidation is far more practical and can be done by quickly passing the tip of the flame from a hand-held propane torch over the polyethylene surface you want to bond to just before applying the resin.

But a lot of simple cracks in single-layer polyethylene boats are better repaired with thermal welding which works pretty well for linear polyethylene boats. Thermal welding does not work effectively for cross-linked polyethylene, but nowadays relatively few boats are made with cross-linked poly.

If you have a thermo-formed hull, it is best to contact the maker to determine whether or not G Flex will bond to it. Unfortunately, the exact composition of some thermo-formable materials used for kayak construction is proprietary and not readily available.

For black skidplates, when do you use black pigment, when graphite powder, when both? I want black for my skidplates, is it enough to just use graphite powder, or just black pigment?

Graphite powder works fine to blacken skid plates. I sent you a PM with a link to an on-line photo album that has pictures of a canoe that I repaired and applied skid plates and a keel strip to. Those were done with Dynel fabric, G Flex epoxy, and graphite powder. If follow the link, you can find out exactly what the end result looks like.

If you mix too much graphite powder into the epoxy you can impair bonding. I never weigh or measure the volume of powder added to the epoxy. I just dust it in to the epoxy as I stir it until it feels and looks right and have never had a problem. If you are going to rely on graphite powder to blacken you skid plates, mix it in to the epoxy you use to wet out the Dynel, not just to the last application. The powder will thicken the epoxy mixture a little bit.

Thanks for the link to the repair photo album, Pete. I’ll have have more questions once I get the materials and start the repairs.

Carbon powder in skid plate.

Here are some measures that I use that were derived from ratios provided by West Systems using their carbon powder
8 of Epoxy - 1.5 Tablespoons carbon
3 oz Epoxy - 1.5 teaspoon carbon
1 oz Epoxy - 1/2 teaspoon carbon.

I also add some black paint - anywhere from 3-8 drops depending on the amount of epoxy I am preparing. I use a cheap small bottle of craft paint you can find at Walmart and craft stores.

Chiselling away the broken and delaminated vinyl and abs will leave several “basins” on the hull where those materials were removed. When cutting the first glass patch, do you cut it so it just fits inside such a basin, or do you overlap the basin’s edge by an inch or two?

I would fill the basin first with thickened epoxy so it becomes nearly level. If you get it right the fabric evens out the depression. The fabric would then then span the wound basin until it is about 2 inches onto the ABS layer.

Small defects extending into the foam core I usually just fill in with thickened G Flex epoxy. But if you have a large void to fill in, of course the repair will be stronger if you use resin impregnated fabric rather then resin alone. If the void is rather deep and concave, I would probably use multiple layers of concentric sized fiberglass cloth with the individual patches cut at differing bias with regard to the warp and weft of the cloth.

I would plan to be covering the entire area of repair anyway so in most cases I would just fill in the void and sand it fair and flush, then cover it. But you could certainly make your largest patch overlap the intact solid outer layer of ABS if you wanted.

From a strength standpoint, I don’t think it makes any difference if you work from smaller to larger patches or larger to smaller. But if you put down your largest patch first and proceed with concentrically smaller ones, you will be able to feather the edges of those smaller patches without cutting through fibers of larger ones.

I started doing some prep work for the repair.

I trimmed away all loose vinyl and ABS and am left with an oval area of exposed
foam that was delimited along its long sides sides by large cracks in the ABS.
Some foam went with the delaminated ABS piece between those cracks. I used a
chisel to trim the ABS edges at a 45 deg angle and trimmed away about an inch of
vinyl around the foam. I also sanded the ABS/vinyl transition smooth.

Here’s a photo:

I was planning on laying down 2-3 concentric patches of glass with the first and largest patch extending the exposed foam by an inch. Is one inch enough? I’ll wait 2-3 hours between layers and use peel ply each time.

Should I paint on a separate layer of thickened or maybe unthickened G/flex without glass onto the exposed foam area before starting with layers of glass?

If I don’t flame treat the vinyl and ABS, should I at least sand it?

Regarding the inside of the boat: From the outside, I can push in the foam and ABS so it comes out in a bubble shape on the inside of the boat, then push it back. I can’t tell if the ABS is broken, but it doesn’t feel like it, although there’s a sharp angle from the sides of the boat to the sides of the bubble. Nothing visible from the outside. Inside the vinyl is slightly creased. Hmmm…

Very nice prep work, you are ready to build it back up.

My approach would be to:

Sand ? Yes, 80 grit, clean with alcohol, let dry and then flame treat it.

Seal the foam core first with g flex. Your exposed foam looks pretty smooth so perhaps you don’t need to thicken the gflex to fill depressions. If there are valleys to fill then I would thicken the gflex. Cover with peel ply to avoid having to sand before the next layers of cloth and epoxy. If you don’t use peel ply you’ll need to sand before you add the the next layers of epoxy and cloth.

Largest fg patch first to span the foam and onto the abs layer.
Smaller concentric patch to cover the foam area (now covered twice).
Last layer of dynel covering everything.

You could lay the 3 cloth layers down in one step if you have everything cut and your epoxy planned ahead of time for each fabric layer. If you get all the layers down within about 2 hours your repair will cure as one piece. Alternatively, you will have 3 distinct bonding layers if you layer them in sequence with curing between each layer. I try do them all at once believing a single cure will hold more reliably than having cures stacked on top of each other.

Looks good so far. My bet would be that the inner solid stratum of ABS on the interior of the stem is likely cracked through under intact vinyl. I would proceed with the external repair and then decide whether or not you want to bother with removing the internal vinyl and applying a patch on the inside of the stem.

I would not try flame oxidizing the foam core. I think it is just too easy to melt or deform it. It probably wouldn’t hurt to carefully pass the flame of a propane torch over the green solid external ABS layer before bonding to it. Don’t use acetone on the exposed foam core. It will quickly melt the ABS. It is OK to use denatured or isopropyl alcohol, but it takes some time to completely evaporate when applied to the foam core. If you are going to use a propane flame anywhere near the foam core after cleaning it with alcohol, make sure it has completely evaporated or you will have a “canoe flambe”. I know this from experience.

I agree with sealing the exposed foam core and smoothing it reasonably fair before laying cloth over it. I would probably thicken the epoxy used for this step at least somewhat with silica powder, simply because it will give it somewhat less tendency to run and sag when applied over this convex surface. In order to completely fill the exposed interstices of the foam core over this curved surface, expect to need to make multiple applications as the epoxy settles into the interstices of the foam, but you can make another application as soon as the first has cured sufficiently not to run. Once the epoxy sealing the foam core has cured enough to sand without totally clogging the paper, I would smooth up the surface before laying down fabric, if it is not already smooth.

I would plan to make your largest glass patch big enough to completely, or nearly completely cover the exposed green ABS. An inch overlap over each side is probably OK but I would overlap each end of the longitudinal crack by 2 inches. I would make the subsequent patches an inch smaller concentrically and make sure you cut them at varying biases. Since we don’t really know about the integrity of the inner solid ABS layer, I would use three layers of fiberglass to replace the external solid ABS layer which is gone. After that repair is complete, you can cover the whole works with a Dynel skid plate if you like.

Depending on your working temperature, even un-thickened G Flex can be quite viscous and often takes a while to soak into and completely saturate fiberglass fibers. It takes even longer to completely soak into and saturate Dynel fibers. You don’t want to wind up with resin-starved fabric. It is fine to have all your patches cut out and ready to go, but I would not try to apply them all at the same time for this reason. You will see videos of shop guys doing mulit-layer laminar repairs by wetting out and applying all layers simultaneously. This saves time and probably works very well with less viscous epoxies.

For each layer of the patch, I would first paint on a layer of un-thickened G Flex, then lay your patch over it. Then wet out the patch starting at center and working to the periphery to minimize fraying. Peelply is fine to use if you have it. It will reduce the time required for sanding but will require a bit more in epoxy consumption. If you do use it, remove the peelply as soon as the epoxy has cured sufficiently to allow you to do so, without pulling up the fiberglass patch. In order to completely fill the weave of the patch, you may well need to apply some more un-thickened epoxy before you lay on your next patch. You can apply each patch as soon as the epoxy on the preceding one has cured sufficiently to allow you to do so. The amount of time required will depend on ambient temperature. Unless it is cold, you should easily be able to apply a three-layer patch easily in one day, as well as an overlying Dynel plate, and the epoxy will still be sufficiently green to allow a good chemical bond between each lamina… If you use Dynel, you will find it is quite “thirsty”. I will often make two more applications of epoxy over the wet-out application, while the epoxy is still green.

How do you get your oval patch to lay flat on the stem?

I can lay the patch down with the sides of the stem smooth, but then the patch rises above the keel line where it curves down (boat upside down). Or I can press it down on the keel line and the sides will form “fabric tunnels” because of too much material. If I cut those fabric tunnels I could overlap some glass, but I would probably compromise strength.

What to do?

Getting everything to lay flat on those curves can present a problem.

Early in my skid plate experience I would cut the fabric tunnel on the side (not keel). However, I later came to find if you wait until the epoxy is beginning to gel and set you can get everything to lay flat by pressing down with the flat side of a Popsicle stick. You might have to return and do this several times until the adhering property of the epoxy holds all the fabric down.

If you are using plain weave fabric, you can work out the excess cloth that wants to form pleats lengthwise along the patch over even quite a sharp curve, but you need to be patient and work the cloth as the epoxy starts to kick, as Waterbearer describes. For your larger patch and skid plate, a patch cut on a 45 degree bias with regards to the keel line will lay down over the curvature somewhat more easily (and fray less) than one cut along the line of the weft and warp of the cloth.

Here is a Dynel skid plate I applied to a canoe with a pretty plumb stem and a sharp bend along the keel line without cutting any darts in the fabric. I probably could have gotten it a bit smoother with more patience or by using peelply, which I did not in this instance:

If I have to wait for the epoxy to gel to get the fabric to lay flat, I probably can’t use peel ply, right? I understand peel ply would have to be applied right away to the wet epoxy and I wouldn’t want to apply it to the gelled epoxy.

You can use peel ply. My memory is that it takes about 30-60 minutes for the epoxy to get tacky enough to hold the fabric flat where it wants to bulge. Apply the peel ply right afterwards.