I’m doing a little early spring refitting on my Tempest 170 Pro and have hit a roadblock. One of the things I’m doing is replacing the screws, nuts and washers that hold the deck rigging hardware in place. The old screws have some corrosion from a number of years of exposure to salt water. Seems like a nice simple project that I can knock out before something breaks at a really bad time.
Problem is this: Three of the fittings retained by screws and bolts are waaaaay up against the forward bulkhead in the cockpit. I went in headfirst, and after a long period of uncomfortable wriggling and not a little cursing, I got to a point where I could put my socket wrench at the end of my outstretched arm just onto the bolt. With my wife on the outside turning the screw, I could get the nut off and remove the fitting.
Before I went all the way on that though, I had a disturbing thought. No way in my contortions do I believe that I could get even farther in to put a new washer and bolt on when it comes time. So I tightened back up and extracted myself.
Anyone done something similar? Short of looking for a scrawny 10 year old and maybe getting arrested, how can I remove and replace that hard to reach washer and nut set?
Try suspending the boat upside down and enter the cockpit head first until your shoulders are in. Take a flashlight and your tools you will be amazed at how far you can reach… Really works.
Thanks. I like the idea and will give it a shot but I have my doubts. Lying on my back, I was able to go headfirst into the cockpit far enough that my butt was fully inside and up against the rear bulkhead. At that point, it sure felt like my shoulders were jammed tight.
If you suspend it low, like on saw horses, find a stool or a box to sit on.
And now the hardware will be on the “bottom” of the kayak making it easier.
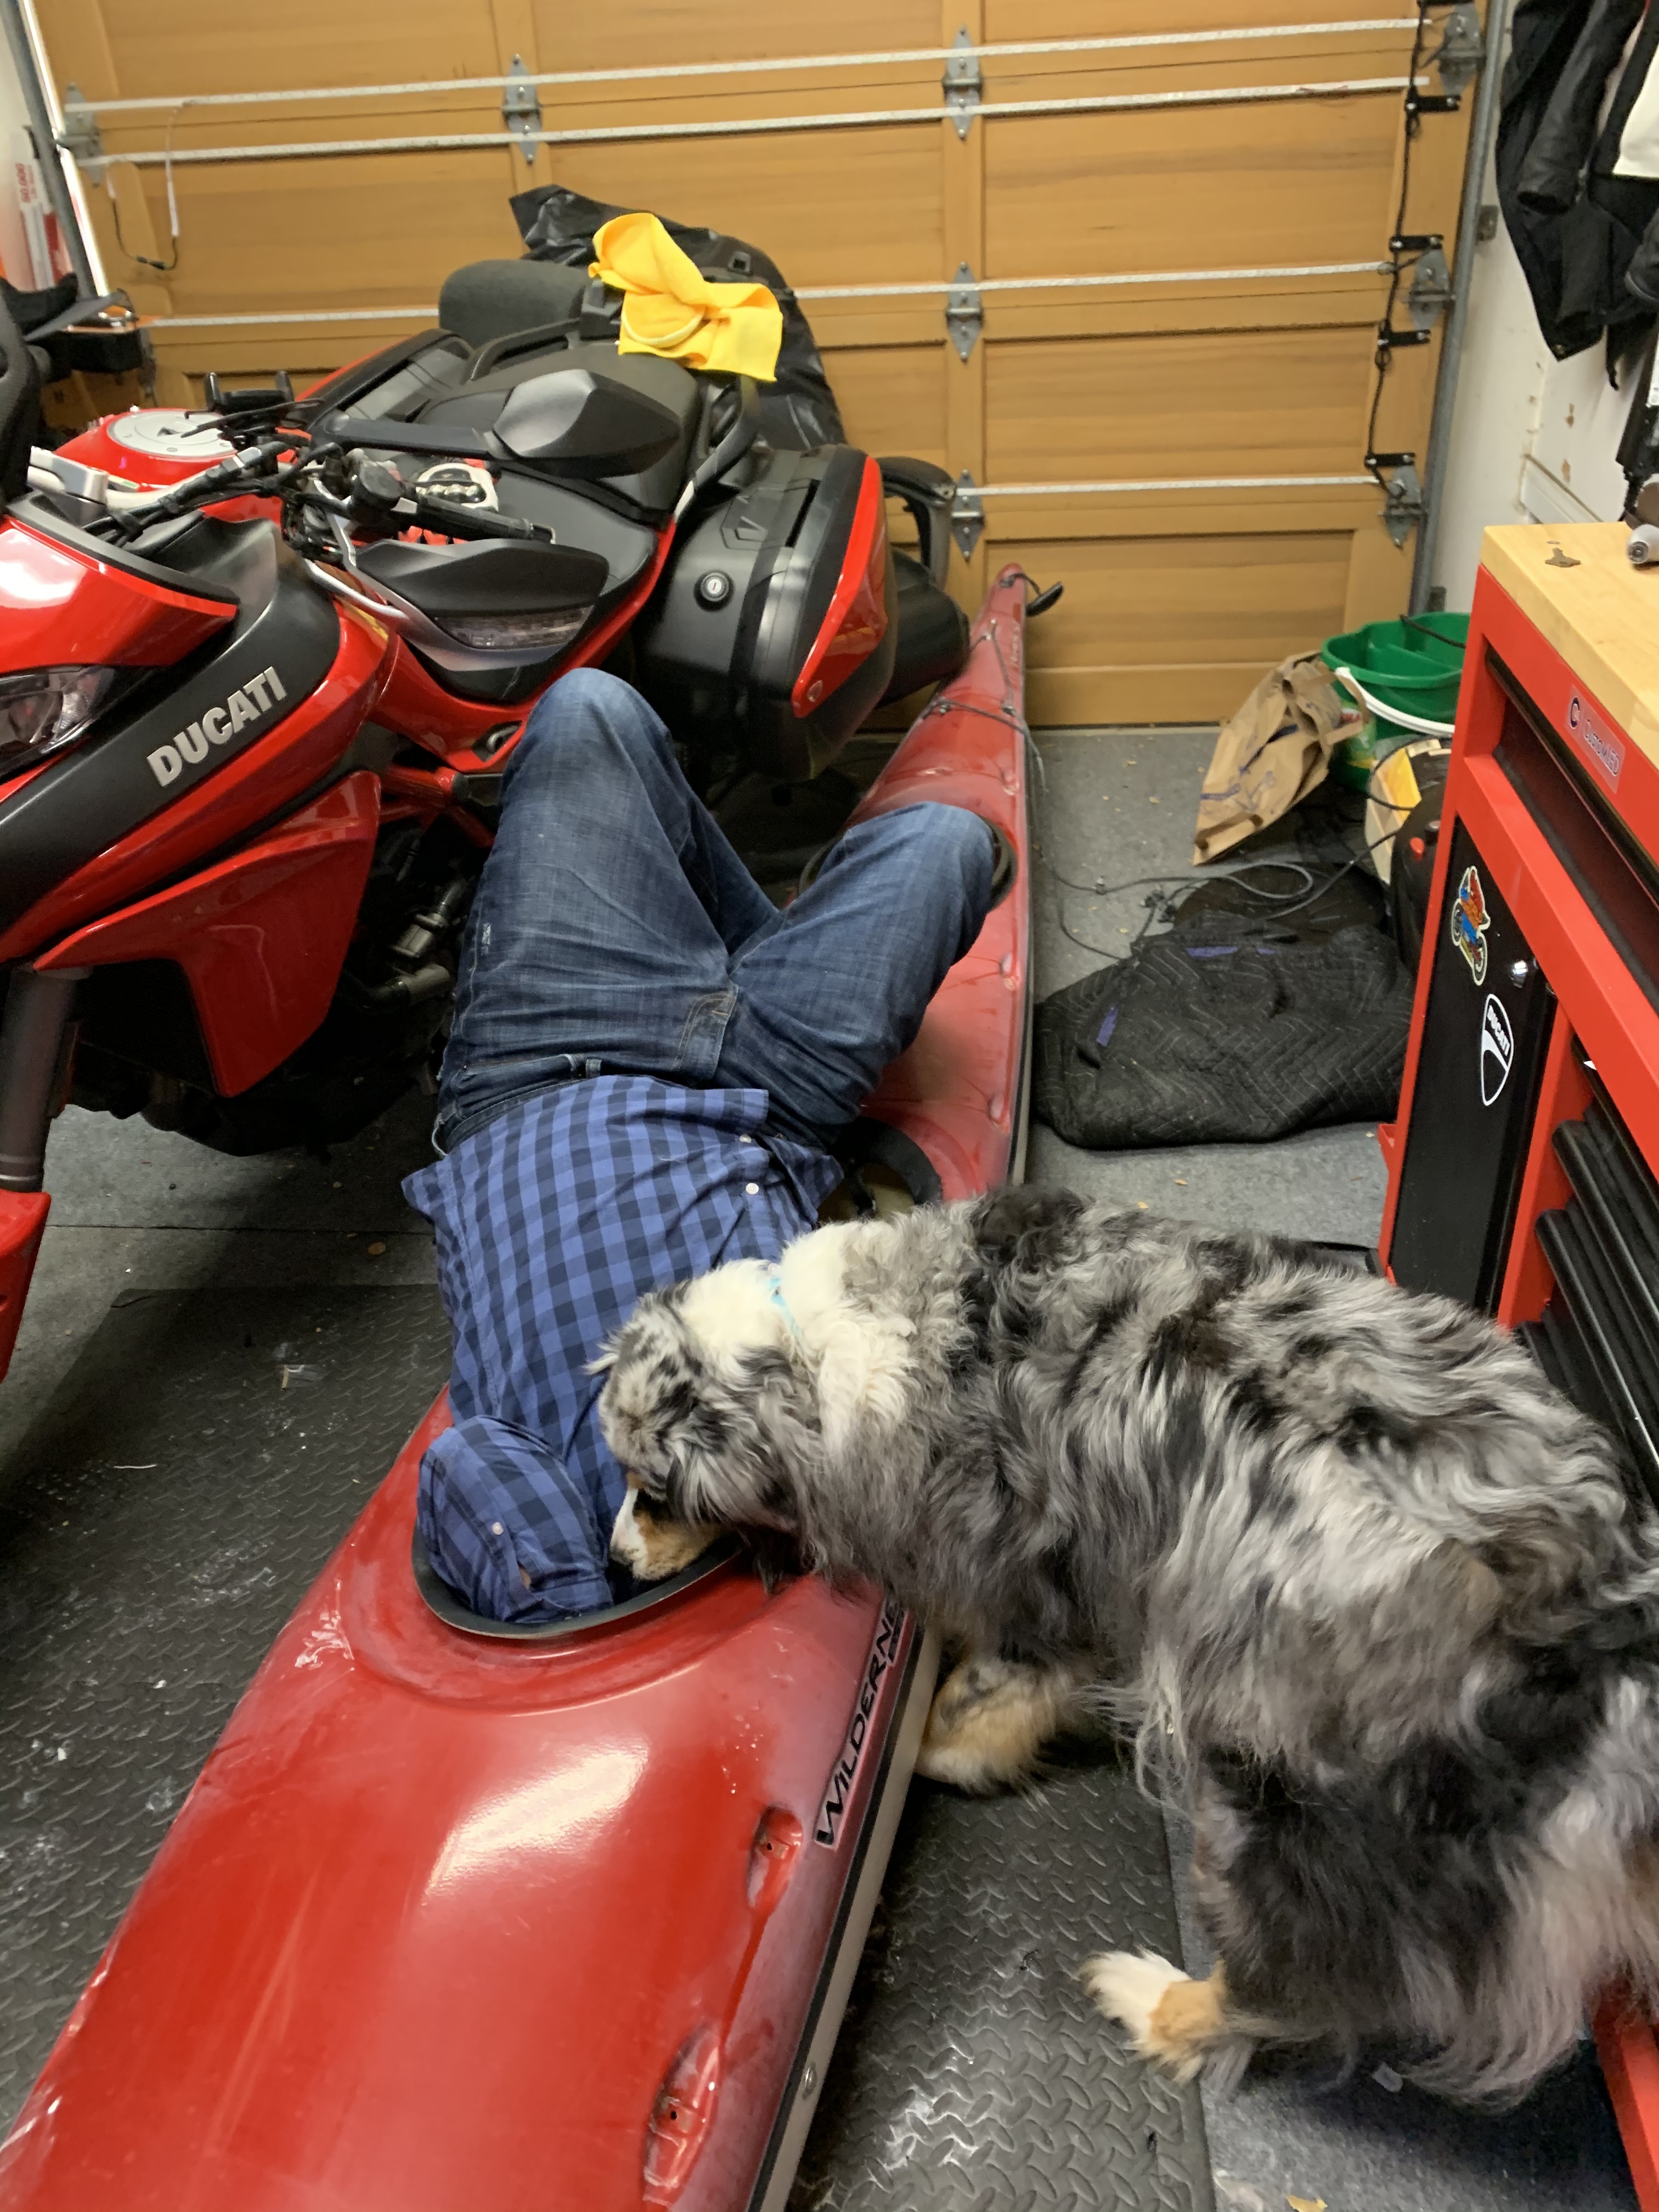
It was at this point that my wife was laughing so hard that she couldn’t get another picture. But I assure you I eventually got my entire upper body into the cockpit.
Use tape or baling wire to attach a box-end wrench to the end of a long stick. Then, create a “pocket” with tape to hold the nut trapped inside the wrench opening. Fold ears of tape over the top of the wrench opening to hold the washer. In the photo, there’s also a lock washer slipped between the nut and flat washer but you can’t see it. The sticky side of the tape is facing up in the photo.
You’ll need your lovely assistant (aka wife) to turn the screw from the outside while you move the wrench device into position. She turns continuously while you fish the wrench/nut into position until the nut engages. Before you get it snugged down, pull the wrench away which will pull the tape ears that hold the washer away as well. That’s so the tape doesn’t get permanently trapped under the washer. Remove the tape from the end of the wrench, then fish the wrench back onto the nut and have your assistant finish tightening.
If your assistant isn’t that handy with tools, help him/her get the screwdriver engaged and aligned so it won’t slip before you stick your head under the deck to get the wrench-on-a-stick into position.
I’ve used this method to get all the way to the stern of a 17 foot sea kayak, like installing the little vee-rest that holds a rudder blade.
This is brilliant, thanks. I messed around with it more last night and am convinced that there’s no way I can get forward enough to do this with my fingers.
One lest obstacle to consider. The fitting is secured by a screw through both a neoprene and a regular washer then into the bolt. The old neoprene washers require a bit of force to get them far enough up the threads so the bolt can engage. I wonder if I can get the leverage with the stick solution to force those on?
I’ll wait until UPS brings me the replacement hardware and see if the new sealing washers are as stiff as the old ones. It’s my hope that the old neoprene has just gotten crusty and the new stuff will be easier to slip over the threads.
Neoprene washer is likely for water sealing. I use 3m, 4100 caulk from the top under the head and in the hole. It doesn’t harden up and is designed for water. Note 5200 will glue the joint together don’t use it for things you’d remove and replace.
If I understand it correctly, tilting the kayak somewhat so you are reaching up sounds best since the washers won’t fall off the bolt before you get it to the hole. As far as extensions go, if you have a socket wrench (not box wrench like in the pic) I’ve seen extensions as long as 3 feet. And you can always add more extensions to get more length, maybe just borrow some from your neighbors?
For the “wrench-on-a-stick”, you need to get the nut square to the end of the screw to get the threads to engage. If the box-end of your wrench is angled, you might need to shim up the end of the wrench (so the wrench handle is not parallel to the stick when it’s taped/wired together) to make the box-end align square to the screw.
Rather than a box-end wrench, use a socket wrench. Stuff some material (foam, wood, cardboard or whatever you have handy) into the socket to keep the nut from going in too deep.
If the neoprene washers are a tight fit, open them up a bit with a drill or a leather punch, so they slip over the screws easily. They will still seal fine.
Use Super Glue to glue the washers to the nuts, so you’re dealing with just one piece instead of three (nut, metal washer, neoprene washer). A small drop on each should be sufficient. You could use a sealant instead (NOT silicone), but it will take time for it to dry.
All good tips, thanks. Since I’m doing my best to avoid unnecessary store visits, I’m going to use some copper pipe as my extension. I’ve been using it as a slightly flexible breaker bar, but I can pound one end down to pinch the rachet in place.
Good idea on reaming the neoprene washer. It’s my bet that the new ones won’t be nearly as tight a fit as the old ones as those have lost all flexibility over the years. And for piece of mind, I’ll prob still back it up with the 3M 4200 since I really don’t want to do this twice.
When I was much younger, I did a bit of caving. I was pretty good at squirming along through tight, awkward spaces. What I have learned is that I am not what I once was. And that getting into a space is not the same as being able to work in that space. The upside of all of this is that all of the rest of the work is super straight forward. And since I have nowhere else that I’m allowed to go, I’ve got a lot of time to devote to this project.
The photo is great ! The pooch is with you in spirit unless there is food in the boat.
If I ever got in that position it would take a month to get over the muscle spasms.
Badger is a Velcro dog. He goes where I go. Right after that photo was taken he tried to climb into the cockpit with me in case I was tryin to leave the house through some previously unknown exit.
Nice advice, but I’ll go ahead & refine these recommendations w/ a few tweaks …
For the sake of ease when initially sitting/aligning the nut to the bolt shaft/threads, use a set of needle-nose vice grips
Duct-Taped to whatever length of stick/all-thread rod you can find, to hold the nut. Since you are in a very difficult bodily position, the ONLY thing you need to concern yourself about is anti-gravity mitigation (keeping the hardware from falling) & holding the spin of the nut.
There’s NO reason that you—initially—need to also have nut-turning capabilities. Your wife/assistant can take care of that from the outside w/ the actual bolt
.
Additionally, holding the nut in the needle-nose vice grips will give you a better FEEL & dexterity for seating the nut properly onto the threads; & help prevent cross-threading.
Secondly, I would forgo super-gluing the washer to the nut—unless the flat washer hole has a bit “slop,” a tight hole tolerance has the potential to increase the difficulty of seating the nut onto the bolt.
Instead, I would just use a dab of the sealant to tack the washer to the nut. All you are really interested in is—again—preventing the washer from falling off.
So the thick, tacky viscosity of the sealant SHOULD be adequate in holding the washer to the nut.
& if inadvertently adding a bit more sealant to the underside fitment is a byproduct, then all the better!
Now I don’t envy the challenge that lies ahead of you, nor have I had to attempt a fix in a yak quite like what you are attempting, but in my 14 years experience as a union Ironworker, bolting up anything from huge structural buildings, to small, precise, drill & tap stainless steel handrail, to curtain wall glass where +/- 1/32” is critical, & even just working on my Jeep,
Cool! We have three different wrench-on-a-stick models to choose from. The tried and true original, the new improved deluxe version, and best of all the wrench-on-a-stick pro model.


 nor have I had to attempt a fix in a yak quite like what you are attempting, but in my 14 years experience as a union Ironworker, bolting up anything from huge structural buildings,
 to small, precise, drill & tap stainless steel handrail, to curtain wall glass where +/- 1/32” is critical,
 & even just working on my Jeep,