I no longer have pictures as this was many years ago, but I simply bolted square Thule bars to the top rails on a utility trailer. Relatively easy on/off and it worked out fine. I now have a purpose-built kayak trailer.
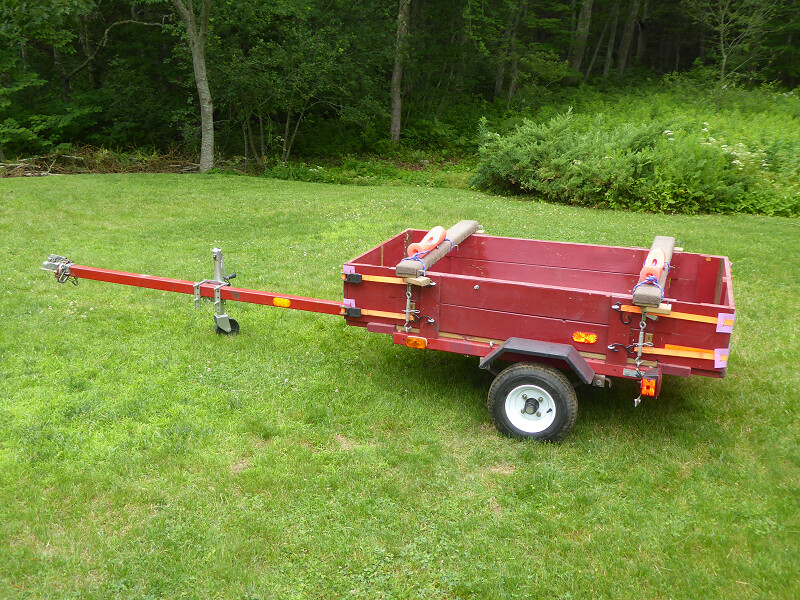
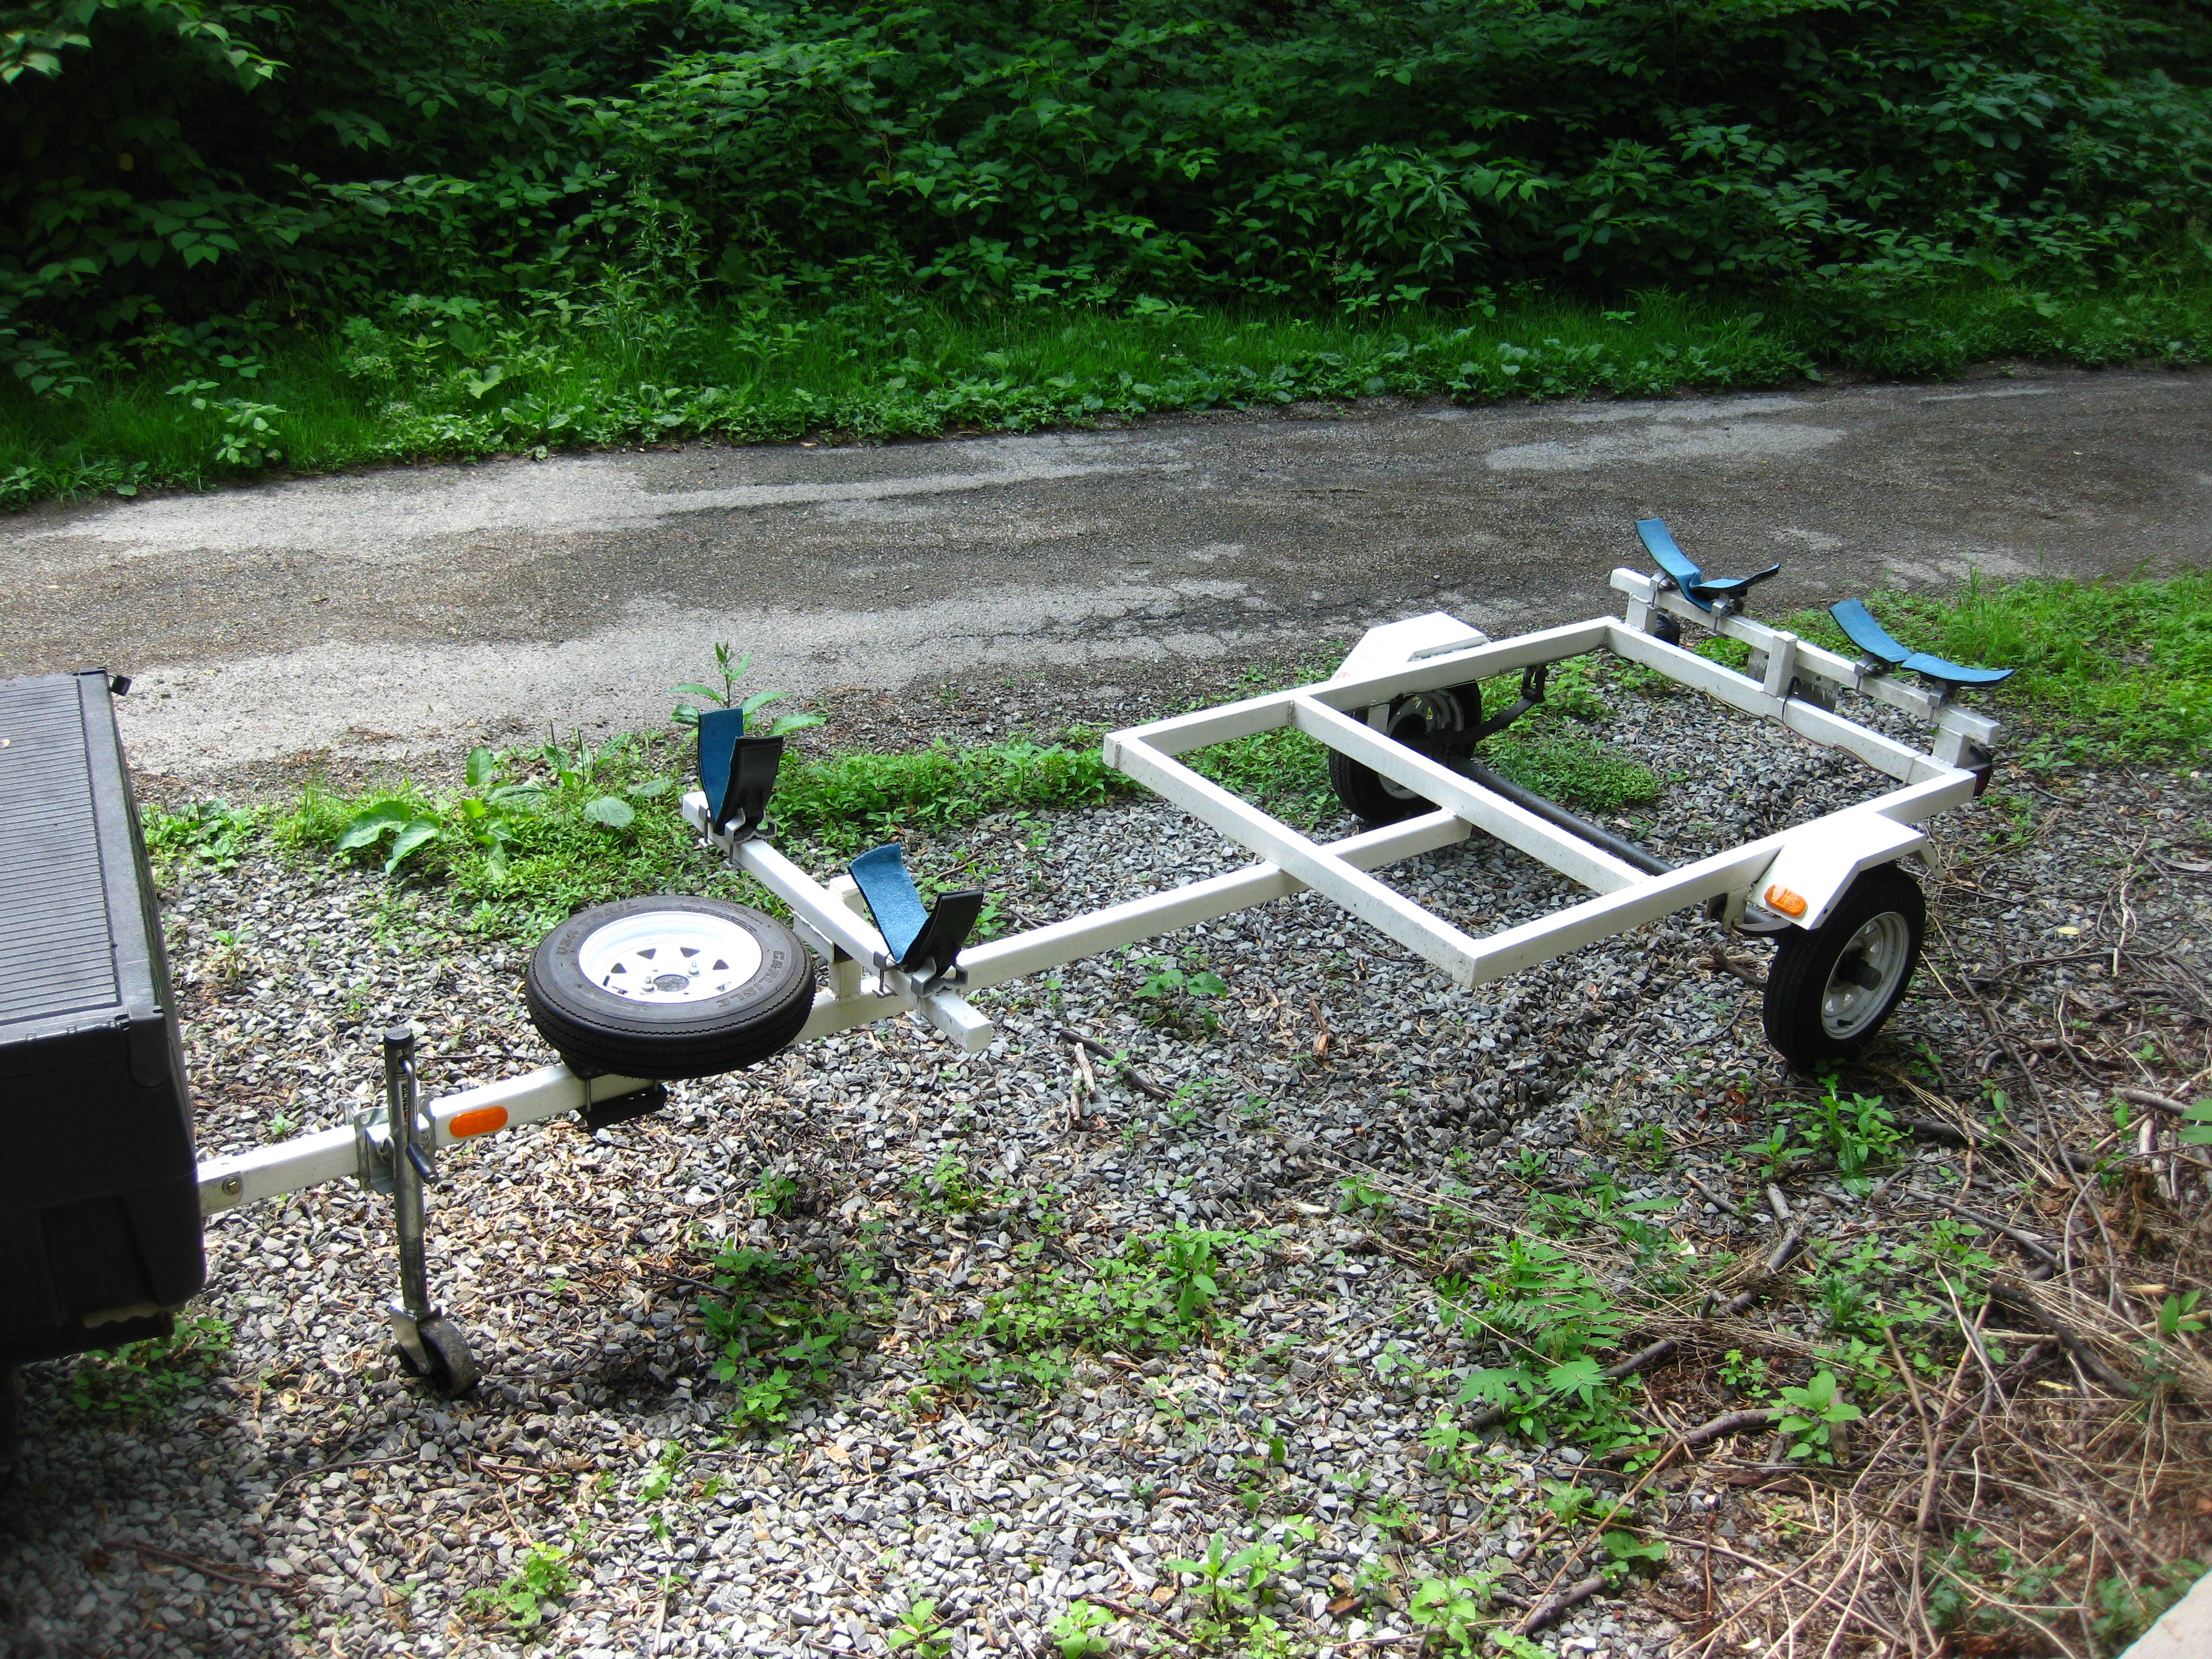
I posted these photos last year. It’s a Trailex aluminum trailer that originally consisted of just the central aluminum tongue and the small aluminum framework to support the springs and axle. I added the larger wooden frame, optional walls of two different heights and an optional lid. As I mentioned in the original post, Trailex does not support making their trailer into a utility trailer - “tongue will snap, warrantee void, etc.”
I do not yet have a kayak trailer and I’m still car topping. I have a truck I’m about to sell and that leaves a hole in my transportation needs. I couldn’t justify getting a hitch mounted to the car and buying plates and hooking up lights and all that just for hauling the boats around on a dedicated kayak trailer.
I really like the idea of a utility trailer with a couple add on mounting things hauling the boats and gear below. I hate the smell of wet gear in the hot car also.
I like the idea in the summer of leaving the canoe and the rec-kayak on the trailer as it might only be a day or two between uses and it seems a waste taking them on and off but driving around with them both on a small car isn’t fun.
Then there is the thought of not having to lift them as high. Not to mention if I want to go buy some lumber or take my riding mower or snow blower someplace it will be easier even than a truck.
Here’s my older trailer, now sold. For a short drive home, I’d just toss my smelly water shoes in the trailer. I would have kept this trailer if I hadn’t stumbled on the aluminum Trailex for $300. It was too good a deal to pass up and let me make improved versions of the various add-on bits. And the aluminum, even with wood additions, is light enough to use as a dolly.
I really like the long drawbar so much easier to back up. Your old setup looks great as well as the new one. Yes for 300 bucks I would have done the same. I have a trailer I made from a pop up camper many years ago but back then they made campers like tanks. The light weight model I can picture coming home hooking it to the lawn tractor and pulling it around behind the garage. We live a block from the put in I could even pull it there with the lawn tractor as we sometimes paddle up stream and float back. Thanks for showing us your handy work.
this is what i have come up with. it holds two kayaks side by side.
I wanted something i would feel comfortable cruising down the thruway with and could keep an eye on while doing so.
rooftop was too high for us to lift kayaks to.
This is my trailer. It is a cheap TSC trailer with a 5’ x 8’ bed. I removed the rear lift gate and welded in a back bar to tie the frame together. I had the Yakima pickup risers in the garage gathering dust so I put them to use. I added a 6’ tongue better hold the long kayaks I have.
For gear, I have a large cargo bag that would mount to the top of an SUV. Just throw it in the bed and fill it up. When back home, it folds up into a small suitcase size package.
If you go on overnight trips you might as well set up our trailer to haul 4 boats. The cleanest way is with welding, but it possible to build a strong trailer with nuts, bolts and lock washers.
I bought this sturdy minimalist welded steel trailer from the guy who made it. He designed it with the long tongue to haul two 17’ sea kayaks.
Seeing this post string reminded me that it has been sitting in my yard for 5 years not being used. I got rid of all my heavy boats a few years ago and have other ways to haul now. Because of the nature of my property I can’t build a driveway and having to jockey the trailer in the dead end alley behind the steep back yard is too much hassle. I was going to build a platform for it to use for utility hauling but ended up getting a small box trailer that serves for that (and also have a 16’ box truck now so I don’t even need that second trailer!)
Tows better with heavy boats on it. I had to add ballast when I had my ultralight kayaks on it to dampen the ride so the safety chains didn’t rattle annoyingly.
So If anybody near the SW Pennsylvania area wants it, I’m going to clean the pollen and dead leaves off it this week see if the tires still hold air (they don’t appear flat) and sell it for $500.
That’s a nice looking trailer, willowleaf, and should be very solid considering that it’s welded. $500 is a good value if someone jumps on it.
Concerning needing ballast, that’s also an issue with typical utility trailers. They are rated to haul something like 800 to 1200 lbs depending on the specific trailer, so when hauling just a couple of kayaks they are very stiff. My older, red trailer that I showed above would bounce if it hit the right bump. My new trailer only has single-leaf springs with a capacity of only 225 to 300 lbs (depending on if I attach the wooden box or not). It’s a much smoother ride for the kayaks but it obviously is limited as a utility trailer by the low weight capacity.
Yes, I think my neglected trailer would work well for somebody with a couple of big heavy fishing kayaks, or even composite sea kayaks. Gross weight per state of PA (I had to get it inspected to register and tag it) says 1,000# but I suspect that is just the weight class. My boats range from 24 pounds to 45 pounds so even the two heaviest barely affect the springs!
The bouncing was not as annoying as the chain rattling it caused – I was meaning to sew up fabric or glue rubber to make slipcover tubes to feed the chains through to muffle them (so I didn’t sound like the Ghost of Jacob Marley coming down the road!) Just another project I never finished!
Like Wolf, I have a basic 4 x 8 utility trailer with low wood sides (about 14" high) that I put my 16-foot canoe on. It’s kind of bouncy (the suspension is really too tight for a light load), but otherwise, it works great. It’s much easier to load. Best part is the multi-use aspect. When I’m not hauling the boat, I can use it for bikes, leaves, brush, etc. I plan to add some kind of wider crosspiece so I can get two kayaks on it.
My Trailex came with vinyl-coated steel coil cables instead of the more common bare chains. They do not make any noise at all, so if it is possible to replace chain with such cables that would eliminate the rattling.
The coils can get slightly annoying when hooking up. I always cross the chains or cables one time between trailer and hitch loops; it is supposed to be safer than a straight run. It is faster to cross chains than coiled cable, though only by a few seconds.
Coiled cable acts like old-school telephone coils!
Wolf, while I won’t condone the mods that Trailex is so CYA about, I must say that the photos you’ve posted of your various creations and mods make me wish I could hire you!
Just a cautionary note: I first owned a Triton Blizzard XT one-sled snowmobile trailer that the dealer modified to create a longer tongue. This was very easy for him, by just drilling another hole where the NESTED tongue tubes were held together. He pulled part of the inside tube out more and then bolted them (still nested) using the new hole. Because the aluminum tubes were each far, far thicker and larger in cross section than the Trailex tongue, it was safe to do so for hauling a light load. The trailer had a payload max of 1300 lbs, so I considered it good for up to 650 lbs—still much higher than two heavy plastic or glass sea kayaks and rack hardware totaled. We made crossbars from padded 2x4s and later changed that to use Yakima bars and towers, which were attached via some minor mods that I hired a welder to do on the low aluminum sidewalls.
I used that trailer frequently for 10 years before handpulling it up a steep dirt driveway and ramp into the storage shed got to be too much. That’s when I bought the Trailex, which weighs less than half as much. But I still miss the Torflex and ground clearance of the snowmobile trailer.
Right away, I noticed how much thinner the aluminum on the Trailex tongue was, in addition to being smaller in height and width of the cross section. Bigger than the limp-noodle tongue of the RacknRoll/Yakima trailer, but still wimpy relative to the snowmobile trailer’s tongue.
Bottom line: Be careful about overloading the Trailex. The warranty is only a temporary concern; the real worry is safety and durability.
Well, this just shows the “personal preference, there’s no best answer” thing. My Trailex also had the coiled wire safety cables, but I found them too stiff/springy so I was concerned they might unhook on bumps due to lack of weight holding the hooks down. So I replaced them with chains.
I like chains better. However, the cable hooks do stay put, and I’ve used the Trailex more than10 yrs now, including on two drives between WA and CO. I make sure to insert the hooks in the keepers so that the coil energy tends to hold them in. This means turning one of the hooks around a half spin.
The way I did the rack in my small Toyota truck and also to build racks for 2 friends in their small trailers was easy and fairly inexpensive.
I used 1X6 and 2X4 lumber and made boxes that fit the inside of the beds. From those boxes I made up-rights and braced them to the box below. I use construction screws made for shear strength and Liquid nails to make the box and the up-rights in addition to all the 45 degree and 30 braces. I cam up only about 6" over the bed of the trailers and only 2" over the cab of the truck and installed 2 cross-members to complete the full rack. The last thing I do is to place the kayak on the frame and install cleats at what ever angles they need to be to lay flat against the hulls of the kayaks. Install them with 1 screw in a place you can make them pivot. Pivot them to lay flat on the hull and then install 2 more screws. Now the rack fits the exact kayak you need to carry. Place old carpet over the cleats and staple it down on the sides so it’s a pad against the hull, but the staples are away from the hull and can’t ever scratch it.
The way I make the racks if you ever need to carry some other kayak you need only unscrew the cleats or unscrew 2 of the 3 screws to pivot the cleat to fit the other kayak and then just screw them into the frame cross-member in a different lactation. The frame and the braces make perfect anchor point for the rope to hold and you can cinch the kayaks down to resist any amount of wind. The weak link in the chain is only the quality of the wood and screws you use. make it like a barn roof and it’s so strong that it’s virtually impossible to have it break under any wind, or at any speed. It’s also easy to come up farther and make 2 sets of cross members so you could carry 4 kayaks instead of 2. Just make the up-rights high enough so the 2nd set of cross-members can be about 18" over the 1st set. Easy, inexpensive and ultra strong. And such a rank can be made to fir anything you can lift onto the back end. You set the bow of the kayak on the rear "yoke’ you made with the cleats and simply slide it up and you life only 1/2 it’s weight. Tie off with bow lines and then I use the combing of the cockpit to put a rope around and cinch it backwards placing pressure against the bow line so you have good tension forward and back wards. The cockpit line simply ties off to the rear cross-member. Throw 2 lines around the girth of the kayaks at the sides even with the up-rights and you are ready to drive.
The last one I made for a friend took the two of us 50 minutes to build in total. He had the lumber already so I can’t say what that cost would be, but it will vary depending on how tall you want to make it, if you make it to carry 1, 2 or 4 kayaks and if you use 4 or 6 up-rights with cross-members. But even a large “over-built” rack made this way is not very costly at all. Less than nearly all the ones I see advertised.
And what I like best about the ones I made is that when you are done hauling the kayaks , 2 people can lift the whole thing out of the trailer or truck bed and set it up as a ground rack too.
To secure them into the beds you can tie down with ropes or good ratchet straps on some. Others need to have plates bolted to the sides of the frame-box and also into the bed. It will vary on what you want to mount it in. But none of them are hard to do. One thing you can do is just to drill 5/8" hole through the up-rights so ropes can pass through them and just tie it down if the trailer of truck bed has anything to tie to. if not. making anchor point on the beds or trailer frames is also fast and easy. I wend or use a bend on 1" steel strap with a hole in it. Drill and tap it to the frame and you have an instant anchor point. Some folks can do all the wood work but no metal work. If that’s the case make the rack as I describe and then take it to a shop that can install the anchor points. Most places will do that for you for only about 15 dollars per eyelet. Or if you drill through and use eye bolts and washer with nuts in many cases and that’s also very fast strong cheap and easy.