When building wood kayaks, you do an end pour. You stand the kayak vertically, each end alternately in a bucket of cold water (to disparate the heat of epoxy curing) and pour in a portion of epoxy. This strengthens the union of deck and hull and the tip.
Here’s an interesting piece by Guilemot kayaks about this that includes a discussion of @rstevens15 wood block idea. End Pour vs End Block | Guillemot Kayaks
3 Likes
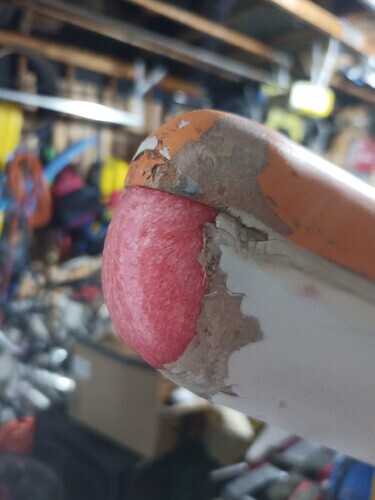
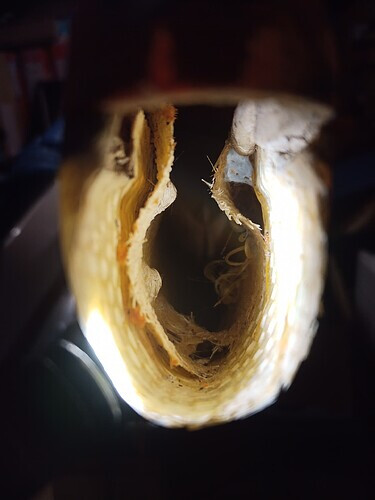
Thinking about the inside issue. I can’t see doing a pour after the end is sealed. The logistics seem daunting. Access to the inside would require I pour down a 3 foot section that gets narrower and narrower. If I did literally pour the resin it would likely be running down the sides, and making a mess before it reached the end. As well not sure I like the idea of a big hunk of resin adding weight to the end.
If I want to do something with the inside it feels like I need to do it before I seal up the end. It does not seem like I can easily sand the inside to prep for resin. Cleaning it is possible with a cloth coated in acetone, however it may not be the most thorough.
It would be good to have a layer of fiberglass that lines the inside back from the hole.
I suppose I could clean the inside as best as possible, then wipe resin along the inside and into the separated inside layer, and then soak a piece of glass and put this inside. Not sure I would be able to get a clean shape for the glass this way.
The foam is providing such a nice form to back the new glass layers. Hard to give that up.
Will have to mull on this a while. Any ideas related to this are welcomed.


1 Like
Thanks for that link. It seems like a doukeischmutz is what I need. That is probably what was in there before that seemed like a heavy rock that was not well attached to the boat. Now how to proceed to create something similar. Do I finish the outside end and then drizzle some resin, soak a doukeischmutz in resin and stuff this into the end hoping it adheres and adds strength and structure to the end? Likely the way I will proceed. If doing this I will want to try and remove as much of the foam mold as possible before adding the doukeischmutz. (My new word of the day.)
Before I settled on what bonding agent or coating I was going to apply to the carved filler, I’d be inclined to test it on the scraps of pool noodle. Some solvents will melt foam materials. I recall my mom discovering that after laboriously building a large display for some event that was adorned with winged cherubs made of molded styrofoam. She tried to spray paint the whole thing gold and all the “heavenly host” melted and shriveled dramatically (we kids were delighted with the grisly result, Mom, not so much.)
Pool noodle material is styrene (so is styrofoam), which dissolves in acetone and benzene and a host of other chemicals. I found a list (attached below) of what compounds dissolve styrene: on the list “S” means it will melt the stuff, “I” means it doesn’t affect it.
I worked in a polymer chemistry lab for a couple of years in my college days and one of my jobs was to dissolve materials so the solutions could be laser scanned to inspect molecular structure. I learned that tetrahydrofuran will dissolve many plastics (I melted a lot of pens and even shirt buttons from spills.) , methanesulfonic acid melts Teflon and you need to use 130% fuming sulfuric acid to dissolve Kevlar.
3 Likes
very good point. Will experiment a bit before I get going.
Adhesion will be dependant on a sanded surface. That allows any epoxy based solution to grab on and bond.
When building my Pygmy wood kayak, you needed to build a tool to help reach into the bow & stern from the hatches to fillet the shear seam. Here’s a screen shot of that page:
.
For the thicker schmutz you’re using, just cut the syringe further up to make a larger hole, maybe use a larger syringe. I’ve never made any of it up before.
I do think you have to do something with those frayed layers of fibreglass. Leaving them unsealed will allow water to seep in between the layers to bad affect.
2 Likes
Oh, and one other thing….epoxy won’t stick to mylar sheets. We’d put small pieces under clamps and such to keep them from sticking to the panels if excess epoxy oozed. You can find the sheets at hobby stores. The sheets I have are pretty stiff and wouldn’t curve around your pool noodle very well but you might be able to find some thinner stuff, or experiment with say a Mylar film like in a balloon.
I can send the whole instruction manual as a .pdf if you’re interested.
1 Like
I would appreciate the guide. What do I need to do to get the guide?
Probably best to email it directly to you. Message me with your email and I’ll post it off.
So sad that Pygmy is no more. John Lockwood knew how to design kayaks. No skeg or rudder needed, easy to build and very good handling boats.
1 Like
Cover the foam in wax paper and push it in. To do an end pour get the right amount / volume and send it down in a tube to prevent a mess. Probably could just run water on it or spray it to cool it.
Feather the edges back a good distance so repair has more to grip if you use glass or Bondo type repair. You can also drill a small hole 1/4" back from the bow point and take a poly syringe and inject material like adhesive filler West Systems epoxy mix into the bow. If hull is bow down it’s like checking and oil fill on an engine. Over fill a bit then plug hole and finish after it all hardens.
Personally I would not try to shape glass back to shape of the nose.
You can make it as stiff as you want or like water. More epoxy to filler ratio makes it harder to sand. I’d make some like cookie dough and work my way out. Probably a few times to shape it properly.
Not sure I understand. Are you suggesting I keep the noodle foam just wrap it in wax paper and push it in? Why push it in? I was thinking this provides a nice backing to wrap new layers of glass.
I have sanded back from the hole about 5 inches. I intend to feather back the layers of glass to some extent, although having a bow guard ridge like the keel guard won’t bother me much. I don’t mind a raised band at the bow.
Is the was paper in answer to my question about how to prevent the foam from attaching to the outside glass layers. If I do that I would need to then try and remove the foam so I could do an end pour using something like what you suggest, a tube.
I had not thought much about heat with an end pour. Is this a big issue? Someone else mentioned this as well.
I was going to experiment with glass cloth rolled up to fit the hole and provide a backing for the outside strips of glass. If I can get the cloth rolled up nicely to provide a shape like the foam, I was wondering if I could line the inside of the nose with resin, soak the rolled cloth in resin and squeeze the cloth into the nose hole and have it form a shape like the foam. I would hope the cloth is soaked enough, and tight enough in the hole that it would provide good reinforcement, and backing for the outside glass layers. Am I thinking straight. It feels like it would work. If the soaked roll of glass has a working time of at least 30 minutes it would provide some time to get the shape and fill the hole well. If it ends up being a disaster after 25 minutes of trying I could remove the lump/roll of resin soaked glass and rethink the process.
Does this make sense?
I was really giving two options with or without the foam. At 65° or there about a half of a 8 ounce mixing cup of epoxy I use will start smoking and melt the cup. You can’t even pick it up. I mixed it then realized I hadn’t prepared something correctly and let it sit.
I think you’ll find it hard to shape glass cloth over the shape of the nose. It’s easy to pushing it into a mold and have it stay. You could probably pust some from the inside like the foam but it will be hard to work in the nose through a hatch. West Systems epoxy you will probably not have close to 25 minutes to play with the glass. They do make a slow hardener but I think I used it once by mistake because bought the wrong hardener.
Possibly take some cloth of the correct size with long needle nose pliers and grab the cloth in the center. Then push it in from the front and then when it’s in pull it back out partially to give you a base and to clog the hole.
You could also make the adhesive filler thick like dough. Then take the plastic mixing sticks WS sells and butter it up from the outside. Sand back the interior 2" with 60 grit and butter it from the outside pressing it into the rough interior surfaces. Then after it hardens make more and shape it back to original shape.
No pro here just my crude ways. Great thing about WS is if need to stiffen the mix I add a small amount of powder filler or add resin to make it flow better.
They sell a pump for resin and hardener so you need not measure it. One or ten pumps or half a pump of each it’s good to use. If I’m doing glass work and need more resin I just hit a pump or two in a cup mix it in 30 seconds. Saves wasting resin or running short.
1 Like
Making the epoxy thicker, so it is moldable is a good thought. There is an excellent epoxy that is already like peanut butter in consistency, that I have used many times for projects:
PC-11® Paste Epoxy – Protective Coating Company (pcepoxy.com)
With it, you could potentially place it in form the outside, a little at a time, building up a shaped bow as you have done with the foam. I have used it to fill gaps and glue together various parts with excellent results. It is easy to shape using rubbing, or denatured alcohol as a “lubricant”, typically I just wet my finger with rubbing alcohol and press and smooth it. Just one more idea to ponder…
1 Like
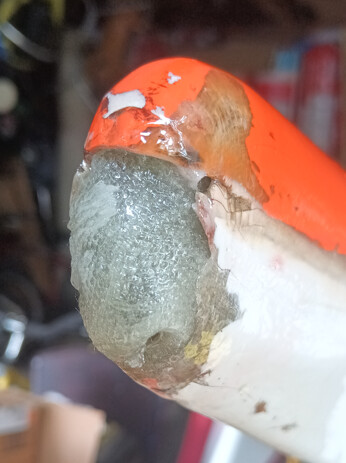
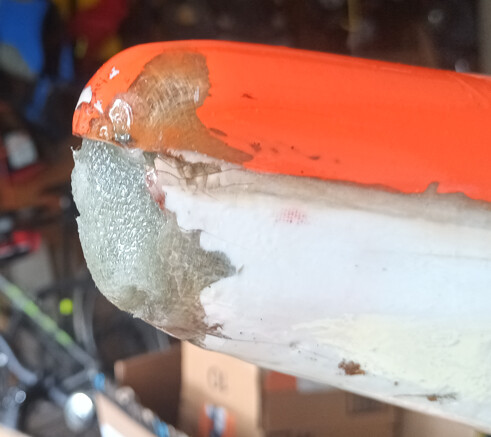
After thinking about it a bit, I decided to go with a roll of fiberglass cloth soaked in Resin to make the DOOKEY SCHMUTZ. Here is what it ended up looking like.


It could have been better, however acceptable.
I then proceeded to fiberglass it from left to right and bottom to top with 4 layers. I mostly focused on extended along the bottom rather than across the top.
Now how to finish this? If I am going to try and make this pretty I may consider redoing all the surface. Would need white and orange gel coat, and would need to find some kind of matching seam ape along the seam between the body and the top. Any body know where something like this can be found?
The seam is probably fiber glass. It could be extruded plastic also.
1 Like
Are you trying to match the tape from the last photo? It looks for all the world like grograin ribbon you’d find at a fabric store. It would be ease to epoxy that over the seam for decoration and would hide some imperfections, but wouldn’t be structural. Doubt you could find the identical pattern.
Good job on the repair, by the way.
1 Like
What I am considering doing is taking a picture of the ribbon pattern, printing off the pattern on whatever material I can find that may be better than basic paper. Then bond this to the kayak along the existing ribbon and over the repair. Resin over to seal it and protect it. I will look at some fabric stores however very unlikely to find something very similar.
you may be able to have a place that prints t-shirts or banners print it for you if you send them the image. you also might be able to do a iron on transfer. once it is covered with your clear coat I would think it would hold up.


